| Installation and Administration | Getting Started | Command Line | Configuration | Eclipse Plugin | Reference Manual | API |
| Show on single page Show on multiple pages |
|
|
|
|
All Data Providers are utilities that run during an analysis. They usually take an input file to parse or parameters specified by the user to generate output files containing violations or metrics to add to your project. Here is a non-exhaustive list of what some of them do:
Use XSLT files to transform XML files
Read information from Microsoft Excel files
Parse HTML test results
Query web services
Export data from OSLC systems
Launch external processes
Repository Connectors are based on the same model and are used to specifically retrieve source code and other data from source code management systems.
Read on to learn about how to configure your Data Provider and make it available in the web interface, and then understand how to implement the scripted part of a Data Provider that is executed during an analysis.
The last part fo this section also introduces two frameworks that you can base your Data Providers on depending on whether you prefer to produce CSV or XML files for Squore.
A Data Provider's parameters are defined in a file called form.xml. The following is an example of form.xml for a Data Provider extending the GenericPerl framework:
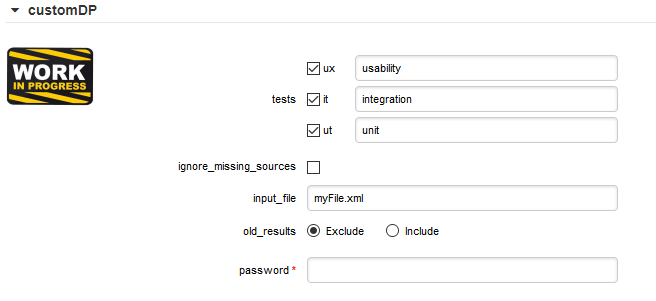
<?xml version="1.0" encoding="UTF-8"?>
<tags baseName="GenericPerl" needSources="true" image="CustomDP.png" projectStatusOnFailure="ERROR">
	<tag type="multipleChoice" displayType="checkbox" optionTitle=" " key="tests">
		<value key="ux" option="usability" />
		<value key="it" option="integration" />
		<value key="ut" option="unit" />
	</tag>
	<tag type="booleanChoice" key="ignore_missing_sources" defaultValue="false" />
	<tag type="text" key="input_file" defaultValue="myFile.xml" changeable="false" />
	<tag type="multipleChoice" key="old_results" style="margin-left:10px" displayType="radioButton" defaultValue="Exclude">
		<value key="Exclude" />
		<value key="Include" />
	</tag>
	<tag type="text" key="java_path" defaultValue="/usr/bin/java" hide="true" />
	<tag type="password" required="true" key="password" />
</tags>
The
tags
element accepts the following attributes:
baseName
(mandatory if you are not using an exec-phase
) indicates on which framework you are basing this Data Provider. The value of this attribute must match a folder from the addons folder of your installation.
needSources
(optional, default: false) allows specifying whether the Data Provider requires sources or not. When set to true, an error will be displayed if you try to select this Data Provider without adding any Repository Connector location to your project.
image
(optional, default: none) allows displaying a logo in the web UI for the Data Provider
projectStatusOnFailure
(optional, default: ERROR) defines what status the project ends in when this Data Provider produces an error. The following values are allowed:
IGNORE
WARNING
ERROR
projectStatusOnWarning
(optional, default: WARNING) defines what status the project ends in when this Data Provider produces a warning. The following values are allowed:
IGNORE
WARNING
ERROR
Each
tag
element is a Data Provider option and allows the following attributes:
key
(mandatory) is the option's key that will be passed to the perl script, or can be used to specify the parameter's value from the command line
type
(mandatory) defines the type of the parameter.
The following values are accepted:
text for free text entry
password for password fields
booleanChoice for a boolean
multipleChoice for offering a selection of predefined values
displayType
(optional) allows specifying how
to display a multipleChoice
parameter by using one of:
comboBox
radioButton
checkbox
defaultValue
(optional, default: empty) is the value used for the parameter when not specified
hide
(optional, default: false) allows hiding a parameter from the web UI, which is useful when combining it with a default value
changeable
(optional, default: true) allows making a parameter configurable only when creating the project but read-only for following analyses when set to true
style
(optional, default: empty) allows setting basic css for the attribute in the web UI
required
(optional, default: false) allows showing a red asterisk next to the field in the web UI to make it visibly required.
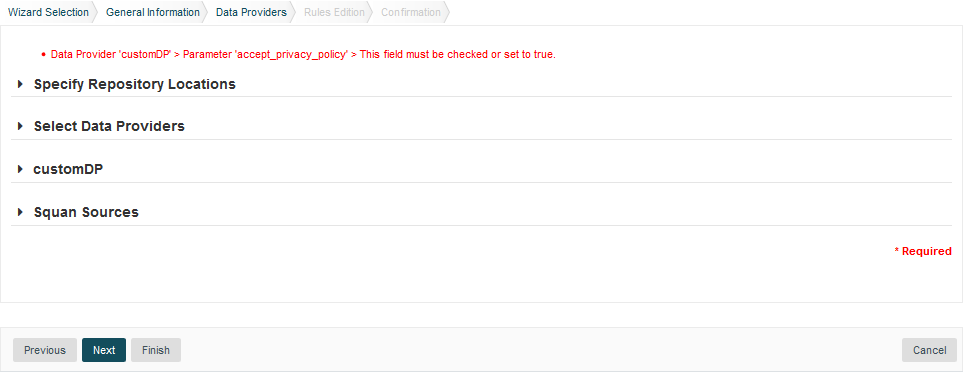
You can use a required tag
of type booleanchoice to ensure that users must check a box in the web UI or set its value to true when building from the command line in order to proceed with the analysis (new in 18.0).
<tag type="booleanChoice" required="true" key="accept_privacy_policy" />
In order to display your Data Provider parameters in different languages in the web UI, yout Data Provider's form.xml does not
contain any hard-coded strings. Instead, Squore uses each parameter's key
attribute to dynamically
retrieve a translation from a form_xx.properties file located next to form.xml.
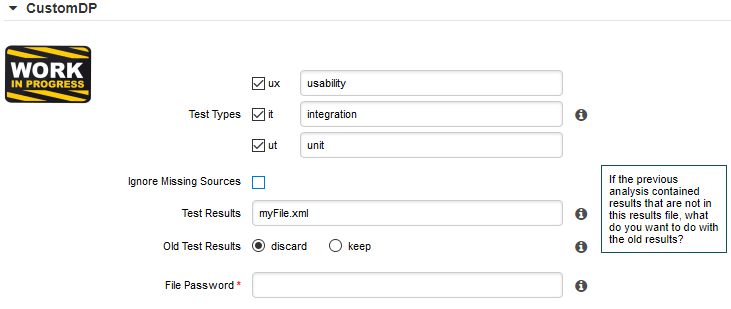
When you create a Data Provider, it is mandatory to include at least an English version of the strings in a file called form_en.properties. You are free to add other languages as needed. Here is a sample .properties for for the CustomDP you created in the previous section:
FORM.GENERAL.NAME  = CustomDP
FORM.DASHBOARD.NAME  = Test Status
FORM.GENERAL.DESCR = CustomDP imports test results for my project
FORM.GENERAL.URL   = http://example.com/CustomDP

TAG.tests.NAME  = Test Types
TAG.tests.DESCR = Check the boxes next to the types of test results contained in the results

TAG.ignore_missing_sources.NAME = Ignore Missing Sources

TAG.input_file.NAME = Test Results
TAG.input_file.DESCR = Specify the absolute path to the file containing the test results

TAG.old_results.NAME = Old Test Results
TAG.old_results.DESCR = If the previous analysis contained results that are not in this results file, what do you want to do with the old results?
OPT.Exclude.NAME = discard
OPT.Include.NAME = keep

TAG.password.NAME = File Password
TAG.password.DESCR = Specify the password to decrypt the test results file
The syntax for the .properties file is as follows:
FORM.GENERAL.NAME is the display name of the Data Provider in the project wizard
FORM.DASHBOARD.NAME is the display name of the Data Provider in the Explorer
FORM.GENERAL.DESCR is the description displayed in the Data Provider's tooltip in the web UI
FORM.GENERAL.URL is a reference URL for the Data Provider. Note that it is not displayed in ther web UI yet.
TAG.tag_name.NAME allows setting the display name of a parameter
TAG.tag_name.DESCR is a help text displayed in a tooltip next to the Data Provider option in the web UI
OPT.option_name.NAME allows setting the display name of an option
Using the form_en.properties above for CustomDP results in the following being displayed in the web UI when launching an analysis:
.properties fileNot all wizards display all Data Providers by default. If your Data Provider does not appear after refreshing your configuration, make sure that your wizard bundle allows displaying all Data Providers
by reviewing the tools
element of Bundle.xml:
<?xml version="1.0" encoding="UTF-8"?>
<Bundle>
	<Wizard ... >
		...
		<tools all="true">
			...
		</tools>
		...
	</Wizard>
</Bundle>
For more information about the wizard bundle, consult the the chapter called "Project Wizards" in the Configuration Guide.
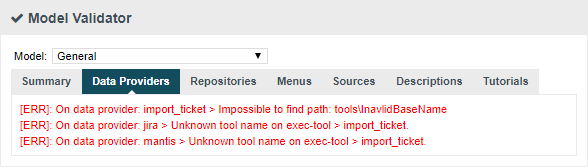
If you have made this change and your Data Provider still does not appear in your wizard, consult the Validator to find out if it was disabled because of an error in its configuration.
Now that you have a new Data Provider available in the web interface (and the command line), this section will show you how to use these parameters and pass them to one or more scripts or executables in order to eventually write data in the format that Squore expects to import during the analysis.
At the end of a Data Provider execution, Squore expects a file named input-data.xml to be written in a specific location. The syntax of the XML file to generate is as follows:
<!-- input-data.xml syntax -->
<bundle version="2.0">
	<artifact [local-key=""] [local-parent=""|parent=""] >
        <artifact [id="<guid-stable-in-time-also-used-as-a-key>"] name="Component" type="REQ" [location=""] >
			<info name|n="DESCR" value="The description of the object"/>
			<key value="3452-e89b-ff82"/>
			<metric name="TEST_KO" value="2"/>
			<finding name="AR120" loc="xxx" p0="The message" />
			<link name="TEST" local-src=""|src=""|local-dst=""|dst="" />
				<artifact id="" name="SubComponent" type="REQ">
				...
				</artifact>
		</artifact>
	</artifact>

	<artifact id="" local-key="" name="" type="" local-parent=""|parent="" [location=""] />
	...

	<link name="" local-src=""|src="" local-dst=""|dst="" />
	...

	<info local-ref=""|ref="" name="" value=""/>
	...

	<metric local-ref=""|ref="" name="" value=""/>
	...

	<finding local-ref=""|ref="" [location=""] p0="" />
	<finding local-ref=""|ref="" [location=""] p0="">
		<location local-ref=""|ref="" [location=""] />
		...
		<relax status="RELAXED_DEROGATION|RELAXED_LEGACY|RELAXED_FALSE_POSITIVE"><![CDATA[My Comment]]></relax>
	</finding>
	...
</bundle>
Your Data Provider is configured by adding an exec-phase
element with a mandatory id="add-data"
attribute in form.xml.
The basic syntax of an exec-phase
can be seen below:
<exec-phase id="add-data">
	<exec name="tcl|perl|java|javascript or nashorn" | executable="/path/to/bin" | executable="executable_name"failOnError="true|false" failOnStdErr="true|false" warn="[WARN]" error="[ERROR|ERR]" fatal="[FATAL]">
		<arg value="${<function>(<args>)}"/>
		<arg value="-freeText" />
		<arg value="${<predefinedVars>}" />
		<arg value="versions" />
		<arg value="-myTag"/>
		<arg tag="myTag"/>
		<env key="MY_VAR" value="SOME_VALUE"/>
	</exec>
	<exec ... />
	<exec-tool name="another_data_provider">
		<param key="<tagName>" value="<value>" />
		<param key="<tagName>" tag="<tag>" />
		<param ... />
	</exec-tool>
	<exec-tool ... >
		...
	</exec-tool>
</exec-phase>
The exec-phase
element accepts one or more launches of scripts or executables
specified in an exec
child element, that can receive arguments and environment
variables specified via arg
and env
elements.
There are four built-in languages for executables:
tcl
perl
java
javascript or nashorn
The scripts are launched using the tcl, perl, or java runtimes defined in your Squore installation. This is also the case for javascript, which is handled by Java's Nashorn engine.
The following attributes of the exec
element allow you to control error handling:
failOnError
(optional, default: true) marks the Data Provider execution as failed if the executable returns an error code
failOnStdErr
(optional, default: true) marks the Data Provider execution as failed if the executable prints something to stdErr during the execution
warn
,
error
and
fatal
(optional, default: see code block above) allow you to define patterns to look for in the executable's standard output to fine-tune the result of the execution.
Other executables can be called, as long as they are available on the system's PATH, or configured in
config.xml
Given the following config.xml:
<!-- config.xml (server or cli) -->
<?xml version="1.0" encoding="UTF-8" standalone="yes"?>
<squore type="server" version="1.3">
  <paths>
     <path name="python" path="C:\Python\python.exe" />
     <path name="git" path="C:\Git\bin\git.exe" />
  </paths>
...
</squore>
git and python can be called in your Data Provider as follows:
<exec-phase id="add-data">
	<exec executable="git">
		...
	</exec>
	<exec executable="python">
		...
	</exec>
</exec-phase>
Argument values can be:
Free text passed in a value
tag, useful to specify a parameter for your script
<exec executable="perl">
	<arg value="-V" />
</exec>
A tag key declared in form.xml passed as a tag
attribute to retrieve the input specified by the user. If no input was specified, you can define a defaultValue
:
<arg tag="maxValue" defaultValue="50" />
<arg tag="configFile" defaultValue="${getToolConfigDir(default.xml)}" />
One of the predefined functions
${getOutputFile(<relative/path/to/file>,<abortIfMissing>)} returns the absolute path of an input-data.xml file output by an exec-phase
. failIfMissing is an optional boolean which aborts the execution when set to true if the file is missing.
${getTemporaryFile(<relative/path/to/file>)} returns the absolute path of a temporary file created by an exec
(only for add-data and repo-add-data phases)
${getToolAddonsDir(<relative/path/to/file>)} returns the absolute path of a file in the Data Provider's addons folder
${getToolConfigDir(<relative/path/to/file>)} returns the absolute path of a file in the Data Provider's configuration folder
${path(<executable_name>)} returns the absolute path of an executable configured in config.xml, or just the executable name
if the executable is available from the system's PATH.
<exec executable="...">
	<arg value="-git_path" />
	<arg value="${path(git)}" />
One of the predefined variables
${tmpDirectory} to get an absolute path to a temp folder to create files
${sourcesList} to get a list of the aliases and locations containing the data extracted by the repository connectors used in the analysis
${outputDirectory} to get the absolute path of folder where the Data Provider needs to write the final input-data.xml
You can call and pass parameters to other Data Providers after your exec-phase
using an exec-tool
element.
The exec-tool
element uses a mandatory name
which is the name of the folder containing the other Data Provider
to launch in your configuration folder and supports passing the parameters expected by the other Data Provider via one or more param
elements where:
As an example, the following Data Provider generates a CSV file that is then passed to the pep8 Data Provider:
<exec-phase id="add-data">
	<exec executable="python">
		<arg value="consolidate-reports-recursive.py" />
		<arg value="-folders" />
		<arg tag="root_folder" />
		<arg value="-outputFile" />
		<arg value="output.csv" />
	</exec>
	<exec-tool name="pep8">
		<param key="csv" value="${getOutputFile(output.csv)}" />
		<param key="separator" tag="separator" defaultValue=";" />
	</exec-tool>
</exec-phase>
In this other example, a perl script is launched to retrieves issues from a ticketing system and the export data is passed to the import_ticket Data Provider:
<exec-phase id="add-data">
	<exec name="perl">
		<arg value="${getToolConfigDir(export_ticket.pl)}" />
		<arg value="-url" />
		<arg tag="url" />
		<arg value="-login" />
		<arg tag="login" />
		<arg value="-pwd" />
		<arg tag="pwd" />
		<arg value="-outputFile" />
		<arg value="${getOutputFile(exportdata.csv,false)}" />
	</exec>
	<exec-tool name="import_ticket">
		<param key="input_file" value="${getOutputFile(exportdata.csv)}" />
		<param key="csv_separator" value=";" />
	</exec-tool>
</exec-phase>
If your Data Provider uses a perl script, Squore provides a small library that makes it easy to retrieve script arguments called SQuORE::Args. Using it as part of your script, you can retrieve arguments using the get_tag_value() function, as shown below:
# name: export_ticket.pl
# description: exports issues to a CSV file
use SQuORE::Args;
# ...
# ...
my $url = get_tag_value("url");
my $login = get_tag_value("login");
my $pwd = get_tag_value("pwd");
my $outputFile = get_tag_value("outputFile");
# ...
exit 0;If you want to find more examples of working Data Providers that use this syntax, check the following Data Providers in Squore's default configuration folder:
conf-checker calls a jar file to write an XML file in Squore's exchange format
import_ticket parses a file to translate it into a format that can then be passed to csv_import to import the tickets into Squore
jira retrieves data from Jira and passes it to import_ticket
The same syntax used to create Data Providers can be used to create Repository Connectors, and therefore instruct Squore to get source code from SCMs. Instead of using an
exec-phase
with the id="add-data"
, your Repository Connector should define the following phases:
id="import"
defines how you extract source code and make it available to Squan Sources so it can be analysed.
This phase is expected to return a path to a folder containing the sources to analyse or a data.properties file listing
the path to the folder containing source and various other properties to be used in other executions:
directory=/path/to/sources-to-analyse
data.<key1>=<value1>
data.<key2>=<value2>
This phase is executed once per source code node in the project and allows you to use the following additional variables:
${outputSourceDirectory} is the folder containing the sources to analyse
${alias} is the alias used for the source code node (empty if there is only one source code node)
id="repo-add-data"
is similar to the add-data phase described for Data Providers in
the section called “Running your Data Provider” and is expected to produce an input-data.xml. The only difference in the case of a Repository Connector is that this
phase is executed once per source code node in the analysis.
id="display"
is the phase that is called when users request to view the source code for an artefact from the web UI. This phase
is expected to return a data.properties file with the following keys:
filePath=/path/to/source/file
displayPath=<Artefact Display Path (optional)>
The contents of filePath will be loaded in the source code viewer, while the value of displayPath
will be used as the file path displayed in the header of the source code viewer.
This phase allows you to use the following additional variables:
${scaInfo} is text to display in the title bar of the source code viewer in the web interface
${artefactName} is the name of the file to display
${artefactPath} is the path (without the alias) of the file to display
During the display phase, you can retrieve any data set during the import phase for the repository using the ${getImportData(<key1>)} function
Consult SVN's form.xml in <SQUORE_HOME>/configuration/repositoryConnectors/SVN for a working example of a Repository Connector
that uses all the phases described above.
If you want your Data Provider to use the Squore toolkit to retrieve references to artefacts, the following variables are available
(in the add-data and repo-add-data phases only):
In order to use the toolkit, your exec
must use the tcl language. As an example, here is a sample
exec-phase
and associated tcl file to get you started:
 <!-- form.xml -->
<exec-phase id="repo-add-data">
	<exec name="tcl">
		<arg value="${getToolAddonsDir(repo-add-data.tcl)}" />
		<arg value="${tclToolkitFile}" />
		<arg value="${squanOutputDirectory}" />
		<arg value="${outputDirectory}" />
		<arg tag="xxx" />
	</exec>
</exec-phase>
#repo-add-data.tcl:
set toolkitFile [lindex $argv 0]
set sqOutputDir [lindex $argv 1]
set outputDir [lindex $argv 2]
set xxx [lindex $argv 3]

# Initialise the toolkit
puts "Initializing toolkit"
source $toolkitFile
toolkit::initialize $sqOutputDir $outputDir

# Execute your code
puts "Main execution"
# yout code here
# ...

# Generate xml files (artefacts)
puts "Generating xml files"
toolkit::generate $outputDir {artefacts}
In order to help you import data into Squore, the following Data Provider frameworks are provided and can
write a valid input-data.xml file for you:
csv_import (new in 18.0)
The csv_import framework allows you to write Data Providers that produce CSV files and then pass them on to the framework to be converted to an XML format that Squore understands. This framework allows you to import metrics, findings, textual information and links as well as generate your own artefacts. It is fully linked to the source code parser and therefore allows to locate existing source code artefacts generated by the source code parser (new in 18.0). Refer to the full csv_import Reference for more information.
xml (new in 18.0)
The xml framework is a sample implementation of a Data Provider that allows you to directly import an XML file or run it through an XSL transformation to that it matches the input format expected by Squore (input-data.xml). This framework therefore allows you to import metrics, findings, textual information and links as well as generate your own artefacts. Refer to the full xml Reference for more information.
If you are looking for the legacy Data Provider frameworks from previous versions of Squore, consult the section called “Legacy Frameworks”.
The legacy Data Provider frameworks are still supported, however using the new frameworks is recommended for developping new Data Providers, as they are more flexible and provide more functionality to interact with source code artefacts.