| > Show on single page > Show on multiple pages |
Copyright © 2016 Squoring Technologies
Licence
No part of this publication may be reproduced, transmitted, stored in a retrieval system, nor translated into any human or computer language, in any form or by any means, electronic, mechanical, magnetic, optical, chemical, manual or otherwise, without the prior written permission of the copyright owner, Squoring Technologies.
Squoring Technologies reserves the right to revise this publication and to make changes from time to time without obligation to notify authorised users of such changes. Consult Squoring Technologies to determine whether any such changes have been made.
The terms and conditions governing the licensing of Squoring Technologies software consist solely of those set forth in the written contracts between Squoring Technologies and its customers.
All third-party products are trademarks or registered trademarks of their respective companies.
Warranty
Squoring Technologies makes no warranty of any kind with regard to this material, including, but not limited to, the implied warranties of merchantability and fitness for a particular purpose. Squoring Technologies shall not be liable for errors contained herein nor for incidental or consequential damages in connection with the furnishing, performance or use of this material.
Abstract
This edition of the Command Line Interface applies to Squore 16.1.2 and to all subsequent releases and modifications until otherwise indicated in new editions.
Table of Contents
The following conventions are used in this manual.
| Typeface or Symbol | Meaning |
| Bold | Book titles, important items, or items that can be selected including buttons and menu choices. For example: Click the Next button to continue |
| Italic | A name of a user defined textual element. For example:
Username
: admin
|
Courier New
| Files and directories; file extensions, computer output. For example:
Edit the config.xml file |
Courier Bold
| Commands, screen messages requiring user action. For example:
Username
: admin
|
| > | Menu choices. For example: Select
File > Open
. This means select the File menu, then select the Open
command from it. |
| <...> | Generic terms. For example:
<SQUORE_HOME> refers to the Squore
installation directory. |
Notes
Screenshots displayed in this manual may differ slightly from the ones in the actual product.
The following acronyms and abbreviations are used in this manual.
| CI | Continuous Integration |
| CLI | Command Line Interface |
| DP | Data Provider, a Squore module capable of handling input from various other systems and import information into Squore |
| RC | Repository Connector, a Squore module capable of extracting source code from source code management systems. |
Table of Contents
This document was released by Squoring Technologies.
It is part of the user documentation of the Squore software product edited and distributed by Squoring Technologies.
This document is the Command Line Interface Guide for Squore.
It is indented as a follow up to the Squore Getting Started Guide and will help you understand how to use Squore CLI to create and update projects. It is divided into several chapters, as detailed below:
Chapter 2, Getting Started With the Squore CLI provides a basic introduction to Squore CLI and the examples provided with your Squore installation.
Chapter 3, Command Line Reference provides a complete reference of all the command line options and parameters for creating projects.
Chapter 4, Repository Connectors covers the default Repository Connectors and the parameters to pass to Squore to use them.
Chapter 5, Data Providers is a reference guide to all the Data Providers shipped with Squore.
If you are already familiar with Squore, you can navigate this manual by looking for what has changed since the previous version. New functionality is tagged with (new in 16.1) throughout this manual. A summary of the new features described in this manual is available in the entry * What's New in Squore 16.1? of this manual's Command Line Interface.
For information on how to use and configure Squore, the full suite of manuals includes:
Squore Installation Checklist
Squore Installation and Administration Guide
Squore Getting Started Guide
Squore Command Line Interface
Squore Eclipse Plugin Guide
Squore Configuration Guide
Squore Reference Manual
If the information provided in this manual is erroneous or inaccurate, or if you encounter problems during your installation, contact Squoring Technologies Product Support: http://support.squoring.com/
You will need a valid Squore customer account to submit a support request. You can create an account on the support website if you do not have one already.
For any communication:
support@squoring.com
Squoring Technologies Product Support
76, allées Jean Jaurès / 31000 Toulouse - FRANCE
Approval of this version of the document and any further updates are the responsibility of Squoring Technologies.
The version of this manual included in your Squore installation may have been updated. If you would like to check for updated user guides, consult the Squoring Technologies documentation site to consult or download the latest Squore manuals at http://support.squoring.com/documentation/16.1.2. Manuals are constantly updated and published as soon as they are available.
Table of Contents
Squore CLI is a package that is installed on every client computer that needs to perform local code analyses or trigger a remote analysis on Squore Server. It contains the client (squore-engine.jar), its libraries, configuration files and some sample job files to help you get started. In this section, you will learn more about the different setup configurations supported by the CLI, its installation and integration into a Continuous Integration environment.
Squore CLI accepts commands and parameters to communicate with Squore Server. Inside the installation folder, some scripts are provided as examples to create projects, save encrypted credentials to disk, and synchronise the client's configuration with the server.
There are two ways to contemplate the deployment of Squore CLI:
As a way to analyse code and process data on a client machine and send the results to the server.
As a way to instruct the server to carry out an analysis of code and other input data.
Squore CLI and Squore Server must always be the same version in order to work together.
The following is a list of the officially supported operating systems:
CentOS 6
Fedora 19
RedHat EL 6
SuSe Linux 11.1
Ubuntu Server 14.04
Windows 7
Windows 8
Windows 10
Windows Server 2008 R2
Windows Server 2012 R2
Squore Server can use the following database management systems to store its data:
PostgreSQL 8.4 and up
Oracle Database 12c Release 1 (new in 16.1)
In both cases, it is possible to have database on the same machine as Squore Server or on a remote machine.
When using a database backend on a remote machine, the database administrator is responsible for backing up the database. The backup scripts included in the Squore Server installation will only handle the backup of the data stored on the Squore Server file system in that case. You can find more information about backup strategies for Squore Server in the section called Backup Tools in the Installation and Administration Guide.
For a successful installation of Squore, you will need:
The latest version of the Squore CLI installer, which can be downloaded from http://support.squoring.com/download_area.php
A user account with system administrator privileges
The Oracle Java Runtime Environment version 1.7.0_51 or higher for Squore CLI
At least 2 GB of space available on the disk for a full installation
The java executable should be in the machine's PATH
environment variable for Squore CLI to run successfully.
A JRE is required for Squore CLI. The Windows installer contains the tcl and perl runtimes needed. It will allow you to obtain the configuration needed to create projects from the server.
On Linux platforms, the following must be installed before installing Squore:
Perl version 5.10.1 or greater including the following extra-modules:
Mandatory packages:
Algorithm::Diff [module details]
Archive::Zip [module details]
Date::Calc [module details]
Digest::SHA [module details]
HTTP::Request [module details]
JSON [module details]
LWP::UserAgent [module details]
Time::HiRes [module details]
XML::Parser [module details]
Optional packages for working with Microsoft Excel:
HTML::Entities [module details]
Spreadsheet::BasicRead [module details]
Optional packages for working with OSLC systems:
Date::Parse [module details]
WWW::Mechanize [module details]
XML::LibXML [module details]
Optional packages for working with GitHub systems:
Date::Parse [module details]
Mail::Box::Manager [module details]
Mail::Message::Body::Lines [module details]
Mail::Message::Construct [module details]
Mail::Mbox::MessageParser [module details]
Net::GitHub [module details]
Optional packages for working with Semios/Prometil systems:
File::Slurp [module details]
Optional packages for Advanced CSV Export Management:
Text::CSV [module details]
If some of these modules are not available as packages on your operating system, use your perl installation's cpan to install the modules. Using the OS packages is recommended, as it avoids having to reinstall via cpan after upgrading your version of perl.
Tcl version 8.5 or greater,
On Red Hat Enterprise Linux and CentOS (6.5 and 7.1), the dependencies are satisfied by the following packages:
Mandatory packages:
java-1.7.0-openjdk
perl
perl-Algorithm-Diff
perl-Archive-Zip
perl-Date-Calc
perl-Digest-SHA
perl-JSON
perl-libwww-perl
perl-Time-HiRes
perl-XML-Parser
tcl
Optional packages for working with Microsoft Excel:
perl-HTML-Parser
perl-CPAN (CPAN utility requirement)
perl-Spreadsheet-ParseExcel (available in the EPEL repository)
perl-Spreadsheet-XLSX (available in the EPEL repository)
The module Spreadsheet::BasicRead is not available as a package and must therefore be installed using cpan (make sure cpan is properly configured, by running cpan without arguments first):
sudo cpan -i Spreadsheet::BasicRead
Optional packages for working with OSLC systems:
perl-TimeDate
perl-WWW-Mechanize (available in the EPEL repository)
perl-XML-LibXML
Optional packages for working with GitHub systems:
perl-TimeDate
perl-Mail-Box (available in the EPEL repository)
perl-Mail-Mbox-MessageParser (available in the EPEL repository)
perl-Net-GitHub (available in the EPEL repository)
Optional packages for working with Semios/Prometil systems:
perl-File-Slurp
Optional packages for Advanced CSV Export Management:
perl-Text-CSV (available in the EPEL repository)
For more information about how to install the Extra Packages for Enterprise Linux (EPEL) repository, consult https://fedoraproject.org/wiki/EPEL.
On Ubuntu 14.04.3 LTS, the dependencies are satisfied by the following packages:
Mandatory packages:
libalgorithm-diff-perl
libarchive-zip-perl
libdate-calc-perl
libhttp-message-perl
libjson-perl
libwww-perl
libxml-parser-perl
openjdk-7-jdk
perl
tcl
Optional packages for working with Microsoft Excel:
make (CPAN utility requirement)
libhtml-parser-perl
libspreadsheet-parseexcel-perl
libspreadsheet-xlsx-perl
The module Spreadsheet::BasicRead is not available as a package and must therefore be installed using cpan (make sure cpan is properly configured, by running cpan without arguments first):
sudo cpan -i Spreadsheet::BasicRead
Optional packages for working with OSLC systems:
libtimedate-perl
libwww-mechanize-perl
libxml-libxml-perl
Optional packages for working with GitHub systems:
libtimedate-perl
libmail-box-perl
libmail-mbox-messageparser-perl
libnet-github-perl
Optional packages for working with Semios/Prometil systems:
libfile-slurp-perl
Optional packages for Advanced CSV Export Management:
libtext-csv-perl
Note that Oracle's Java Runtime Environment (minimum version 1.7.0_51) is required on the client machine for the CLI to run.
After verifying that you meet the prerequisites detailed in the section called “Installation Prerequisites”, log on with an account that has administrator privileges and launch Squore CLI installer. Each of the wizard screens is documented below in the order that you will see them.
The data and temporary folders must be excluded from the scope of virus scanners, malware protectors and search indexers to avoid any errors during an analysis.
Squore CLI installer Welcome screen
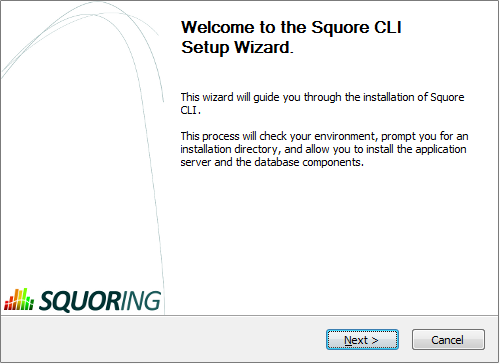
Squore CLI installer Welcome screen
On the Welcome screen, click the Next button to start the installation.
Squore CLI licence agreement screen
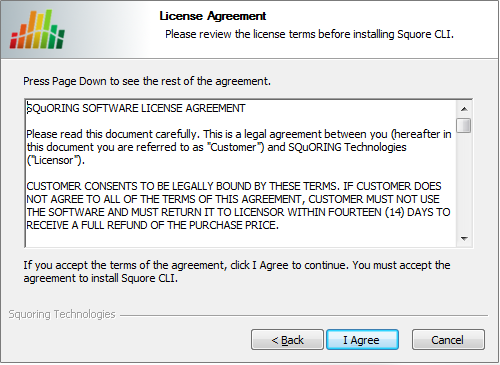
Squore CLI licence agreement screen
Click the I Agree button after reviewing the terms of the licence to continue the installation.
Squore CLI components screen
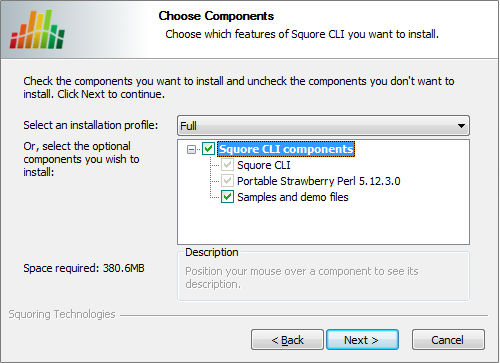
Squore CLI components screen
Select the components you want to install and click the Next button to proceed to the next step of the installation.
Squore CLI destination folder screen
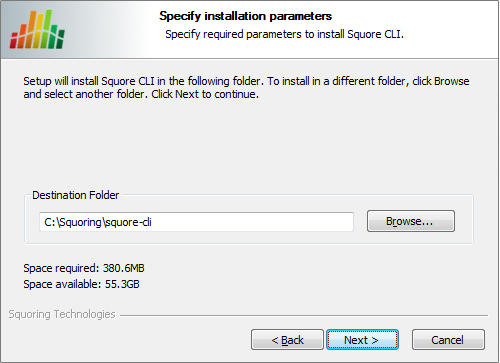
Squore CLI destination folder screen
Browse for the folder where you want to deploy Squore CLI and click the Next button to proceed to the next step of the installation.
Squore CLI installation parameters screen
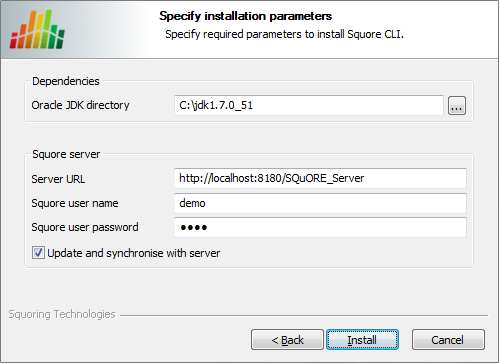
Squore CLI installation parameters screen
Specify the path of the JDK installation (a JRE is also supported) on your system. Specify the details of Squore Server that the client should connect to. if you check the Update and synchronise with server box, the installer will attempt to retrieve the up-to-date client binaries from the server as well as the configuration. Click the Next button to start copying the installation files onto your hard disk.
If an error happens during the installation process, a log file is available in the destination folder you selected during the installation.
Before installing Squore CLI on a Linux platform, verify that all prerequisites are met, as described in the section called “Installation Prerequisites”
Unzip the squore-cli-linux-16.1.2.<buildNumber>.tar.bz2
archive file and then extract the content of the tar file in
<SQUORE_HOME>
: i.e. the selected Squore
installation directory.
tar xjf
							squore-cli-linux-16.1.2.<buildNumber>.tar.bz2
<SQUORE_HOME> now
contains a new folder called squore-cli, for example:
/home/user/squore-cli.
Run the installation script in a command shell:
<SQUORE_HOME>/bin/install
							  -v
							  -s http://localhost:8180/SQuORE_Server

							  -u user

							  -p password
For more details on install options, refer to install(1).
When installing Squore CLI, a connection to Squore Server is automatically attempted to retrieve the most up-to-date client
and configuration. You can disable this synchronisation attempt by passing -N to the installation script.
If you have deployed some third-party tools on Squore Server, they will automatically be downloaded to your client when you launch the client synchronisation script.
AntiC and Cppcheck on Linux also require special attention: Cppcheck must be installed and available in the path, and antiC must be compiled with the command:
# cd <SQUORE_HOME>/addons/Antic_auto/bin/ && gcc antic.c -o antic
For more information, refer to the Command Line Interface Manual, which contains the full details about special installation procedures for Data Providers and Repository Connectors.
After the CLI installation is successful, you can familiarise yourself will the structure of the installation directory:
<SQUORE_HOME>/addons A folder containing the Data Providers of the product.
<SQUORE_HOME>/bin A folder containing sample projects creation scripts and utilities.
<SQUORE_HOME>/configuration A configuration of the product containing the tools, wizards and analysis models.
<SQUORE_HOME>/docs A folder containing the Command Line Interface manual.
<SQUORE_HOME>/lib A folder containing the main engine and its client libraries.
<SQUORE_HOME>/samples A folder containing sample source code to be used with the sample launchers supplied in <SQUORE_HOME>/bin.
<SQUORE_HOME>/share: A folder containing specific perl libraries used by the CLI to launch jobs.
<SQUORE_HOME>/tools A folder containing the perl and tclsh distributions on Windows. This folder does not exist in the Linux version, since the system installations of perl and tclsh are used.
<SQUORE_HOME>/config.xml An XML configuration file that the CLI uses to find its configuration.
After installing Squore CLI, the credentials for the user you specified during the installation have been saved, and the scripts in <SQUORE_HOME>/bin will use the username and password specified.
The file config.xml contains information about the Squore CLI installation.. Here is the default
config.xml:
<?xml version="1.0" encoding="utf-8" standalone="yes"?>
<squore type="client" version="1.1">
	<paths>
		<path name="perl.dir" path="path/to/perl"/>
		<path name="tclsh.dir" path="path/to/tclsh"/>
	</paths>
	<configuration>
		<path directory="<SQUORE_HOME>/configuration"/>
	</configuration>
	<addons>
		<path directory="<SQUORE_HOME>/addons"/>
	</addons>
</squore>
You can extend your config.xml by specifying where you want the temporary and data files to be
stored on your system, as shown below:
Folder used to store temporary log files:<tmp directory="${java.io.tmpdir}/squore-${user.name}"/>
Folder used to run analyses and store project files before they are sent to the server:<projects directory="${user.home}/.squore/projects"/>
Folder used when extracting files from SCM systems:<sources directory="${java.io.tmpdir}/sources"/>
Using java system properties to specify
the paths to the tmp, projects and sources folders is useful
if you want the Squore CLI installation to work for multiple users.
Note that all three elements are optional, and will use the values shown above by default if you do not specify them in
config.xml.
Here is an example of a full config.xml:
<?xml version="1.0" encoding="utf-8" standalone="yes"?>
<squore type="client" version="1.1>
	<paths>
		<path name="perl.dir" path="path/to/perl"/>
		<path name="tclsh.dir" path="path/to/tclsh"/>
	</paths>
	<configuration>
		<path directory="<INSTALLDIR>/configuration"/>
	</configuration>
	<addons>
		<path directory="<INSTALLDIR>/addons"/>
	</addons>
	<tmp directory="${java.io.tmpdir}/squore-${user.name}"/>
	<projects directory="${user.home}/.squore/projects"/>
	<sources directory="${java.io.tmpdir}/sources"/>
</squore>In order to upgrade Squore CLI to a new version, simply run <SQUORE_HOME>\bin\synchronise.bat (on Windows)
or <SQUORE_HOME>/bin/synchronise (on Linux) script to retrieve the latest version of the binaries
from Squore Server.
You can remove Squore Server from your machine by going through the uninstaller wizard, as described below:
Launch the uninstaller wizard from the Add/Remove Programs dialog in
the control panel or directly by double-clicking <SQUORE_HOME>/squore_CLI_Uninst.exe. The wizard opens:
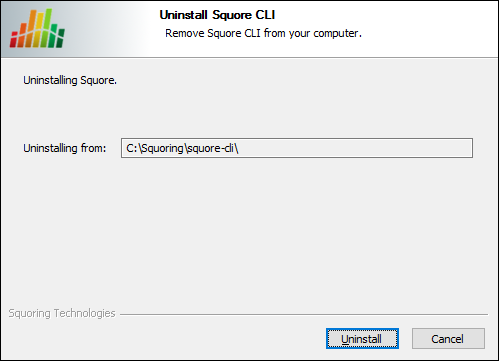
The Squore CLI uninstallation wizard
Click Uninstall to procede with the removal of the software.
This operation cannot be interrupted or rolled-back.
The wizard will notify you when the uninstallation finishes, as shown below:

The Uninstallation Complete screen
Click Finish to exit the wizard.
Squore CLI includes a small utility called add-credentials.sh that can save your credentials to disk. This avoids typing your password every time you create a project, and also avoids having to save the password in your script files.
add-credentials.sh is located in <SQUORE_HOME>/bin and allows saving passwords for Squore users and the various Repository Connectors known to Squore. To start saving credentials, simply run add-credentials.sh. You are presented with a choice of several types of credentials you can save:

Available credentials types in add-credentials.sh
In order to save user credentials for Squore Server, select 1, then type the login and associated password.
In order to save credentials for a SVN server, select 2. add-credentials.sh will prompt you for the
URL of the SVN repository, for example https://svnserver/var/svn. Upon confirming, you will be prompted for your username and password to access this SVN URL.
Note that the saved credentials are only used by Squore CLI. When you use Squore's web interface, you will need to enter your password again to log in or browse source code.
Credentials are only saved for the current user. If you want to clear the credentials saved for a user profile, remove the file $HOME/.squorerc on linux or %USERPROFILE%\.squorerc on Windows.
Adding credentials can be done from the command line by running the following command:
java -cp /path/to/squore-engine.jar -Dsquore.home.dir=$SQUORE_HOME com.squoring.squore.client.credentials.MakeCredentials --type squore --login demo --password demo --url http://localhost:8180/SQuORE_Server
The <SQUORE_HOME>/bin folder contains scripts that use the source code in the folder <SQUORE_HOME>/samples to create demo projects.
You can also copy the command lines in these scripts to start creating your own projects.
A sample job instruction is a call to squore-engine.jar with some arguments and parameters to specify the Data Providers, Repository Connectors and attribute values you want to use, for example:
java -Dsquore.home.dir="<SQUORE_HOME>" -jar squore-engine.jar
 --url="<server_url>" --login="<LOGIN>" --password="<password>
 --name="myProject" --wizardId="ISO9126"
 -r "type=FROMPATH,path=/path/to/java/sources"
 --commands "DELEGATE_CREATION"
To learn more about command line parameters, refer to Chapter 3, Command Line Reference
Squore can be used in a continuous integration environment using the commands detailed in Chapter 3, Command Line Reference
Below is an example of a native call to the client using the ant exec task:
<project name="CIproject" default="build" basedir=".">
    <property name="squore.server"
    	value="http://localhost:8180/SQuORE_Server>
    <property name="squore.client"
    	value="D:\CLI"/>

	<target name="build">
		<exec executable="java">
			<arg value="-Dsquore.home.dir=${SQUORE_HOME}"/>
			<arg value="-jar"/>
			<arg value="${SQUORE_HOME}\lib\squore-engine.jar"/>
			<arg value="--url=${squore.server.url}" />
			<arg value="--version=${label}" />
			<arg value="--repository type=FROMPATH,path=${source.dir}" />
			<arg value="--color=rgb(255,0,0)" />
			<arg value="--name=${project.name}" />
			<arg value="--login=demo" />
			<arg value="--password=demo" />
			<arg value="--wizardId=Code ISO-9126 Maintainability Level" />
			<arg value="--tag BV=0" />
			<arg value="--tag COST=0" />
			<arg value="--commands=PROCESS_CREATION" />
		</exec>
    </target>
</project>
Table of Contents
In this chapter, you will learn about the commands and options you can use with squore-engine.jar
In order to run a command, you always need to specify at least:
-Dsquore.home.dir=<SQUORE_HOME> to tell java there Squore CLI is installed
--url=http://localhost:8180/SQuORE_Server to tell Squore CLI which Squore Server to connect to.
--login=demo to tell Squore CLI which user to connect with.
--commands="..." to tell Squore CLI what action you need it to perform.
squore.home.dir is used to set the location of Squore CLI's config.xml to ${squore.home.dir}/config.xml.
If your config.xml is in a different location,
you can specify it on the command line with the option: -Dsquore.configuration=/path/to/config.xml.
The following is a list of commands you can use with Squore CLI and their meaning:
RETRIEVE_ENGINE_PACKAGE Retrieves the full up-to-date package of the Engine and its libraries from the server.
SYNCHRONISE Retrieves the up-to-date configuration from the server.
GENERATE_CONF_PARAMETERS Generates the command line options associated to all parameters found in the specified configuration file. It requires the 'projectConfFile' option to be defined.
CHECK_MODELS Checks the validity of a model's configuration. It requires the 'outputCheckModelsFile' option.
PROCESS_CREATION Process project creation on client-side, it is shortcut for PROCESS_TOOLS;GENERATE_TOOLS_DATA_ZIP;SEND_TOOLS_DATA.
PROCESS_TOOLS Generates data for the Data Providers specified in a project. It should always be called before any other generation command is called.
GENERATE_TOOLS_DATA_ZIP Creates a zip archive of the data generated by the PROCESS_TOOLS command. It should be called after the PROCESS_TOOLS command.
SEND_TOOLS_DATA Sends the zip archive generated by the GENERATE_TOOLS_DATA_ZIP command and the project settings to the server, to request a project creation (analysis model computation and database update). It should be called after the GENERATE_TOOLS_DATA_ZIP command.
DELEGATE_CREATION Sends the project settings to the server to request a project creation.
ANALYZE_AND_DECIDE_DATA Performs the analysis model and the decision model computation on the data generated by the PROCESS_TOOLS command. It should be called after the PROCESS_TOOLS command.
GENERATE_OUTPUT Generates output data and statistics of the project's creation. It should always be called after all other commands.
DELETE_PROJECT --name=project_name Deletes the project project_name. This operation
cannot be undone and must be called separately from any other command.
DELETE_VERSIONS --name=project_name --version=version_to_delete_from Deletes the versions project_name from version_to_delete_from
until the latest version. This operation cannot be undone and must be called separately from any other command.
You will generally use a combination of these commands rather than a single command at a time.
If you intend to use the client as a remote control to trigger project creations on the server, use -c='DELEGATE_CREATION'.
A more common configuration is for the client to carry out the analysis and send the results to the server to create the project. This can be done by passing the commands -c='SYNCHRONISE;PROCESS_CREATION' .
Note: Using the SYNCHRONISE command is optional but ensures that the client and the server are using the same model to produce analysis results.
Parameters are used to define the environment in which commands are processed. The list of parameters is as follows:
--commands or -c (optional, default=''): The list of commands to launch.
This list is a semicolon-separated string defining the commands to launch. Use -commands="GET_COMMANDS_LIST" to obtain the list of available commands. For more information about the available commands, refer to the section called “Squore CLI Commands”.
--url or -s (optional, default='http://localhost:8180/SQuORE_Server'): The URL of Squore Server.
--outputFile or -o (optional, default='null'): The absolute path to the output file generated by the engine.
--outputCheckModelsFile or -m (optional, default='null'):Define the absolute path to the output check models file generated by the engine.
--printOutput or -print (optional, default='false'): Redirect the engine's output to the standard output.
--help or -? (optional, default='false'): Display help.
--subFoldersAsVersions or -sub (optional, default='false'): Loop on the repository path to create a version for each sub-folder using the sub-folder name as the version name.
--help:commands or -?cmd (optional, default='false'): Display help about the available commands.
--projectConfFile or -x (optional, default='null'): The XML file defining the project settings.
--updateModelFile or -uf (optional, default='null'): The XML file listing the changes to be applied to the standard analysis model for this analysis. This parameter is only read and applied when creating the first version of a project, for models where editing the ruleset is allowed. The XML file contains a list of rules with their status and categories, as shown below:
<UpdateRules>
   <UpdateRule measureId="R_NOGOTO" disabled="true" categories="SCALE_SEVERITY.CRITICAL"/>
</UpdateRules>
For more information about the Analysis Model Editor, consult the Getting Started Guide.
When using a combination of a project file and some parameters passed from the command line, the command line parameters override the project file ones.
In order to create a project, you need to pass project parameters to Squore CLI. The following is a list of the parameters and their meaning:
--name or -n=MyProject defines the name of the project that will be created
--group=MyGroup defines the group that the project belongs to. Projects from the same group are displayed together in the project portfolios and the group can optionally be rated as a whole. Note that you can specify subgroups by adding a / in your group name: --group="prototype/phase1" will create a phase1 group under a prototype group.
--color=rgb(130,196,240) defines the color used to identify the project in the Squore user interface after its creation. The numbers define the numbers define the values for red, green and blue respectively. Note that if you do not specify a colour on the command line, a random colour will be picked.
--autoBaseline or -b=true instructs Squore CLI to build a baseline version that will not be overwritten by a subsequent analysis. When set to false, every analysis overwrites the previous one, until a new baseline is created. If not set, this parameter defaults to true.
--keepDataFiles=true|false instructs Squore to keep or discard analysis files from old versions or only for the latest baseline. Note that this behaviour only affects disk space on the server, not the analysis results.
--version or -v=v1 defines the label used for the version of this project.
--versionDate="YYYY-MM-DDTHH:MM:SS" (default: actual analysis time) allows specifying a date for the version that is different from the current date. This is useful when the charts on your dashboard haves axes or intervals that show dates instead of version names. Note that for every new analysis, the date must be after the date of the previous analysis.
--login or u=demo is the ID of the user requesting the project creation.
--password -k=demo is the password of the user requesting the project creation. If you do not want to specify a password in your command line, refer to the section called “Saving Credentials to Disk”.
--teamUser or q="mike,DEVELOPER;john,TESTER;peter,PROJECT_MANAGER" is a semicolon-separated list of login,roleID pairs used to define a list of users who will be able to access the project when it is created.
Note that this option is taken into account when creating a new project but is ignored when creating a new version. In order to edit the list of users in a project team, you must use the Squore web interface.
Refer to the list of available roleIDs in Squore by clicking Administration > Roles. This option can be combined with the teamGroup parameter if needed.
--teamGroup or g="devUsers,DEVELOPER;management,GUEST" is a semicolon-separated list of group,roleID pairs used to define a list of groups who will be able to access the project when it is created.
Note that this option is taken into account when creating a new project but is ignored when creating a new version. In order to edit the list of groups in a project team, you must use the Squore web interface.
Refer to the list of available roleIDs in Squore by clicking Administration > Roles. This option can be combined with the teamUser parameter if needed.
--WizardId or -w=ISO9126 The id of the wizard used to create the project. If this parameter is not specified, it will be read from the wizard settings.
--versionPattern=V#.N# defines the pattern used to label the version automatically if no version parameter was passed.
--tag or -t TAGNAME="tagValue" If the wizard allows tags (i.e. project attributes), then use the this parameter to inform the CLI of the tag values to use for this project.
--repository or -r "type=REPOTYPE,opt1=value1,opt2=value2" is how you specify repository for sources. For more information about repositories syntax, refer to Chapter 4, Repository Connectors.
--dp or -d "type=DPName,dp_opt=dp_opt_value" is how you specify information for Data Providers. For more information about individual Data Provider syntax, refer to Chapter 5, Data Providers.
--filter or -f "FILTER_OPTS" is a semicolon-separated string of triplets {artefactType,filterType,filterValue}. In order to export the measure LC at application level and the indicator MAIN at application level, pass -f "APPLICATION,MEASURE,LC;APPLICATION,INDICATOR_LEVEL,MAIN;".
The artefact type ALL_TYPES and the filter types ALL_DEFECT_REPORTS, ALL_MEASURES, ALL_INDICATORS_LEVELS and ALL_INDICATORS_RANKS can also be used, followed by an empty filter value. In order to export all measures at application level in the output file, pass the parameter --filter="APPLICATION,ALL_MEASURES,;". In order to export all indicators for all artefact types in the output file, pass the parameter --filter="ALL_TYPES,ALL_INDICATORS_LEVELS,;".
-M "id=BETA_RELEASE,date=2015/05/31,PROGRESS=95" allows you to define a milestone in the project. This parameter accepts a date and a series of metrics with their values to specify the goals for this milestone. Note that this parameter allows you to add milestones or modify existing ones (if the ID provided already exists), but removing a milestone from a project can only be done from the web interface.
The rest of the parameters that you will pass to the Engine to create projects are specific to Repository Connectors and Data Providers and are detailed respectively in the Chapter 4, Repository Connectors and Chapter 5, Data Providers.
The versionPattern parameter allows specifying a pattern to create the version name automatically for every analysis. It supports the following syntax:
#N#: A number that is automatically incremented
#Nn#: A number that is automatically incremented using n digits
#Y2#: The current year in 2-digit format
#Y4#: The current year in 4-digit format
#M#: The current month in two digit format
#D#: The current day in two digit format
#H#: The current hour in 24 hour format
#MN#: The current minute in two digit format
#S#: The current second in two digit format
Any character other than # is allowed in the pattern. As an example, if you want to
produce versions labelled build-198.2013-07-28_13h07m (where 198 is an auto-incremented number and the date and time are the
timestamp of the project creation), you would use the pattern: build-#N3#.#Y4#-#M#-#D#_#H#h#MN#m
After a successful or unsuccessful run, the CLI returns an exit code from this list:
0: OK - The operation completed successfully.
1: Client creation error - There was an error launching the client process.
2: Configuration error - This could be due to an unreachable configuration file or a parameter set to an invalid value.
3: Problem while launching one of the commands - One of the commands failed to complete successfully. The console should provide information about what exactly failed.
4: Engine validity error - The client you are running is not compatible with the server. You should try to run the command RETRIEVE_ENGINE_PACKAGE to get the latest compatible package from the server.
Table of Contents
The simplest method to analyse source code in Squore is to provide a path to a folder contining your code.
Remember that the path supplied for the analysis is a path local to the machine running the analysis, which may be different from your
local machine. If you analyse source code on your local machine and then send results to the server, you will not be able to view the
source code directly in Squore, since it will not have access to the source code on the other machine. A common workaround to
this problem is to use UNC paths (\\Server\Share, smb://server/share...) or a mapped server drive
in Windows.
This Repository Connector allows you to upload a zip file containing your sources to analyse. Select a file to upload in the project creation wizard and it will be extracted and analysed on the server.
The contents of the zip file are extracted into Squore Server's temp folder. If you want to uploaded files to persist, contact your Squore administrator so that the uploaded zip files and extracted sources are moved to a location that is not deleted at each server restart.
The Concurrent Versions System (CVS), is a client-server free software revision control system in the field of software development.
For more details, refer to http://savannah.nongnu.org/projects/cvs.
The following is a list of commands used by the CSV Repository Connector to retrieve sources:
cvs -d $repository export [-r $branch] $project
cvs -d $repository co -r $artefactPath -d $tmpFolder
CVS has the following options:
Repository (repository, mandatory) Specify the location of the CVS Repository.
Project (project, mandatory) Specify the name of the project to get files from.
Tag or Branch (branch) Specify the tag or branch to get the files from.
The full command line syntax for CVS is:
-r "type=CVS,repository=[text],project=[text],branch=[text]"
IBM Rational ClearCase is a software configuration management solution that provides version control, workspace management, parallel development support, and build auditing. The command executed on the server to check out source code is: $cleartool $view_root_path $view $vob_root_path.
For more details, refer to http://www-03.ibm.com/software/products/en/clearcase.
The ClearCase tool is configured for Linux by default. It is possible to make it work for Windows by editing the configuration file
ClearCase has the following options:
View root path (view_root_path, mandatory, default: /view) Specify the absolute path of the ClearCase view.
Vob Root Path (vob_root_path, mandatory, default: /projets) Specify the absolute path of the ClearCase vob.
View (view) Specify the label of the view to analyse sources from. If no view is specified, the current ClearCase view will be used automatically, as retrieved by the command cleartool pwv -s.
Server Display View (server_display_view) When viewing source code from the Explorer after building the project, this parameter is used instead of the view parameter specified earlier. Leave this field empty to use the same value as for view.
Sources Path (sub_path) Specify a path in the view to restrict the scope of the source code to analyse. The value of this field must not contain the vob nor the view. Leave this field empty to analyse the code in the entire view. This parameter is only necessary if you want to restrict to a directory lower than root.
The full command line syntax for ClearCase is:
-r "type=ClearCase,view_root_path=[text],vob_root_path=[text],view=[text],server_display_view=[text],sub_path=[text]"
The Perforce server manages a central database and a master repository of file versions. Perforce supports both Git clients and clients that use Perforce's own protocol.
For more details, refer to http://www.perforce.com/.
The Perforce repository connector assumes that the specified depot exists on the specified Perforce server, that Squore can access this depot and that the Perforce user defined has the right to access it. The host where the analysis takes place must have a Perforce command-line client (p4) installed and fully functional. The P4PORT environment variable is not read by Squore. You have to set it in the form. The path to the p4 command can be configured in the perforce_conf.tcl file located in the configuration/repositoryConnectors/Perforce folder. The following is a list of commands used by the Perforce Repository Connector to retrieve sources:
p4 -p $p4port [-u username] [-P password] client -i <$tmpFolder/p4conf.txt
p4 -p $p4port [-u username] [-P password] -c $clientName sync "$depot/...@$label"
p4 -p $p4port [-u username] [-P password] client -d $clientName
p4 -p $p4port [-u username] [-P password] print -q -o $outputFile $artefactPath
The format of the p4conf.txt file is:
Client: $clientName
Root: $tmpFolder
Options: noallwrite noclobber nocompress unlocked nomodtime normdir
SubmitOptions: submitunchanged
view:
  $depot/... //$clientName/...
Perforce has the following options:
P4PORT (p4port, mandatory) Specify the value of P4PORT using the format [protocol:]host:port (the protocol is optional). This parameter is necessary even if you have specified an environment variable on the machine where the analysis is running.
Depot (depot, mandatory) Specify the name of the depot (and optionnally subforders) containing the sources to be analysed.
Revision (label) Specify a label, changelist or date to retrieve the corresponding revision of the sources. Leave this field empty to analyse the most recent revision fo the sources.
Authentication (useAccountCredentials, default: NO_CREDENTIALS)
Username (username)
Password (password)
The full command line syntax for Perforce is:
-r "type=Perforce,p4port=[text],depot=[text],label=[text],useAccountCredentials=[multipleChoice],username=[text],password=[password]"
Git is a free and open source distributed version control system designed to handle everything from small to very large projects with speed and efficiency.
For more details, refer to http://git-scm.com/.
The following is a list of commands used by the Git Repository Connector to retrieve sources:
git clone [$username:$password@]$url $tmpFolder
git checkout $commit
git log -1 "--format=%H"
git config --get remote.origin.url
git clone [$username:$password@]$url $tmpFolder
git checkout $commit
git fetch
git --git-dir=$gitRoot show $artefactPath
Git has the following options:
URL (url, mandatory) URL of the git repository to get files from. The local, HTTP(s), SSH and Git protocols are supported.
Branch or commit (commit) This field allows specifying the SHA1 of a commit or a branch name. If a SHA1 is specified, it will be retieved from the default branch. If a branch label is specified, then its latest commit is analysed. Leave this field empty to analyse the latest commit of the default branch.
Sub-directory (subDir) Specify a subfolder name if you want to restrict the analysis to a subpath of the repository root.
Authentication (useAccountCredentials, default: NO_CREDENTIALS)
Username (username)
Password (password)
The full command line syntax for Git is:
-r "type=Git,url=[text],commit=[text],subDir=[text],useAccountCredentials=[multipleChoice],username=[text],password=[password]"
This Repository Connector allows analysing sources hosted in PTC Integrity, a software system lifecycle management and application lifecycle management platform developed by PTC.
For more details, refer to http://www.ptc.com/products/integrity/.
PTC Integrity has the following options:
Server Hostname (hostname, mandatory) Specify the name of the Integrity server. This value is passed to the command line using the parameter --hostname.
Port (port) Specify the port used to connect to the Integrity server. This value is passed to the command line using the parameter --port.
Project (project) Specify the name of the project containing the sources to be analysed. This value is passed to the command line using the --project parameter.
Revision (revision) Specify the revision number for the sources to be analysed. This value is passed to the command line using the --projectRevision parameter.
Scope (scope, default: name:*.c,name:*.h) Specifies the scope (filter) for the Integrity sandbox extraction. This value is passed to the command line using the --scope parameter.
Authentication (useAccountCredentials, default: NO_CREDENTIALS)
Username (username)
Password (password)
The full command line syntax for PTC Integrity is:
-r "type=MKS,hostname=[text],port=[text],project=[text],revision=[text],scope=[text],useAccountCredentials=[multipleChoice],username=[text],password=[password]"
Team Foundation Server (TFS) is a Microsoft product which provides source code management, reporting, requirements management, project management, automated builds, lab management, testing and release management capabilities. This Repository Connector provides access to the sources hosted in TFS's revision control system.
For more details, refer to https://www.visualstudio.com/products/tfs-overview-vs.
The TFS repository connector (Team Foundation Server - Team Foundation Version Control) assumes that a TFS command-line client (Visual Studio Client or Team Explorer Everywhere) is installed on the Squore server and fully functional. The configuration of this client must be set up in the tfs_conf.tcl file. The repository connector form must be filled according to the TFS standard (eg. the Project Path must begin with the '$' character...). Note that this repository connector works with a temporary workspace that is deleted at the end of the analysis. The followign is a list of commands used by the TFS Repository Connector to retrieve sources:
tf workspace [/login:$username,$password] /server:$url /noprompt /new $workspace
tf workfold [/login:$username,$password] /map $path $tempFolder /workspace:$workspace
tf get [/login:$username,$password] /version:$version /recursive /force $path
tf workspace [/login:$username,$password] /delete $workspace
tf view [/login:$username,$password] /server:$artefactPath
TFS has the following options:
URL (URL, mandatory) Specify the URL of the TFS server.
Path (path, mandatory) Path the project to be analysed. This path usually starts with $.
Version (version) Specify the version of the sources to analyse. This field accepts a changeset number, date, or label. Leave the field empty to analyse the most recent revision of the sources.
Authentication (useAccountCredentials, default: NO_CREDENTIALS)
Username: (username)
Password (password)
The full command line syntax for TFS is:
-r "type=TFS,URL=[text],path=[text],version=[text],useAccountCredentials=[multipleChoice],username=[text],password=[password]"
Rational Synergy is a software tool that provides software configuration management (SCM) capabilities for all artifacts related to software development including source code, documents and images as well as the final built software executable and libraries.
For more details, refer to http://www-03.ibm.com/software/products/en/ratisyne.
The Synergy repository connector assumes that a project already exists and that the Synergy user defined has the right to access it. The host where the analysis takes place must have Synergy installed and fully functional. Note that, as stated in IBM's documentation on http://pic.dhe.ibm.com/infocenter/synhelp/v7m2r0/index.jsp?topic=%2Fcom.ibm.rational.synergy.manage.doc%2Ftopics%2Fsc_t_h_start_cli_session.html, using credentials is only supported on Windows, so use the NO_CREDENTIALS option when Synergy runs on a Linux host. The following is a list of commands used by the Synergy Repository Connector to retrieve sources:
ccm start -d $db -nogui -m -q [-s $server] [-pw $password] [-n $user -pw password]
ccm prop "$path@$projectSpec"
ccm copy_to_file_system -path $tempFolder -recurse $projectSpec
ccm cat "$artefactPath@$projectSpec"
ccm stop
Synergy has the following options:
Server URL (server) Specify the Synergy server URL, if using a distant server. If specified, the value is used by the Synergy client via the -s parameter.
Database (db, mandatory) Specify the database path to analyse the sources it contains.
Project Specification (projectSpec, mandatory) Specify the project specification for the analysis. Source code contained in this project specification will be analysed recursively.
Subfolder (subFolder) Specify a subfolder name if you want to restrict the scope of the analysis to a particular folder.
Authentication: (useAccountCredentials, default: NO_CREDENTIALS) Note that, as stated in IBM's documentation, using credentials is only supported on Windows. The "No Credentials" must be used option when Synergy runs on a Linux host. For more information, consult http://pic.dhe.ibm.com/infocenter/synhelp/v7m2r0/index.jsp?topic=%2Fcom.ibm.rational.synergy.manage.doc%2Ftopics%2Fsc_t_h_start_cli_session.html.
(name)
Password (password)
The full command line syntax for Synergy is:
-r "type=Synergy,server=[text],db=[text],projectSpec=[text],subFolder=[text],useAccountCredentials=[multipleChoice],name=[text],password=[password]"
Connecting to an SVN server is supported using svn over ssh, or by using a username and password. The command run by the server to extract the source code is svn export --force --non-interactive $url.
For more details, refer to https://subversion.apache.org/.
The following is a list of commands used by the SVN Repository Connector to retrieve sources (you can edit the common command base or the path to the executable in <SQUORE_HOME>/configuration/repositoryConnectors/SVN/svn_conf.tcl if needed):
svn info --xml --non-interactive --trust-server-cert --no-auth-cache [--username $username] [--password $password] [-r $revision] $url
svn export --force --non-interactive --trust-server-cert --no-auth-cache [--username $username] [--password $password] [-r $revision] $url
SVN has the following options:
URL (url, mandatory) Specify the URL of the SVN repository to export and analyse. The following protocols are supported: svn://, svn+ssh://, http://, https://.
Revision (rev) Specify a revision number in this field, or leave it blank to analyse files at the HEAD revision.
Authentication (useAccountCredentials, default: NO_CREDENTIALS)
Username (username)
Password (password)
The full command line syntax for SVN is:
-r "type=SVN,url=[text],rev=[text],useAccountCredentials=[multipleChoice],username=[text],password=[password]"
Squore allows using multiple repositories in the same analysis. If your project consists of some code that is spread over two distinct servers or SVN repositories, you can set up your project so that it includes both locations in the project analysis. This is done by labelling each source code node before specifying parameters, as shown below
-r "type=FROMPATH,alias=Node1,path=/home/projects/client-code"
-r "type=FROMPATH,alias=Node2,path=/home/projects/common/lib"
Note that only alpha-numeric characters are allowed to be used as labels. In the artefact tree, each node will appear as a separate top-level folder with the label provided at project creation.
Using multiple nodes, you can also analyse sources using different Repository Connectors in the same analysis:
-r "type=FROMPATH,alias=Node1,path=/home/projects/common-config"
-r "type=SVN,alias=Node2,url=svn+ssh://10.10.0.1/var/svn/project/src,rev=HEAD"
Input files for Squore's Data Providers, like source code, can be located in your version control system. When this is the case, you need to specify a variable in the input field for the Data Provider instead of an absolute path to the input file.
A Data Provider using an input file extracted from a remote repository
The variable to use varies depending on your scenario:
You have only one node of source code in your project
In this case, the variable to use is $src.
You have more than one node of source code in your project
In this case, you need to tell Squore in which node the input file is located. This is done using a variable that has the same name as the alias you defined for the source code node in the previous step of the wizard. For example, if your nodes are labelled Node1 and Node2 (the default names), then you can refer to them using the $Node1 and $Node2 variables.
When using these variables from the command line on a linux system, the $ symbol must be escaped:
-d "type=PMD,configFile=\$src/pmd_data.xml"
Table of Contents
This chapter describe the Data Providers shipped with Squore and the default parameters that they accept via the Command Line Interface.
AntiC is a part of the jlint static analysis suite and is launched to analyse C and C++ source code and produce findings.
For more details, refer to http://jlint.sourceforge.net/.
On Linux, the antiC executable must be compiled manually before you run it for the first time by running the command:
# cd <SQUORE_HOME>/addons/tools/Antic_auto/bin/ && gcc antic.c -o antic
Automotive Coverage Import: generic import mechanism for coverage results at FUNCTION level
Automotive Coverage Import has the following options:
Enter the CSV file for coverage measures (csv) CSV File shall contain the following (PATH;NAME;TESTED_C1;OBJECT_C1;TESTED_MCC;OBJECT_MCC;TESTED_MCDC;OBJECT_MCDC)
The full command line syntax for Automotive Coverage Import is:
-d "type=Automotive_Coverage,csv=[text]"
BullseyeCoverage is a code coverage analyzer for C++ and C. The coverage report file is used to generate metrics.
For more details, refer to http://www.bullseye.com/.
CPD is an open source tool which generates Copy/Paste metrics. The dectection of duplicated blocks is set to 100 tokens. CPD provides an XML file which can be imported to generate metrics as well as findings.
For more details, refer to http://pmd.sourceforge.net/pmd-5.3.0/usage/cpd-usage.html.
CPD is an open source tool which generates Copy/Paste metrics. The dectection of duplicated blocks is set to 100 tokens. CPD provides an XML file which can be imported to generate metrics as well as findings.
For more details, refer to http://pmd.sourceforge.net/pmd-5.3.0/usage/cpd-usage.html.
This data provider requires an extra download to extract the CPD binary in <SQUORE_HOME>/addons/tools/CPD_auto/. For more information, refer to the Installation and Administration Guide's Third-Party Plugins and Applications section.
CPD (plugin) has the following options:
Run CPD during the analysis. (cpd_auto, default: true) Check this box if you want to run CPD during the analysis in order to generate metrics and findings for the source code specified.
The full command line syntax for CPD (plugin) is:
-d "type=CPD_auto,cpd_auto=[booleanChoice]"
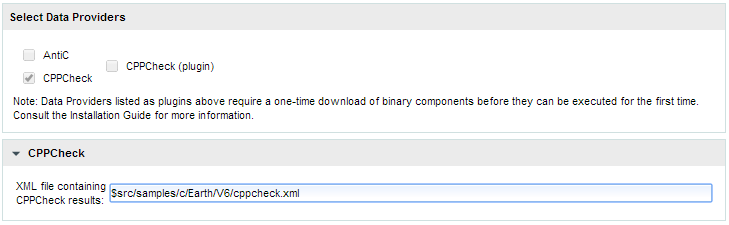
Cppcheck is a static analysis tool for C/C++ applications. The tool provides an XML output which can be imported to generate findings.
For more details, refer to http://cppcheck.sourceforge.net/.
Cppcheck is a static analysis tool for C/C++ applications. The tool provides an XML output which can be imported to generate findings.
For more details, refer to http://cppcheck.sourceforge.net/.
On Windows, this data provider requires an extra download to extract the Cppcheck binary in <SQUORE_HOME>/addons/tools/CPPCheck_auto/. On Linux, you can install the cppcheck application anywhere you want. The path to the Cppcheck binary for Linux can be configured in config.tcl. For more information, refer to the Installation and Administration Guide's Third-Party Plugins and Applications section.
Cppcheck (plugin) has the following options:
Source code folder (dir) Specify the folder containing the source files to analyse. If you want to analyse all of source repositories specified for the project, leave this field empty.
The full command line syntax for Cppcheck (plugin) is:
-d "type=CPPCheck_auto,dir=[text]"
Parasoft C/C++test is an integrated solution for automating a broad range of best practices proven to improve software development team productivity and software quality for C and C++. The tool provides an XML output file which can be imported to generate findings and metrics.
For more details, refer to http://www.parasoft.com/product/cpptest/.
Cantata is Test Coverage tools. It provides an XML output which can be imported to generate coverage metrics at function level.
For more details, refer to http://www.qa-systems.com/cantata.html.
CheckStyle is an open source tool that verifies that Java applications adhere to certain coding standards. It produces an XML file which can be imported to generate findings.
For more details, refer to http://checkstyle.sourceforge.net/.
CheckStyle is an open source tool that verifies that Java applications adhere to certain coding standards. It produces an XML file which can be imported to generate findings.
For more details, refer to http://checkstyle.sourceforge.net/.
This data provider requires an extra download to extract the CheckStyle binary in <SQUORE_HOME>/addons/tools/CheckStyle_auto/. For more information, refer to the Installation and Administration Guide's Third-Party Plugins and Applications section.
CheckStyle (plugin) has the following options:
Configuration file (configFile) A Checkstyle configuration specifies which modules to plug in and apply to Java source files. Modules are structured in a tree whose root is the Checker module. Specify the name of the configuration file only, and the data provider will try to find it in the CheckStyle_auto folder of your custom configuration. If no custom configuration file is found, a default configuration will be used.
Xmx (xmx, default: 1024m) Maximum amount of memory allocated to the java process launching Checkstyle.
The full command line syntax for CheckStyle (plugin) is:
-d "type=CheckStyle_auto,configFile=[text],xmx=[text]"
CheckStyle is an open source tool that verifies that Java applications adhere to certain coding standards. It produces an XML file which can be imported to generate findings.
For more details, refer to http://checkstyle.sourceforge.net/.
This data provider requires an extra download to extract the CheckStyle binary in <SQUORE_HOME>/addons/tools/CheckStyle_auto_for_SQALE/. For more information, refer to the Installation and Administration Guide's Third-Party Plugins and Applications section.
CheckStyle for SQALE (plugin) has the following options:
Configuration file (configFile, default: config_checkstyle_for_sqale.xml) A Checkstyle configuration specifies which modules to plug in and apply to Java source files. Modules are structured in a tree whose root is the Checker module. Specify the name of the configuration file only, and the data provider will try to find it in the CheckStyle_auto folder of your custom configuration. If no custom configuration file is found, a default configuration will be used.
Xmx (xmx, default: 1024m) Maximum amount of memory allocated to the java process launching Checkstyle.
The full command line syntax for CheckStyle for SQALE (plugin) is:
-d "type=CheckStyle_auto_for_SQALE,configFile=[text],xmx=[text]"
Cobertura is a free code coverage library for Java. Its XML report file can be imported to generate code coverage metrics for your Java project.
For more details, refer to http://cobertura.github.io/cobertura/.
Codesonar is a static analysis tool for C and C++ code designed for zero tolerance defect environments. It provides an XML output file which is imported to generate findings.
For more details, refer to http://www.grammatech.com/codesonar.
Compiler Warning impor allows to import information from compiler
For more details, refer to Compiler.
Coverity is a static analysis tool for C, C++, Java and C#. It provides an XML output which can be imported to generate findings.
For more details, refer to http://www.coverity.com/.
Findbugs is an open source tool that looks for bugs in Java code. It produces an XML result file which can be imported to generate findings.
For more details, refer to http://findbugs.sourceforge.net/.
Findbugs is an open source tool that looks for bugs in Java code. It produces an XML result file which can be imported to generate findings. Note that the data provider requires an extra download to extract the Findbugs binary in [INSTALLDIR]/addons/tools/Findbugs_auto/. You are free to use FindBugs 3.0 or FindBugs 2.0 depending on what your standard is. For more information, refer to the Installation and Administration Manual's "Third-Party Plugins and Applications" section.
For more details, refer to http://findbugs.sourceforge.net/.
This data provider requires an extra download to extract the Findbugs binary in <SQUORE_HOME>/addons/tools/Findbugs_auto/. For more information, refer to the Installation and Administration Guide's Third-Party Plugins and Applications section.
FindBugs (plugin) has the following options:
Classes (class_dir, mandatory) Specify the folders and/or jar files for your project in classpath format, or point to a text file that contains one folder or jar file per line.
Auxiliary Class path (auxiliarypath) Specify a list of folders and/or jars in classpath format, or specify the path to a text file that contains one folder or jar per line. This information will be passed to FindBugs via the -auxclasspath parameter.
Memory Allocation (xmx, default: 1024m) Maximum amount of memory allocated to the java process launching FindBugs.
The full command line syntax for FindBugs (plugin) is:
-d "type=Findbugs_auto,class_dir=[text],auxiliarypath=[text],xmx=[text]"
FxCop is an application that analyzes managed code assemblies (code that targets the .NET Framework common language runtime) and reports information about the assemblies, such as possible design, localization, performance, and security improvements. FxCop generates an XML results file which can be imported to generate findings.
For more details, refer to https://msdn.microsoft.com/en-us/library/bb429476(v=vs.80).aspx.
GCov is a Code coverage program for C application. GCov generates raw text files which can be imported to generate metrics.
For more details, refer to http://gcc.gnu.org/onlinedocs/gcc/Gcov.html.
GCov has the following options:
Directory containing results files (dir) Specify the path of the root directory containing the GCov results files.
Results files extension (ext, default: *.c.gcov) Specify the file extension of GCov results files.
The full command line syntax for GCov is:
-d "type=GCov,dir=[text],ext=[text]"
GNATcheck is an extensible rule-based tool that allows developers to completely define a coding standard. The results are output to a log file that can be imported to generate findings.
For more details, refer to http://www.adacore.com/gnatpro/toolsuite/gnatcheck/.
GNATCompiler is a free-software compiler for the Ada programming language which forms part of the GNU Compiler Collection. It supports all versions of the language, i.e. Ada 2012, Ada 2005, Ada 95 and Ada 83. It creates a log file that can be imported to generate findings.
For more details, refer to http://www.adacore.com/gnatpro/toolsuite/compilation/.
JUnit is a simple framework to write repeatable tests. It is an instance of the xUnit architecture for unit testing frameworks. JUnit XML result files are imported to generate findings and the total number of tests is made available as a measure.
For more details, refer to http://junit.org/.
JUnit has the following options:
Results folder (resultDir, mandatory) Specify the path to the folder containing the JUnit results. The data provider will parse all available XML files. Note that the minimum support version of JUnit is 4.10.
The full command line syntax for JUnit is:
-d "type=JUnit,resultDir=[text]"
JaCoCo is a free code coverage library for Java. Its XML report file can be imported to generate code coverage metrics for your Java project.
For more details, refer to http://www.eclemma.org/jacoco/.
JaCoCo has the following options:
XML report (xml, mandatory) Specify the path to the XML report generated by JaCoCo. Note that the folder containing the XML file must also contain JaCoCo's report DTD file, available from http://www.eclemma.org/jacoco/trunk/coverage/report.dtd. XML report files are supported from version 0.6.5.
The full command line syntax for JaCoCo is:
-d "type=Jacoco,xml=[text]"
Klocwork is a static analysis tool. Its XML result file can be imported to generate findings.
For more details, refer to http://www.klocwork.com.
The Logiscope suite allows the evaluation of source code quality in order to reduce maintenance cost, error correction or test effort. It can be applied to verify C, C++, Java and Ada languages and produces a CSV results file that can be imported to generate findings.
For more details, refer to http://www.kalimetrix.com/en/logiscope.
NCover is a Code coverage program for C# application. NCover generates an XML results file which can be imported to generate metrics.
For more details, refer to http://www.ncover.com/.
This data provider reads an Oracle compiler log file and imports the warnings as findings. Findings extracted from the log file are filtered using a prefix parameter.
For more details, refer to http://www.oracle.com/.
Oracle PLSQL compiler Warning checker has the following options:
Compiler log file (log)
Prefixes (prefix) Prefixes and their replacements are specified as pairs using the syntax [prefix1|node1;prefix2|node2]. Leave this field empty to disable filtering. The parsing algorithm looks for lines fitting this pattern: [PATH;SCHEMA;ARTE_ID;ARTE_TYPE;LINE;COL;SEVERITY_TYPE;WARNING_ID;SEVERITY_ID;DESCR] and keeps lines where [PATH] begins with one of the input prefixes. In each kept [PATH], [prefix] is replaced by [node]. If [node] is empty, [prefix] is removed from [PATH], but not replaced. Some valid syntaxes for prefix: One prefix to remove: svn://aaaa:12345/valid/path/from/svn One prefix to replace: svn://aaaa:12345/valid/path/from/svn|node1 Two prefixes to remove: svn://aaaa:12345/valid/path/from/svn|;svn://bbbb:12345/valid/path/from/other_svn| Two prefixes to remove: svn://aaaa:12345/valid/path/from/svn;svn://bbbb:12345/valid/path/from/other_svn Two prefixes to replace: svn://aaaa:12345/valid/path/from/svn|node1;svn://bbbb:12345/valid/path/from/other_svn|node2
The full command line syntax for Oracle PLSQL compiler Warning checker is:
-d "type=Oracle_PLSQLCompiler,log=[text],prefix=[text]"
PC-lint is a static code analyser. The PC-lint data provider reads an PC-lint log file and imports MISRA violations as findings.
For more details, refer to http://www.gimpel.com/html/pcl.htm.
MISRA Rule Checking using PC-lint has the following options:
Log file folder (logDir) Specify the path to the folder containing the PC-lint log files.
Extensions to exclude (excludedExtensions, default: .h;.H) Specify the file extensions to exclude from the reported violations.
The full command line syntax for MISRA Rule Checking using PC-lint is:
-d "type=PC_Lint_MISRA,logDir=[text],excludedExtensions=[text]"
PMD scans Java source code and looks for potential problems like possible bugs, dead code, sub-optimal code, overcomplicated expressions, duplicate code... The XML results file it generates is read to create findings.
For more details, refer to http://pmd.sourceforge.net.
PMD scans Java source code and looks for potential problems like possible bugs, dead code, sub-optimal code, overcomplicated expressions, duplicate code ... The XML results file it generates is read to create findings.
For more details, refer to http://pmd.sourceforge.net.
This data provider requires an extra download to extract the PMD binary in <SQUORE_HOME>/addons/tools/PMD_auto/. For more information, refer to the Installation and Administration Guide's Third-Party Plugins and Applications section.
PMD (plugin) has the following options:
Ruleset file (configFile) Specify the path to the PMD XML ruleset you want to use for this analysis. If you do not specify a ruleset, the default one from INSTALLDIR/addons/tools/PMD_autow ill be used.
The full command line syntax for PMD (plugin) is:
-d "type=PMD_auto,configFile=[text]"
Polyspace is a static analysis tool which includes a MISRA checker. It produces an XML output which can be imported to generate findings. Polyspace Verifier detects RTE (RunTime Error) such as Division by zero, Illegal Deferencement Pointer, Out of bound array index... Such information is turned into statistical measures at function level. Number of Red (justified/non-justified), Number of Grey (justified/non-justified), Number of Orange (justified/non-justified), Number of Green.
For more details, refer to http://www.mathworks.com/products/polyspace/index.html.
MISRA Rule Checking using Polyspace has the following options:
Results folder (resultDir) Specify the folder containing the Polyspace results. The data provider will parse all sub-folders searching for XML result files called "MISRA-CPP-report.xml" or "MISRA-C-report.xml" located in a "Polyspace-Doc" folder and aggregate results.
Unit by Unit (unitByUnit, default: true) Check this box if the Polyspace verification was run unit by unit.
The full command line syntax for MISRA Rule Checking using Polyspace is:
-d "type=Polyspace_MISRA,resultDir=[text],unitByUnit=[booleanChoice]"
Polyspace is a static analysis tool which includes a MISRA checker. It produces an binary output format which can be imported to generate findings. Polyspace Verifier detects RTE (RunTime Error) such as Division by zero, Illegal Deferencement Pointer, Out of bound array index... Such information is turned into statistical measures at function level. Number of Red (justified/non-justified), Number of Grey (justified/non-justified), Number of Orange (justified/non-justified), Number of Green. Note that this data provider requires an extra download to extract the Polyspace Export binary in [INSTALLDIR]/addons/tools/Polyspace_RTE/. For more information, refer to the Installation and Administration Manual's "Third-Party Plugins and Applications" section.
For more details, refer to http://www.mathworks.com/products/polyspace/index.html.
This data provider requires an extra download to extract the Polyspace Export binary in <SQUORE_HOME>/addons/tools/Polyspace_RTE. For more information, refer to the Installation and Administration Guide's Third-Party Plugins and Applications section.
Polyspace (plugin) has the following options:
Results folder (resultDir) Specify the folder containing the Polyspace results. The data provider will run the polyspace-export binary on all sub-folders to export results to XML and aggregate them.
Unit by Unit (unitByUnit, default: true) Check this box if the Polyspace verification was run unit by unit.
The full command line syntax for Polyspace (plugin) is:
-d "type=Polyspace_RTE,resultDir=[text],unitByUnit=[booleanChoice]"
QAC identifies problems in C source code caused by language usage that is dangerous, overly complex, non-portable, difficult to maintain, or simply diverges from coding standards. Its CSV results file can be imported to generate findings.
For more details, refer to http://www.phaedsys.com/principals/programmingresearch/pr-qac.html.
MISRA Rule Checking with QAC has the following options:
Code Folder (logDir) Specify the path to the folder that contains the annotated files to process. For the findings to be successfully linked to their corresponding artefact, several requirements have to be met: - The annotated file name should be [Original source file name].txt e.g. The annotation of file "controller.c" should be called "controller.c.txt" - The annotated file location in the annotated directory should match the associated source file location in the source directory. e.g. The annotation for source file "[SOURCE_DIR]/subDir1/subDir2/controller.c" should be located in "[ANNOTATIONS_DIR]/subDir1/subDir2/controller.c.txt" The previous comment suggests that the source and annotated directory are different. However, these directories can of course be identical, which ensures that locations of source and annotated files are the same.
Extension (ext, default: html) Specify the extension used by QAC to create annotated files.
The full command line syntax for MISRA Rule Checking with QAC is:
-d "type=QAC_MISRA,logDir=[text],ext=[text]"
Rational Test RealTime is a cross-platform solution for component testing and runtime analysis of embedded software. Metrics are generated from its CSV results file.
For more details, refer to http://www-01.ibm.com/software/awdtools/test/realtime/.
Unit Test Code Coverage from Rational Test RealTime has the following options:
.xrd folder (logDir) Specify the path to the folder containing the .xrd files generated by RTRT.
Excluded file extensions (excludedExtensions, default: .h;.H)
The full command line syntax for Unit Test Code Coverage from Rational Test RealTime is:
-d "type=RTRT,logDir=[text],excludedExtensions=[text]"
RIF/ReqIF (Requirements Interchange Format) is an XML file format that can be used to exchange requirements, along with its associated metadata, between software tools from different vendors.
For more details, refer to http://www.omg.org/spec/ReqIF/.
ReqIF has the following options:
ReqIF file (file) Specify the path to the XML ReqIF file. Note that the XML file will be validated using the schema available from http://www.omg.org/spec/ReqIF/20110401/reqif.xsd.
Spec Object Type (objType, default: _AUTO_) Specify the SPEC_OBJECT_TYPE property LONG-NAME to be used to process the ReqIf file. Using the _AUTO_ value will let the Data Provider extract the value fro the ReqIf file, and assumes that there is only one such definition.
The full command line syntax for ReqIF is:
-d "type=ReqIf,file=[text],objType=[text]"
SQL Code Guard is a free solution for SQL Server that provides fast and comprehensive static analysis for T-Sql code, shows code complexity and objects dependencies.
For more details, refer to http://www.sqlcodeguard.com.
Squan Sources provides basic-level analysis of your source code.
For more details, refer to http://www.squoring.com.
The analyser can output info and warning messages in the build logs. Recent additions to those logs include better handling of structures in C code, which will produce these messages:
[Analyzer] Unknown syntax declaration for function XXXXX at line yyy to indicate that we whould have found a function but, probably due to preprocessing directives, we are not able to parse it.
[Analyzer] Unbalanced () blocks found in the file. Probably due to preprocessing directives, parenthesis in the file are not well balanced.
[Analyzer] Unbalanced {} blocks found in the file. Probably due to preprocessing directives, curly brackets in the file are not well balanced.
You can specify the languages for your source code by passing pairs of language and extensions to the languages paramater. For example, a project mixing php and javascript files can be analysed with:
--dp "type=SQuORE,languages=php:.php;javascript:.js,.JS"
Squan Sources has the following options:
Languages (languages) Check the boxes for the languages used in the specified source repositories. Adjust the list of file extensions as necessary. Note that two languages cannot use the same file extension, and that the list of extensions is case-sensitive. Tip: Leave all the boxes unchecked and Squan Sources will auto-detect the language parser to use.
Force full analysis (rebuild_all, default: false) Analyses are incremental by default. Check this box if you want to force the source code parser to analyse all files instead of only the ones that have changed since the previous analysis. This is useful if you added new rule files or text parsing rules and you want to re-evaluate all files based on your modifications.
Generate control graphs (genCG, default: true) This option allows generating a control graph for every function in your code. The control graph is visible in the dashboard of the function when the analysis completes.
Use qualified names (qualified, default: false) Note: This option cannot be modified in subsequent runs after you create the first version of your project.
Limit analysis depth (depth, default: false) Use this option to limit the depth of the analysis to file-level only. This means that Squan Sources will not create any class or function artefacts for your project.
Add a 'Source Code' node (scnode, default: false) Using this options groups all source nodes under a common source code node instead of directly under the APPLICATION node. This is useful if other data providers group non-code artefacts like tests or requirements together under their own top-level node. This option can only be set when you create a new project and cannot be modified when creating a new version of your project.
'Source Code' node label (scnode_name, default: Source Code) Specify a custom label for your main source code node. Note: this option is not modifiable. It only applies to projects where you use the "Add a 'Source Code' node" option. When left blank, it defaults to "Source Code".
Compact folders (compact_folder, default: true) When using this option, folders with only one son are aggregates together. This avoids creating many unnecessary levels in the artefact tree to get to the first level of files in your project. This option cannot be changed after you have created the first version of your project.
Content exclusion via regexp (pattern) Specify a PERL regular expression to automatically exclude files from the analysis if their contents match the regular expression. Leave this field empty to disable content-based file exclusion.
File Filtering (files_choice, default: Exclude) Specify a pattern and an action to take for matching file names. Leave the pattern empty to disable file filtering.
pattern (pattern_files) Use a shell-like wildcard e.g. '*-test.c'. * Matches any sequence of characters in string, including a null string. ? Matches any single character in string. [chars] Matches any character in the set given by chars. If a sequence of the form x-y appears in chars, then any character between x and y, inclusive, will match. On Windows, this is used with the -nocase option, meaning that the end points of the range are converted to lower case first. Whereas {[A-z]} matches '_' when matching case-sensitively ('_' falls between the 'Z' and 'a'), with -nocase this is considered like {[A-Za-z]}. \x Matches the single character x. This provides a way of avoiding the special interpretation of the characters *?[] in pattern. Tip: Use ; to separate multiple patterns.
Folder Filtering (dir_choice, default: Exclude) Specify a pattern and an action to take for matching folder names. Leave the pattern empty to disable folder filtering.
pattern (pattern_dir) Use a shell-like wildcard e.g. 'Test_*'. * Matches any sequence of characters in string, including a null string. ? Matches any single character in string. [chars] Matches any character in the set given by chars. If a sequence of the form x-y appears in chars, then any character between x and y, inclusive, will match. On Windows, this is used with the -nocase option, meaning that the end points of the range are converted to lower case first. Whereas {[A-z]} matches '_' when matching case-sensitively ('_' falls between the 'Z' and 'a'), with -nocase this is considered like {[A-Za-z]}. \x Matches the single character x. This provides a way of avoiding the special interpretation of the characters *?[] in pattern. Tip: Use ; to separate multiple patterns.
Detect algorithmic cloning (clAlg, default: true) When checking this box, Squan Sources launches a cloning detection tool capable of finding algorithmic cloning in your code.
Detect text cloning (clTxt, default: true) When checking this box, Squan Sources launches a cloning detection tool capable of finding text duplication in your code.
Backwards-compatible cloning (clBw, default: false) When checking this box, the cloning detection tool is run in a way that produces metrics that are backwards-compatible with earlier versions of this product (2014-A): exact matching is used for algorithmic cloning and a 5% margin is used for text duplication. This legacy behaviour should only be used if you are using an old configuration that was developed before 2014-B.
Cloning fault ratio (clFR, default: 0.1) This threshold defines how much cloning between two artefacts is necessary for them to be considered as clones by the cloning detection tool. For example, a fault ratio of 0.1 means that two artefacts are considered clones if less than 10% of their contents differ. Note that this option is ignored if you are using backwards-compatible cloning.
Detect Open Source cloning (deprecated) (clOS, default: false) This option is no longer supported and should not be used anymore.
Compute Textual stability (genTs, default: true) This option allows keeping track of the stability of the code analysed for each version. The computed stability is available on the dashboard as a metric called and can be interpreted as 0% meaning completely changed and 100% meaning not changed at all.
Compute Algorithmic stability (genAs, default: true) This option allows keeping track of the stability of the code analysed for each version. The computed stability is available on the dashboard as a metric called Stability Index (SI) and can be interpreted as 0% meaning completely changed and 100% meaning not changed at all.
Detect artefact renaming (clRen, default: true) This option allows Squan Sources to detect artefacts that have been moved since the previous version, ensuring that the stability metrics of the previous artefact are passed to the new one. This is typically useful if you have moved a file to a different folder in your source tree and do not want to lose the previous metrics generated for this file. If you do not use this option, moved artefacts will be considered as new artefacts.
Additional parameters (additional_param) These additional parameters can be used to pass instructions to external processes started by this data provider. This value is generally left empty in most cases.
The full command line syntax for Squan Sources is:
-d "type=SQuORE,languages=[multipleChoice],rebuild_all=[booleanChoice],genCG=[booleanChoice],qualified=[booleanChoice],depth=[booleanChoice],scnode=[booleanChoice],scnode_name=[text],compact_folder=[booleanChoice],pattern=[text],files_choice=[multipleChoice],pattern_files=[text],dir_choice=[multipleChoice],pattern_dir=[text],clAlg=[booleanChoice],clTxt=[booleanChoice],clBw=[booleanChoice],clFR=[text],clOS=[booleanChoice],genTs=[booleanChoice],genAs=[booleanChoice],clRen=[booleanChoice],additional_param=[text]"
Squore Import is a data provider used to import the results of another data provider analysis. It is generally only used for debugging purposes.
For more details, refer to http://www.squoring.com.
Squore Virtual Project is a data provider that can use the output of several projects to compile metrics in a meta-project composed of the import sub-projects.
For more details, refer to http://www.squoring.com.
Squore Virtual Project has the following options:
Paths to output.xml files (output) Specify the paths to all the output.xml files you want to include in the virtual project. Separate paths using ';'.
The full command line syntax for Squore Virtual Project is:
-d "type=SQuOREVirtualProject,output=[text]"
StyleCop is a C# code analysis tool. Its XML output is imported to generate findings.
For more details, refer to https://stylecop.codeplex.com/.
StyleCop is a C# code analysis tool. Its XML output is imported to generate findings.
For more details, refer to https://stylecop.codeplex.com/.
Note that this data provider is not supported on Linux. On windows, this data provider requires an extra download to extract the StyleCop binary in <SQUORE_HOME>/addons/tools/StyleCop_auto/. For more information, refer to the Installation and Administration Guide's Third-Party Plugins and Applications section.
Tessy is a tool automating module/unit testing of embedded software written in dialects of C/C++. Tessy generates an XML results file which can be imported to generate metrics.
For more details, refer to http://www.hitex.com/index.php?id=172.
Tessy has the following options:
Results folder (resultDir) Specify the top folder containing XML result files from Tessy. Note that this data provider will recursively scan sub-folders looking for index.xml files to aggregate results.
The full command line syntax for Tessy is:
-d "type=Tessy,resultDir=[text]"
OSLC-CM allows retrieving information from Change Management systems following the OSLC standard. Metrics and artefacts are created by connecting to the OSLC system and retrieving issues with the specified query.
For more details, refer to http://open-services.net/.
OSLC has the following options:
Change Server (server) Specify the URL of the project you want to query on the OSLC server. Typically the URL will look like this: http://myserver:8600/change/oslc/db/3454a67f-656ddd4348e5/role/User/
Query (query) Specify the query to send to the OSLC server (e.g.: release="9TDE/TDE_00_01_00_00"). It is passed to the request URL via the ?oslc_cm.query= parameter.
Query Properties (properties, default: request_type,problem_number,crstatus,severity,submission_area,functionality,mb_code,professional_line,ir_submitted_time,ir_conclude_time,product_version,release,dc:identifier,dc:type,change:resolver,change:layer,change:est_appl_effort,change:est_ctrl_effort,change:est_sw_effort,change:est_ana_effort,change:effort,change:configuration,change:create_time,change:crstatus,change:origine_type,change:severity) Specify the properties to add to the query. They are passed to the OSLC query URL using the ?oslc_cm.properties= parameter.
Login (login)
Password (password)
The full command line syntax for OSLC is:
-d "type=oslc_cm,server=[text],query=[text],properties=[text],login=[text],password=[password]"
pep8 is a tool to check your Python code against some of the style conventions in PEP 88. Its CSV report file is imported to generate findings.
For more details, refer to https://pypi.python.org/pypi/pep8.
Pylint is a Python source code analyzer which looks for programming errors, helps enforcing a coding standard and sniffs for some code smells (as defined in Martin Fowler's Refactoring book). Pylint results are imported to generate findings for Python code.
For more details, refer to http://www.pylint.org/.
QA-C is a static analysis tool for MISRA checking.
For more details, refer to http://www.programmingresearch.com/static-analysis-software/qac-qacpp-static-analyzers/.
You can create your own Data Providers by using the built-in frameworks included in Squore. Each solution uses a different approach, but the overall goal is to produce one or more CSV files that your Data Provider will send to Squore to associate metrics, findings, textual information or links to artefacts in your project.
This section helps you choose the right framework for your custom Data Provider and covers the basics of creating a custom configuration folder to extend Squore.
The following is a list of the available Data Provider frameworks:
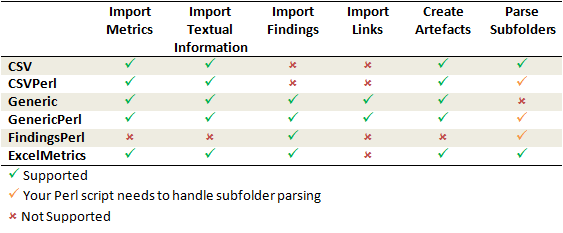
Data Provider frameworks and their capabilities
Csv
The Csv framework is used to import metrics or textual information and attach them to artefacts of type Application or File. While parsing one or more input CSV files, if it finds the same metric for the same artefact several times, it will only use the last occurrence of the metric and ignore the previous ones. Note that the type of artefacts you can attach metrics to is limited to Application and File artefacts. If you are working with File artefacts, you can let the Data Provider create the artefacts by itself if they do not exist already. Refer to the full Csv Reference for more information.
CsvPerl
The CsvPerl framework offers the same functionality as Csv, but instead of dealing with the raw input files directly, it allows you to run a perl script to modify them and produce a CSV file with the expected input format for the Csv framework. Refer to the full CsvPerl Reference for more information.
FindingsPerl
The FindingsPerl framework is used to import findings and attach them to existing artefacts. Optionally, if an artefact cannot be found in your project, the finding can be attached to the root node of the project instead. When launching a Data Provider based on the FindingsPerl framework, a perl script is run first. This perl script is used to generate a CSV file with the expected format which will then be parsed by the framework. Refer to the full FindingsPerl Reference for more information.
Generic
The Generic framework is the most flexible Data Provider framework, since it allows attaching metrics, findings, textual information and links to artefacts. If the artefacts do not exist in your project, they will be created automatically. It takes one or more CSV files as input (one per type of information you want to import) and works with any type of artefact. Refer to the full Generic Reference for more information.
GenericPerl
The GenericPerl framework is an extension of the Generic framework that starts by running a perl script in order to generate the metrics, findings, information and links files. It is useful if you have an input file whose format needs to be converted to match the one expected by the Generic framework, or if you need to retrieve and modify information exported from a web service on your network. Refer to the full GenericPerl Reference for more information.
ExcelMetrics
The ExcelMetrics framework is used to extract information from one or more Microsoft Excel files (.xls or .xslx). A detailed configuration file allows defining how the Excel document should be read and what information should be extracted. This framework allows importing metrics, findings and textual information to existing artefacts or artefacts that will be created by the Data Provider. Refer to the full ExcelMetrics Reference for more information.
The Data Providers that are not based on these frameworks can do a lot more than just import information from CSV files. Here is a non-exhaustive list of what some of them do:
Use XSLT files to transform XML files
Read information from microsoft Word Files
Parse HTML test result files
Query web services
Export data from OSLC systems
Launch external processes
If you are interested in developping Data Providers that go beyond the scope of what is described in the open frameworks, consult Squoring Technologies to learn more about the available training courses in writing Data Providers.
After you choose the framework to extend, you should follow these steps to make your custom Data Provider known to Squore:
Create a new configuration tools folder to save your work in your
custom configuration folder: MyConfiguration/configuration/tools.
Create a new folder for your data provider inside the new tools
folder: CustomDP. This folder needs to contain the following files:
form.xml defines the input parameters for the Data Provider, and the base framework to use
form_en.properties contains the strings displayed in the web interface for this Data Provider
config.tcl contains the parameters for your custom Data Provider that are specific to the selected framework
CustomDP.pl is the perl script that is executed automatically if your custom Data Provider uses one of the *Perl frameworks.
Edit Squore Server's configuration file to register your new configuration path, as described in the Installation and Administration Guide.
Log into the web interface as a Squore administrator and reload the configuration.
Your new Data Provider is now known to Squore and can be triggered in analyses. Note that you may have to modify your Squore configuration to make your wizard aware of the new Data Provider and your model aware of the new metrics it provides. Refer to the relevant sections of the Configuration Guide for more information.
Table of Contents
install — Squore CLI install script
install [
-v
] [
-s
] [
server_url
-u
] [
user
-p
] [
password
options
...]
Installs and configures Squore CLI.
The most common options when installing Squore CLI are -s,
-u and -p, to configure the server URL, user and password
used to connect to the server. These details will be stored on the machine so that the password does not
have to be passed again on the command line for this user account. The -N disables
the automatic synchronisation of the configuration folders with the server at the end of the installation. This can
also be launched manually later on if needed.
-s server_url
(default: http://localhost:8180/SQuORE_Server) The URL of Squore Server that Squore CLI will connect to after installation.
-u user
(default: demo) The username to use to connect to Squore Server.
-p password
(default: demo) The username to use to connect to Squore Server.
-N
Do not synchronise client with server
-v
Turn on verbose mode