Preface
© 2019 Vector Informatik GmbH - All rights reserved - https://www.vector.com/ - This material may not be reproduced, displayed, modified or distributed without the express prior written permission of the copyright holder. Squore is protected by an Interdeposit Certification registered with Agence pour la Protection des Programmes under the Inter Deposit Digital Number IDDN.FR.001.390035.001.S.P.2013.000.10600.
Foreword
This edition of the Installation and Administration Guide was released by Vector Informatik GmbH.
It is part of the user documentation of the Squore software product edited and distributed by Vector Informatik GmbH.
If you are already familiar with Squore, you can navigate this manual by looking for what has changed since the previous version. New functionality is tagged with (new in 19.0) throughout this manual. A summary of the new features described in this manual is available in the entry * What’s New in Squore 19.0? of this manual’s Index.
For information on how to use and configure Squore, the full suite of manuals includes:
User Manual |
Target Audience |
|---|---|
New users before their first installation |
|
IT personnel and Squore administrators |
|
End users, new users wanting to discover Squore features |
|
Continuous Integration Managers |
|
Squore configuration maintainers, Quality Assurance personnel |
|
Eclipse IDE users |
|
End Users, Squore configuration maintainers |
|
End Users, Continuous Integration Managers |
|
End Users, Quality Assurance personnel |
|
You can also use the online help from any page when using the Squore web interface by clicking ? > Help. |
Licence
No part of this publication may be reproduced, transmitted, stored in a retrieval system, nor translated into any human or computer language, in any form or by any means, electronic, mechanical, magnetic, optical, chemical, manual or otherwise, without the prior written permission of the copyright owner, Vector Informatik GmbH. Vector Informatik GmbH reserves the right to revise this publication and to make changes from time to time without obligation to notify authorised users of such changes. Consult Vector Informatik GmbH to determine whether any such changes have been made. The terms and conditions governing the licensing of Vector Informatik GmbH software consist solely of those set forth in the written contracts between Vector Informatik GmbH and its customers. All third-party products are trademarks or registered trademarks of their respective companies.
Warranty
Vector Informatik GmbH makes no warranty of any kind with regard to this material, including, but not limited to, the implied warranties of merchantability and fitness for a particular purpose. Vector Informatik GmbH shall not be liable for errors contained herein nor for incidental or consequential damages in connection with the furnishing, performance or use of this material.
This edition of the Installation and Administration Guide applies to Squore 19.0.17 and to all subsequent releases and modifications until otherwise indicated in new editions.
Responsabilities
Approval of this version of the document and any further updates are the responsibility of Vector Informatik GmbH.
Contacting Vector Informatik GmbH Product Support
If the information provided in this manual is erroneous or inaccurate, or if you encounter problems during your installation, contact Vector Informatik GmbH Product Support: https://support.squoring.com/
You will need a valid customer account to submit a support request. You can create an account on the support website if you do not have one already.
For any communication:
-
support@squoring.com
-
Vector Informatik GmbH Product Support
Squoring Technologies - 76, allées Jean Jaurès / 31000 Toulouse - FRANCE
Getting the Latest Version of this Manual
The version of this manual included in your Squore installation may have been updated. If you would like to check for updated user guides, consult the Vector Informatik GmbH documentation site to consult or download the latest Squore manuals at https://support.squoring.com/documentation/latest. Manuals are constantly updated and published as soon as they are available.
1. Introduction
This document is the Installation and Administration Guide for the Squore software suite.
While we recommend that you read it in its entirety, we divided it up into chapters for an easier introduction to Squore:
-
Jump to The Squore Architecture to learn about the available Squore components.
-
Jump to Installing Squore Server to learn how to deploy Squore in your environment.
-
Jump to Starting and Stopping Squore to learn how to to start Squore Server.
-
Jump to Squore Administration to discover how to maintain a Squore installation.
-
Jump to Integrating Squore on Your Network to understand how to integrate Squore Server within your network.
-
Jump to Sizing Squore Server and Database to evaluate the resources that Squore will require in your environment.
If you want to install Squore Command Line Interface, refer to the Command Line Interface manual.
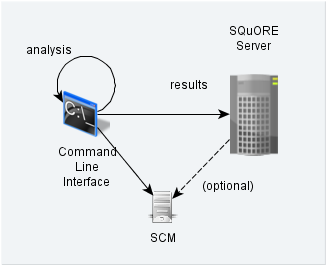
2. The Squore Architecture
The Squore Ecosystem
-
A database and a data folder for storing project data
-
An application server running the main application, the licence server and a distribution of PhantomJS
-
Clients that can interact with the server: a front-end accessible through a Web Browser and a Command Line Interface (Squore CLI) to interact with the server from a console
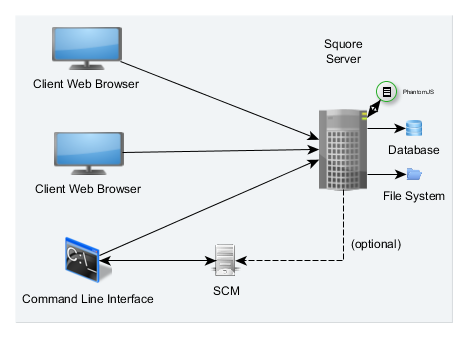
As shown in the schema above, Squore Server can provide analysis results to clients without having access to any source code, in scenarios where the analysis is carried out on a client machine with access to the SCM repository, as is the case in most Continuous Integration environments.
If you are planning to access source code hosted in Subversion, Git, ClearCase, CVS, Integrity, Perforce, TFS or Synergy repositories, a command line client for this repository must be available on the machine where the Squore analysis carried out. For complete information about all installation pre-requisites, consult Installation Prerequisites.
Squore allows analysing source code in the following programming languages: ABAP, Ada, C, C++, MindC, C#, COBOL, Java, JavaScript, Fortran 77, Fortran 90, Objective-C, PHP, PL/SQL, Python, T-SQL, Visual Basic .NET, XAML, Lustre.
Frequently Asked Questions
The following is a list of frequently asked questions when considering a Squore installation.
Is the Squore solution self-hosted? Does it require internet access?
Squore can be installed within your network and does not require internet access.
How does licencing work?
A Squore Server installation contains a licence file which defines how many active users are allowed to use the software. The licence is specific to the server machine’s hardware and will have to be changed for a new one if the installation moves to a new environment.
It is not necessary to identify the machines where clients will run ahead of time.
You can find a complete description of Squore licencing in the Installation and Administration Guide in the section called The Squore Licence Server.
What languages does the source code parser support?
The following languages are available by default: ABAP, Ada, C, C++, MindC, C#, COBOL, Java, JavaScript, Fortran 77, Fortran 90, Objective-C, PHP, PL/SQL, Python, T-SQL, Visual Basic .NET, XAML, Lustre
You can add basic support for additional languages by consulting the Configuration Guide’s Adding More Languages to Squan Sources section.
How can I import results from a tool that is not available in Squore?
If you have results from a tool not currently supported by Squore’s Software Analytics analysis model, our open Data Provider framework lets you write more plugins so you can import your results. Consult the Configuration Guide’s Creating a form.xml for your own Data Providers, Repository Connectors and Export Definitions section for more information.
How often do you release new versions?
Squore releases use the following naming pattern: <major>.<minor>.<patch>.
A new major release of Squore comes out every year with new features and an improved analysis model. One or two minor releases may also come out during the year to bring new functionality without impacting the the analysis model used in the existing major version.
Patch releases for maintained versions are released usually every 4 to 8 weeks to fix issues reported by customers. These patch releases are fully compatible with the major or minor release they bring fixes for. They do not affect your existing analysis results, unless explicitly stated in our release notes. A patch release never contains new features or functionality, only bug fixes.
|
You can keep track of release announcements by following our Release space on the support wiki at https://openwiki.squoring.com. |
How often should I upgrade?
If you install a production server that runs a major or minor release, it is recommended to upgrade regularly to the latest patch release available for this Squore version to benefit from the most recent bug fixes.
Before upgrading to a new minor or major release, we recommend replicating your environment to test the migration. While our releases are always backwards-compatible, some of your analysis results may be impacted by changes and improvements to the analysis model in new major or minor versions.
How easy is it to upgrade my Squore installation?
Our upgrade script or installer takes care of deploying the new version of the software and migrating your existing data and configuration if needed in one simple process.
|
Before upgrading your Squore installation, always check the release notes on our support wiki at https://openwiki.squoring.com. |
Upgrade instructions can be found in the Installation and Administration Guide, in the section called Upgrading from a Previous Version.
What documentation is available?
A list of all existing user manuals and their target audience is available in the Preface.
Online help is also available on every page of the Squore web interface.
If you are new to Squore, you should probably start with the Installation and Administration Guide to install Squore and move on to Getting Started Guide to discover all the features that Squore has to offer.
What information does your dashboard show?
The main page of the web interface is the Explorer, which consists of tabs showing the following information:
-
Dashboard: shows the score card and displays data on charts. Depending on your role in the project, you may have access to different dashboards.
-
Action Items: displays the action plan computed by the Decision Model to improve the quality of your project
-
Highlights: displays flat lists of artefacts that match conditions defined in each highlight definition
-
Findings: displays the list of violations in the project
-
Reports: offers a selection of reports and data exports in various output formats
-
Forms: displays a list of project attributes that can be modified after an analysis
-
Indicators: lists the key performance indicators and their associated performance levels computed for the current artefact
-
Measures: lists the metrics and their computed values for the current artefact
-
Comments: displays comments and discussion threads started about the current artefact and its descendants
|
An artefact is a component of your project, to which Squore attaches measures, indicators, textual information and findings. Each artefact is rated by the analysis model, and can consist of several sub-artefacts. When analysing source code, the smallest artefact created by the source code parser is usually a function artefact, which is a child of a class artefact, which is itself a child of a file artefact. |
To learn more about the Explorer, consult the Getting Started Guide or use the online help directly from the web interface.
Why are there three trees in the web interface?
Squore uses a triple drill-down navigation. Each tree in the web interface allows you to access different information:
-
The Project Portfolios list all projects and versions, grouped by analysis model and group.
-
The Artefact Tree displays all the artefacts of your project. Clicking an artefact updates the Explorer to display the information about the selected artefact, and its descendants where applicable.
-
The Indicator Tree displays details about how the rating for the currently selected artefact is computed. You can click any metric in the tree to see how it is computed, and how it has evolved since the previous analyses of your project.
How are artefacts rated?
The Software Analytics analysis model is the result of Vector Informatik GmbH’s years of experience in the field of software quality and provides the best rating for your software development or system engineering projects. Squore aggregates metrics from a source code parser, various code analysis tools, requirement and test management systems, bugtrackers and version control systems to provide you with an impartial assessment of the quality and progress of your projects through standardised dashboards and reports.
The analysis model is highly customisable so it can adapt to your process and the tools you use in-house.
Your project is broken down into a hierarchy of artefacts of different types, which are evaluated using base measures that are aggregated into key performance indicators. The rating is computed differently for each type of artefact so that all aspects of your project weigh in appropriately overall for the entire project.
Does Squore provide an API?
A REST API is available. You can find the full API documentation here.
How do I ensure secure communication between a Squore server and its clients?
You should enable and configure SSL on your server. Follow the Installation and Administration Guide’s instructions for securing your traffic.
Note that you may also need to import your server’s certificate into your client’s java keystore to run analyses from the command line after securing your server, as explained in the section called Import a private key and a certificate in the Installation and Administration Guide.
Is there a command line interface?
Yes. We provide a command line interface so you can automate analyses and integrate them into your continous integration process. Find out more in the Command Line Interface manual.
Are projects analysed automatically when I change source code?
Squore analyses are triggered by humans via the web interface. A command line interface is available so you automate analyses. The command line syntax is described in the Command Line Interface manual so you can integrate Squore in your continuous integration system or even launch analyses when checking in source code.
Are my analysis results public? Who can view my source code?
Squore uses a role-based access model, so you decide who gets to see your projects and even if they can launch new analyses or view source code. For a full descriptions of the permissions available to users, check out the Getting Started Guide’s User Roles section.
|
Squore administrators have access to the full list of existing projects on a server so they can administer them and resolve issues. |
Why is there a database and a projects folder?
Part of your data is stored in a database and another part in a folder on the Squore Server’s hard drive. Both locations must be backed up together simultaneously to ensure backups can be restored. The database stores the metrics, findings and the artefacts, while the data folder mostly contains information about project configuration and data used to assess the stability and level of cloning in the source code.
What is Squore doing with my source code? Is it stored in the Squore database?
Squore does not store any of your source code in its database. Each artefact in your project only stores a reference to the location of the source code that was analysed. Users with appropriate access may request to view source code referenced in an analysis, which will prompt them for valid credentials for your repository.
During an analysis, source code is retrieved via a SVN checkout or a git clone and stored into a temporary folder that is deleted when it is no longer needed.
In sensitive environments, it is even possible to run analyses locally on a client so that the source code never reaches the Squore Server. See more about Common Deployment Scenarios in the Installation and Administration Guide.
Can I modify the dashboards?
Squore’s dashboards, but also its decision model, highlight and export definitions are fully configurable. The Configuration Guide showcases all the possible customisations so you can modify the default model, or even build a model from scratch.
Instead of modifying the default configuration, Squore lets you override the default model so you can keep your customisations when you upgrade to a new version. For more details about overriding the default configuration, refer to the Configuration Guide’s Customising the Squore Configuration.
What are the known limitations of Squore? How many projects and versions can I create? How many metrics? How many charts?
You do not have to worry about how many metrics and indicators you can add to your model. The Squore database can handle over 1018 metrics.
Dashboards can be extended to include many charts, as they are rendered client-side and should not have a meaningful impact on server performance.
Consult the section called Sizing Squore Server and Database in the Installation and Administration Guide for more information about database and disk usage.
How do I read and analyse server logs?
Squore runs in a WildFly instance which the installer deploys for you. As a result, some WildFly server codes can be quite useful to analyse issues:
-
WFLYSRV0049: WildFly application server startup launched
-
WFLYSRV0010: application (squore-server, squore-license) deployed successfully - message displayed during startup
-
WFLYSRV0025: WildFly application server started successfully
-
WFLYSRV0026: WildFly application server started with errors
-
WFLYSRV0028: application (squore-server, squore-license) stopped successfully - message displayed during shutdown
-
WFLYSRV0050: WildFly application server shutdown successfully
-
<TIMESTAMP> INFO [com.squoring.squore.server.BootstrapBean] (ServerService Thread Pool — \d+) {} Squore started — Squore is available for users to log in
Other useful log messages include:
-
<TIMESTAMP> INFO User <user> authenticated / unauthenticated - for user login/logout actions
-
<TIMESTAMP> INFO {\taskId\} <project> semaphore acquired / released - indicated the beginning / end of a task of a project (analysis or deletion)
-
<TIMESTAMP> WARN {taskId} No data found for this measure : '<MEASURE_ID>' for type '<TYPE>' - indicates that no Data Provider provided a value for a metric, when the analysis model expected one. Cases where this is unexpected should be investigated.
-
<TIMESTAMP> WARN {taskId} Measure '<MEASURE_ID>' that occurs x times is not defined in model - indicates that a Data Provider tried to import a metric that is not defined in the analysis model. Review your analysis model to check if the reported metric should be defined.
-
<TIMESTAMP> WARN {taskId} On measure <MEASURE_ID> (<ARTEFACT_TYPE>) > On computation: <COMPUTATION> > x/y artefacts use the default value - indicates that the default value for was used for a metric. Cases where this is unexpected should be investigated.
-
<TIMESTAMP> WARN ARJUNA012117 - indicates that a timeout happened. This can mean a timeout when clicking a control in the web interface, or a timeout during a project task (analysis or deletion).
|
The server log is only accessible to Squore administrators, but Squore project owners also have access to logs specific to their own projects via the Projects page in the web interface. |
The Squore Database and Data Folder
-
A hierarchy of artefacts defined in a software project (e.g. files, classes, functions)
-
Incremental sets of measures provided by the source code parsers and other data providers, or computed according to an analysis model
Along with the database, a set of data files is maintained on disk to compute information about a project’s history and stability. All of the changes you make to the default Squore configuration are stored in a workspace folder so they are not lost when upgrading. A backup of a Squore installation must always include the database, projects and workspace folders. For more information about backing up your installation, refer to Backing-Up the Squore Data.
|
No source code is stored in the database or the projects folder. Source code checked out from SCMs is located in a temporary folder and can be cleaned up at the end of an analysis. |
The Squore Application Server
-
Aggregating data coming from the various Squore Data Providers
-
Applying an analysis model, producing high-level key performance indicators
-
Exploring and analysing the results using efficient graphical representations and statistical features
The Squore Web Interface
Squore end-users access the server services through a Web interface that enables them to:
-
Create projects from source code or other data types via the Squore Data Providers system.
-
Explore the results of analyses, view the levels of performance of the project artefacts via a user-specific, dynamic dashboard making use of filtering and sorting features
-
Review action plans, highlights and findings of the analysis
-
Export information for reporting purposes
-
Perform administration tasks like managing users and groups or troubleshooting the system
Refer to Browser Compatibility to make sure that your the Squore Web Interface is compatible with your browser
For more details on performance-related requirements when using Squore, please refer to Sizing Squore Server and Database.
Squore CLI
In order to provide compatibility with Continuous Integration systems or run analyses on machines other than Squore Server, Vector Informatik GmbH also delivers Squore CLI (Command Line Interface): a set of APIs used to remotely create and manage Squore projects.
Squore CLI is a Squore package that allows a Squore client to locally analyse project source code files visible to the client machine and send the results to a remote Squore server.
Squore CLI comes as a separate installable package that can be downloaded from Vector Informatik GmbH’s support site: https://support.squoring.com/download_area.php.
For more information about installing Squore CLI, refer to the Command Line Interface manual.
The Squore Licence Server
Squore Server requires a valid licence file in order to allow users to log in and create projects. The licence file information is served by the Squore Licence Server , which reads a licence file called squore-license.p7s located in <SQUORE_HOME>/server/standalone/configuration.
The licence file is delivered by Vector Informatik GmbH and can be copied on the machine hosting Squore Licence Server at installation time or post-installation. In all cases, Squore Server must be restarted to take into account new licence information.
If you run multiple instances of Squore Server , each one can have its own Squore Licence Server and licence file, or you can point them to a common Squore Licence Server.
|
Sharing an instance of Squore Licence Server between multiple Squore Server instances means that each Squore Server instance queries the Squore Licence Server to find out which licence features are available. The Squore Licence Server keeps track of the total number of active users, volume of code analysed and number of projects created on all instances of Squore Server. User-Management is specific to each Squore Server: if a user called "admin" exists on two instances of Squore Server linked to the same Squore Licence Server and both accounts are active, as far as the Squore Licence Server is concerned, two licences are used by two individual users. |
The licence file restricts Squore usage according to the following parameters:
-
A licence file has a start date: it becomes active at a date decided by Vector Informatik GmbH when the licence is issued.
-
A licence file has an end date: it becomes invalid at a date decided by Vector Informatik GmbH when the licence is issued.
-
A licence file is tied to a particular server host-id, a fingerprint of some of the hardware components of a server machine. It can therefore not be used on another machine. If you need to move your licence file to another machine, contact Vector Informatik GmbH to request a new licence. If you need to know your host-id, refer to Obtaining a Licence File.
-
A licence file defines a maximum number of active users. A user is active if any activity has been recorded for their Squore Server account in the past 6 months. Activities include remote project creation, viewing of analysis results, and e-mail notification.
-
A Squore login is meant to be used by an individual user: each Squore user should log into Squore using their own personal account.
-
A licence file defines a maximum number of projects that can be created. After this number is reached, no new projects can be created. Existing projects can continue to be analysed.
-
A licence file defines a maximum number of lines of source code that can be analysed. After this number is reached, no new analyses can be carried out.
-
A licence file defines the ability to generate XML report of analyses, export data in CSV format and generate PDF reports from the web interface.
3. Installing Squore Server
|
Squore Server can only be installed in a folder whose path contains no space, accented and non-Latin letters or special characters. This is a PostgreSQL limitation that must be followed to ensure maximum compatibility, efficiency, and to avoid unexpected behaviour when analysing projects. The application files (product binaries and standard configuration) and the data files (database cluster, analysis data, custom configuration, custom scripts…) must be located in separate folders. By default, application files are deployed in a folder we will refer to in this manual as <SQUORE_HOME> and data files are deployed under a folder we will refer to as <SQUORE_DATA>. |
Refer to the specific options of the setup package for your platform below to know how to specify the desired paths when installing Squore Server.
Installation Prerequisites
Supported Operating Systems
The following is a list of the officially supported and tested operating systems:
-
CentOS 6.7
-
CentOS 7.3
-
Ubuntu 18.04 LTS
-
Windows 10
-
Windows Server 2016
|
A 64-bit version of the OS is required |
The following is a list of the operating systems that are not regularly tested but are known to be working:
-
Red Hat Enterprise Linux 6
-
Red Hat Enterprise Linux 7
-
Fedora 29
-
SuSe Linux 11.1
-
Ubuntu Server 16.04
-
Windows 7
-
Windows 8
-
Windows Server 2008 R2
-
Windows Server 2012 R2
Supported Database Management Systems
Squore Server can use the following database management systems to store its data:
-
PostgreSQL 8.4 (9.4 and up is recommended) [1]
-
Oracle Database 12c Enterprise Edition Release 12.1.0.2.0 - 64bit Production
It is possible to host the database on the same machine as Squore Server or on a remote machine with either DBMS.
|
When using a database backend on a remote machine, the database administrator is responsible for backing up the database. The backup scripts included in the Squore Server installation will only handle the backup of the data stored on the Squore Server file system in that case. You can find more information about backup strategies for Squore Server in the section called Backup Tools in the Installation and Administration Guide. |
Browser Compatibility
Squore is compatible with many browsers . The following is the list of officially supported browsers:
-
Microsoft Internet Explorer 11.0 (Update Versions 11.0.19 and up)
-
Microsoft Edge 40.15063.0.0 and up
For All Systems
-
The latest version of the Squore Server installer, which can be downloaded from https://support.squoring.com/download_area.php
-
A supported Operating System, as stated in Supported Operating Systems
-
The latest version of the Squore CLI installer, which can be downloaded from https://support.squoring.com/download_area.php for installations where only a command-line client is needed
-
A user account with system administrator privileges
-
The Oracle Java Runtime Environment version 8 (other versions are not supported)
|
Using the 64-bit version is recommended. It is technically possible to run Squore on a server using a 32-bit JRE, however this will limit the memory available to 1GB of RAM to run the application, which will result in poor performance. If you still want to attempt such an installation, consult the troubleshooting page at http://openwiki.squoring.com/index.php/Running_Squore_On_A_32-bit_Java_Installation |
|
Keep in mind that the requirements above are the strict minimum. In production, Squore Server generally runs on a dedicated machine. A performant configuration is usually:
Squore reserves 25% of the available RAM of the machine to the database and another 25% to the server. External processes (like Checkstyle or FindBugs) running on the same machine as Squore may add to the amount of RAM required for analysing source code. Linux is known to offer better performances than Windows when running Squore. For a production database, you should plan a minimum of 20 GB of disk space. For more details about resource usage in Squore, consult Sizing Squore Server and Database. |
Prerequisites for Oracle
When using Oracle as a database backend, a database administrator must create an Oracle user before you can install Squore.
The user requires the following privileges:
-
CREATE PROCEDURE
-
CREATE SEQUENCE
-
CREATE SESSION
-
CREATE TABLE
-
CREATE TYPE
-
CREATE VIEW
-
A valid quota for the tablespace used by the user (for example UNLIMITED)
Obtaining a Licence File
A Squore licence file is linked to the hardware that Squore Server is installed on. When you complete your installation of Squore Server, and access http://localhost:8180/SQuORE_Server in your browser, you are presented with a screen that allows you to request an activation key and download an evaluation licence.
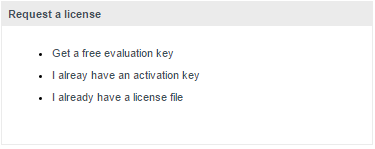
Request an activation key or enter an existing one to download a temporary licence for your machine. Requesting an activation key ensures that Vector Informatik GmbH gets all the information necessary to generate your final licence file when the evaluation period ends.
|
The licence request dialog only displays when accessing http://localhost:8180/SQuORE_Server (it redirects to http://localhost:8180/SQuORE_Server/License/License.xhtml) from the machine where Squore Server is installed. If you cannot open a browser window on the server, you will have to request your evaluation licence by manually generating and e-mailing your host-id to Vector Informatik GmbH:
|
Packages for Windows
A JRE is required for Squore Server. The Windows installer contains the tcl and perl runtimes as well as a portable PostgreSQL installation and a distribution of PhantomJS.
A compatible version of Eclipse must be downloaded from http://www.eclipse.org/downloads/ if you are planning on using Squore Eclipse Plugin .
Packages for CentOS and Red Hat Enterprise Linux
On Red Hat Enterprise Linux and CentOS (6.5 and 7.1), the dependencies are satisfied by the following packages:
Mandatory packages:
-
java-1.8.0-openjdk
-
perl
-
perl-Date-Calc
-
perl-Digest-SHA
-
perl-JSON
-
perl-libwww-perl
-
perl-Time-HiRes
-
perl-XML-Parser
-
fontconfig
-
postgresql-server (unless you use a RDBMS running on another system)
-
rsync
-
tcl
Optional packages for working with RTRT:
-
perl-XML-Simple
Optional packages for working with Microsoft Excel:
-
perl-HTML-Parser
-
perl-CPAN(CPAN utility requirement)
-
perl-Spreadsheet-ParseExcel(available in the EPEL repository)
-
perl-Spreadsheet-XLSX(available in the EPEL repository)
|
The module Spreadsheet::BasicRead is not available as a package and must therefore be installed using cpan (make sure cpan is properly configured, by running |
Optional packages for working with OSLC systems:
-
perl-TimeDate
-
perl-WWW-Mechanize(available in the EPEL repository)
-
perl-XML-LibXML
Optional packages for Advanced CSV Export Management:
-
perl-Text-CSV
Optional packages for working with Mantis, Jira and other ticket management software:
-
perl-TimeDate
-
perl-JSON-XS
-
perl-Spreadsheet-ParseExcel(available in the EPEL repository)
-
perl-Text-CSV
-
perl-WWW-Mechanize(available in the EPEL repository)
-
perl-XML-LibXML
|
The module Spreadsheet::BasicRead is not available as a package and must therefore be installed using cpan (make sure cpan is properly configured, by running |
For more information about how to install the Extra Packages for Enterprise Linux (EPEL) repository, consult https://fedoraproject.org/wiki/EPEL.
Packages for Ubuntu
On Ubuntu 16.04.3 LTS, the dependencies are satisfied by the following packages:
Mandatory packages:
-
libdate-calc-perl
-
libdbd-pg-perl (if you are using PostgreSQL and use export scripts for HIS metrics)
-
libdbi-perl (if you are using PostgreSQL and use export scripts for HIS metrics)
-
libhttp-message-perl
-
libjson-perl
-
libwww-perl
-
libxml-parser-perl
-
openjdk-8-jre
-
perl
-
postgresql (unless you use a RDBMS running on another system)
-
rsync
-
tcl
Optional packages for working with RTRT:
-
libxml-simple-perl
Optional packages for working with Microsoft Excel:
-
make (CPAN utility requirement)
-
libhtml-parser-perl
-
libspreadsheet-parseexcel-perl
-
libspreadsheet-xlsx-perl
|
The module Spreadsheet::BasicRead is not available as a package and must therefore be installed using cpan (make sure cpan is properly configured, by running |
Optional packages for working with OSLC systems:
-
libtimedate-perl
-
libwww-mechanize-perl
-
libxml-libxml-perl
Optional packages for Advanced CSV Export Management:
-
libtext-csv-perl
Optional packages for working with Mantis, Jira and other ticket management software:
-
libtimedate-perl
-
libjson-perl
-
libspreadsheet-parseexcel-perl(available in the EPEL repository)
-
libtext-csv-perl
-
libwww-mechanize-perl(available in the EPEL repository)
-
libxml-libxml-perl
|
The module Spreadsheet::BasicRead is not available as a package and must therefore be installed using cpan (make sure cpan is properly configured, by running |
Packages for other Linux distributions
On Linux platforms, the following must be installed before installing Squore:
-
Perl version 5.10.1 or greater including the following extra-modules:
-
Mandatory packages:
-
Date::Calc [module details]
-
DBD::Pg (if you are using PostgreSQL and use export scripts for HIS metrics) [module details]
-
DBI (if you are using PostgreSQL and use export scripts for HIS metrics) [module details]
-
Digest::SHA [module details]
-
HTTP::Request [module details]
-
JSON [module details]
-
LWP [module details]
-
LWP::UserAgent [module details]
-
Time::HiRes [module details]
-
XML::Parser [module details]
-
-
Optional packages for working with RTRT:
-
XML::Simple [module details]
-
-
Optional packages for working with Microsoft Excel:
-
HTML::Entities [module details]
-
Spreadsheet::BasicRead [module details]
-
-
Optional packages for working with OSLC systems:
-
Date::Parse [module details]
-
WWW::Mechanize [module details]
-
XML::LibXML [module details]
-
-
Optional packages for Advanced CSV Export Management:
-
Text::CSV [module details]
-
-
Optional packages for working with Mantis, Jira and other ticket management software:
-
Date::Parse [module details]
-
JSON::XS [module details]
-
Spreadsheet::ParseExcel [module details]
-
Spreadsheet::BasicRead [module details]
-
Text::CSV [module details]
-
WWW::Mechanize [module details]
-
XML::LibXML [module details]
-
If some of these modules are not available as packages on your operating system, use your perl installation’s cpan to install the modules. Using the OS packages is recommended, as it avoids having to reinstall via cpan after upgrading your version of perl.
-
-
Tcl version 8.5 or greater,
-
PostgreSQL version 8.4 (9.4 and up is recommended) [2] (unless you use a RDBMS running on another system) including at least the server component, and optionally, the pgAdmin utility.
-
The rsync utility
-
A supported Eclipse version (Luna SR2 and up) if you are planning on using the Squore Eclipse Plugin
Common Deployment Scenarios
Creating Projects using the Web Interface Only
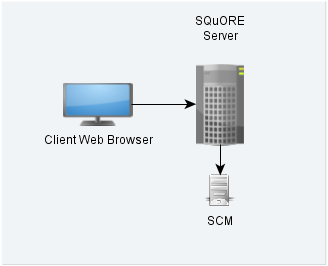
In this simple deployment, you only use the web UI to create projects. Squore Server is installed on a machine and you connect to it using a web browser. Analyses are carried out on the server, which must have access to the source files you are telling it to analyse.
Creating Projects From a Client Machine
Instructing the Server to Run an Analysis
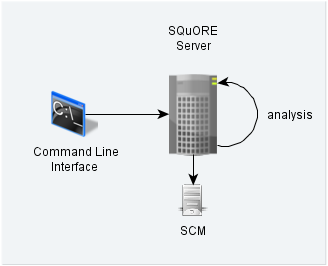
In this deployment, Squore Server is installed on one machine (the server), and Squore CLI is installed on another machine (the client). The client remote-controls the server and instructs it to analyse source files. The client provides the path to the sources as the server sees it. The sources need to be visible or accessible from the server only, and the code is fully analysed on the server. This is known as the Delegate method and is quite similar to what you achieve by creating projects from the web interface directly.
Sending Local Analysis Results to the Server
In this type of deployment the setup is the same as in the previous method, but the client runs the full analysis and only send the results of the analysis to the server when it is done. This is useful when the server does not have access to the source code, or when parts of the data analysed is only available on the client machine.
Using a Remote Database
It is possible to install Squore Server and use a database running on another machine. In this mode, Squore Server does not manage the database startup and shutdown, and database backups should be performed manually.
If you plan on performing such an installation, ensure that you have access to the information:
-
The IP address or hostname of the server where the database is running
-
The port that the database is listening on
-
The name of the PostgreSQL database or the Oracle schema that will store your data
-
The credentials required to connect to the database backend
The installer requires that the specified user and database already exist so it can connect and initialise the database using the details provided. However, the Linux installation script also include an extra option to specify SYSDBA credentials to automatically create a new Oracle schema for Squore.
|
When performing backups, ensure that you backup the database and the project folder at the same time so that you can restore a coherent snapshot of your data. For more information about backups in Squore, consult Backup Tools. |
Using Squore in Continuous Integration
In a Continuous Integration scenario, you are free to choose either client/server deployment method described in Creating Projects From a Client Machine. This will depend on which machine carried out the source code extraction or computes the data you feed to the Data Providers. You can learn more about how to configure Squore in a Continuous Integration environment by referring to the Command Line Interface Manual.
Access from Mobile Devices
Squore provides a mobile-friendly web interface that can be used by users to view their favourite charts in their dashboards. This requires no extra configuration on your part, as it uses the same http port as the main web interface. For more information about how users may use Squore Mobile, refer to the Getting Started Guide.
Installing Squore Server on Windows
This section describes the possible scenarios for installing Squore on windows.
If you use all the default settings, the installer will deploy the following components in the specified locations:
-
<SQUORE_HOME> is %SYSTEMDRIVE%\squoring\squore-server and contains Squore Server and its dependencies, including dedicated distributions of:
-
Strawberry Perl 5.12.3.0 Portable
-
PostgreSQL 9.6.7 Portable
-
Tcl 8.5 for Windows 8.5.12
-
PhantomJS 2.1.1
-
WildFly 10.1.0
-
-
<SQUORE_DATA> is %SYSTEMDRIVE%\squoring\squore-data and consists of the following subfolders:
-
The Squore database in <SQUORE_DATA>\cluster
-
The Squore database backup directory in <SQUORE_DATA>\backup
-
The Squore project data directory in <SQUORE_DATA>\projects
-
The Squore temporary data directory in <SQUORE_DATA>\temp
-
The Squore temporary source code directory in <SQUORE_DATA>\temp\sources
-
The Squore workspace directory in <SQUORE_DATA>\workspace
-
The installer provides options to:
-
use a different installation folder
-
use a specific path for temporary data and project data
-
use a specific path for the local PostgreSQL cluster and backup folder
-
use an existing local PostgreSQL instance
-
use a remote PostgreSQL or Oracle database
-
use your own perl distribution
|
The data and temporary folders must be excluded from the scope of virus scanners, malware protectors and search indexers to avoid any errors during an analysis. |
In order to start installing Squore, log on with an account that has administrator privileges and launch the Squore installer (squore-19.0.17-windows-x86_64.msi). Each of the wizard screens is documented below in the order that you will see them.
|
Running the Windows installer generates a log file in "<SQUORE_HOME>\install.log", which you can consult if you think there is an issue with your installation. When an installation or upgrade fails, the operation is rolled back in an attempt to remove all files in the selected installation folder. When this happens, the log file can be found in "%LOCALAPPDATA%\Temp\install_squore.log" instead. |
-
The Squore installer Welcome screen
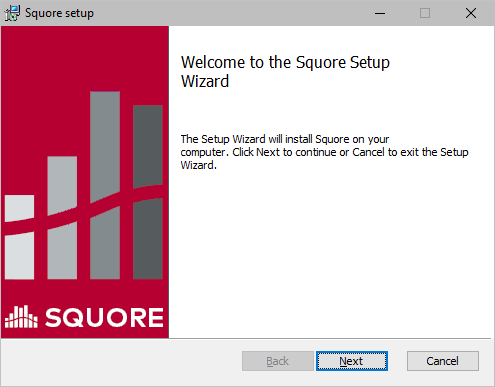 The Squore installer Welcome screen
On the Welcome screen, click the Next button to start the installation.
-
The Squore Licence Agreement screen
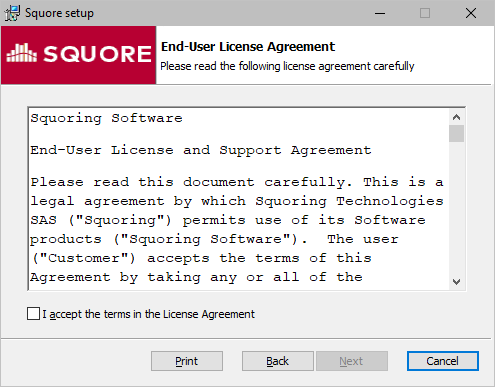 The Squore Licence Agreement screen
Review and accept the Licence Agreement, then click the Next button to continue with the installation.
-
Squore Server Destination Folder screen
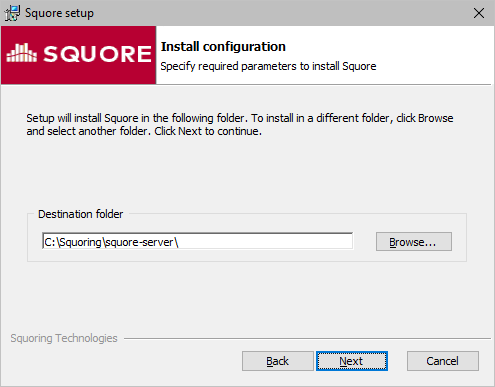 Squore Server Destination Folder screen
The Destination Folder screen allows you to select the Squore installation folder, where the application server will be installed. If you choose the path of an existing Squore installation, the installer will offer to upgrade this existing installation. Note that you should back up your data before you attempt to upgrade a Squore installation.
The steps to follow in order to upgrade an existing installation are described in Upgrading from a Previous Version. The rest of the current chapter describes the procedure for a new installation.
Check that the location suggested by the Squore installer is appropriate. If not, use the Browse… button to select another location.
After specifying the Destination Folder, click on the Next button.
-
The Feature Selection screen
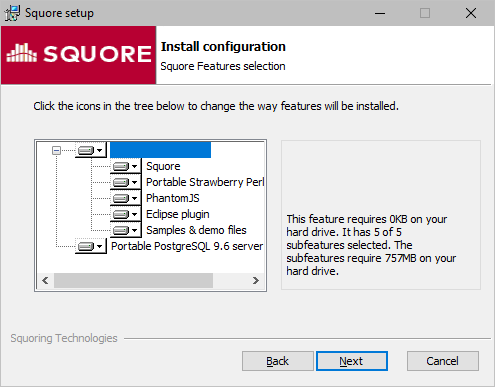 The Feature Selection screen
The Components screen allows you to choose the components of Squore that will be installed.
If you are unsure which components are needed on your system, you can safely leave all of them selected and then, click the Next button.
-
The General Options screen
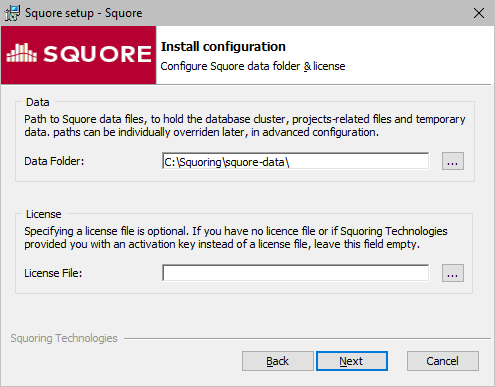 The Data Folder and Licence screen
The Squore Data Folder and Licence screen allows specifying where Squore stores its data and which licence file is used for the installation.
-
Data Folder: The data folder is the main folder where the data generated by Squore will be stored. Define a path on your system to hold the data. By default, the database cluster, the temporary folder, the project data, the configuration workspace and the default backup folder will live in this location. Note that you can refine each individual location later by going through the advanced option screens of the installation wizard.
-
Licence File: The location of the Squore licence file you wish to use for your installation. Note that you can leave this field empty at this time and provide the licence information only after the installation procedure has finished. This is explained in further details in Updating the Squore Licence File.
After specifying the data location and optionally pointing to a licence file, click the Next button.
-
-
The Server Configuration screen
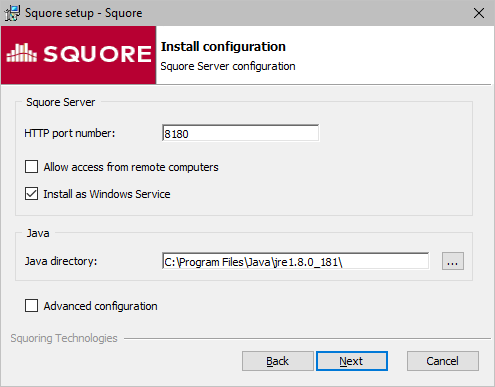 The Server Configuration screen
The Server Configuration screen allows specifying the rest of the necessary, basic options for your installation.
-
HTTP port number: Define the port used to access Squore from your browser.
-
Allow access from remote computers: Check this box to allow other computers on your network to connect to the Squore installation from a web browser. This setting is off by default to provide a safe installation that is only accessible from the server machine itself. The value can be changed after the installation process finishes by following the steps detailed on http://openwiki.squoring.com/openwiki/index.php/Connect_remotely_to_the_server.
-
Install as Windows service: Check this box if you want to be able to start and stop Squore Server using a Windows service. You can optionally customise the service name when clicking the Next button.
-
Java directory: the directory where the Oracle JRE is installed. The wizard should have found the appropriate Java installation on your server, but you can modify the value if the JRE you want to use is in a different location using the ... button. Note that Java 8 (other versions are not supported) is required (see Installation Prerequisites).
-
Advanced configuration: Check this box to see more installation options for advanced users. Advanced options include finer control over data folder locations, memory settings, and advanced database configuration (like using a remote PostgreSQL installation or an Oracle database).
After setting your preferences, click the Next button to view a summary of your installation settings (step 14) or proceed with the advanced configuration options (step 7).
-
-
The Advanced Squore configuration screen
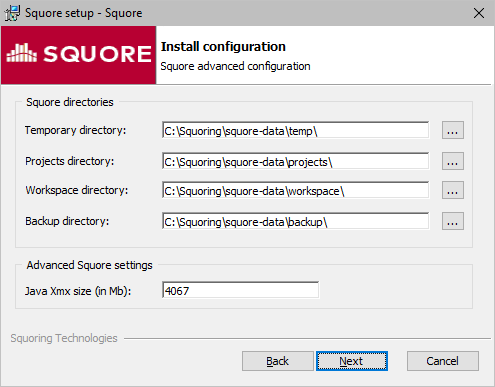 The Advanced Squore configuration screen
This screen is only displayed if you checked the Advanced configuration box in step 6.
On the Advanced configuration screen, you can modify the default work directory and memory and performance settings for the server.
-
Temporary directory: The location of the temporary data generated by Squore.
-
Projects directory: The location of the data generated by Squore when running analyses on the server.
-
Workspace directory: The location where changes to your analysis models and dashboards made in the web interface are stored on disk.
-
Backup directory: The location used to store backups when the backup script is launched. For more details about backing up your Squore data, see Backing-Up the Squore Data
-
Java Xmx size (in Mb): The maximum amount of RAM available to Squore Server, set to 25% of the physical RAM available on your server by default. It is recommended to keep the memory allocated to Squore under 25% of the total physical RAM so that other Squore modules (especially the database) or external processes (the OS and some Data Providers like Checkstyle or FindBugs) still have enough resources available. This setting can be changed after installation by following the procedure described in Changing the Java Heap Size.
-
-
The Perl selection screen
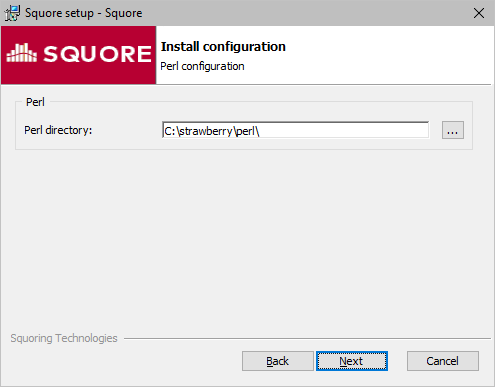 The Perl selection screen
This screen is only displayed if you disabled the installation of Strawberry Perl 5.12.3.0 Portable box in step 4.
On the Perl selection screen, you can modify the path to the Perl distribution that will be used by Squore Server. Use the ... button to specify the Perl installation folder and click the Next button to continue.
-
The Database Type screen
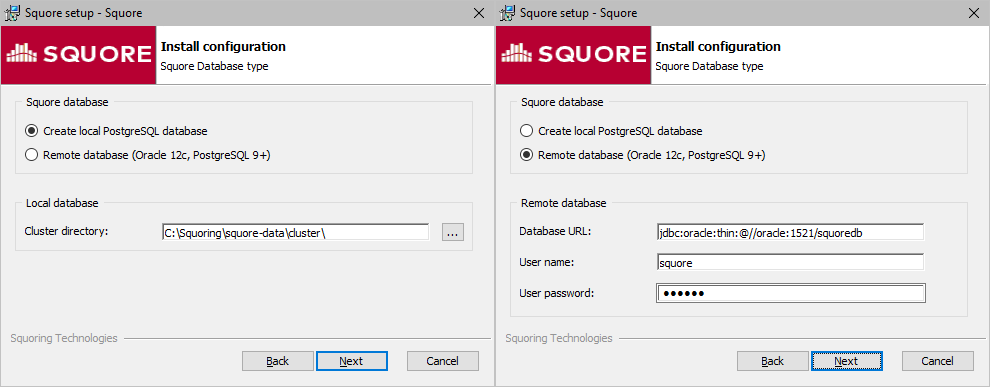 The Database Type screen options for local and remote databases
On the Database Type screen, you can specify if your Squore Server installation should use a local PostgreSQL cluster or a database on a remote DBMS.
In order to use a local PostgreSQL cluster, modify the path to the PostgreSQL installation that will be used by the installer to create the Squore database. Use the ... button to specify the installation folder and click the Next button to continue.
In order to use a remote database backend, specify its URL and provide the username and password of a dedicated user for the Squore installation.
The syntax for the database URL is:
-
jdbc:oracle:thin:@//host:port/sid for Oracle
-
jdbc:postgresql://host:port/dbname for PostgreSQL
Click the Next button to continue, after making sure that the database URL and credentials are correct.
-
-
The PostgreSQL selection screen
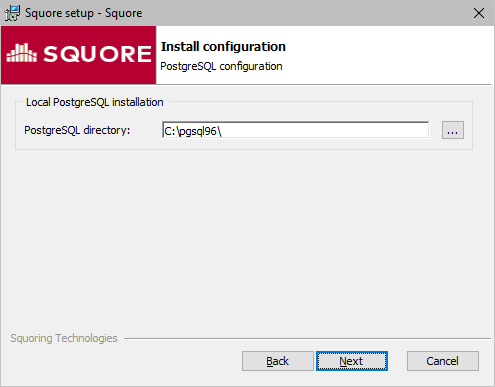 The PostgreSQL selection screen
This screen is only displayed if you disabled the installation of PostgreSQL box in step 4.
On the PostgreSQL selection screen, you can modify the path to the local PostgreSQL installation that will be used by Squore Server. Use the ... button to specify the PostgreSQL installation folder and click the Next button to continue.
-
The PostgreSQL server configuration screen
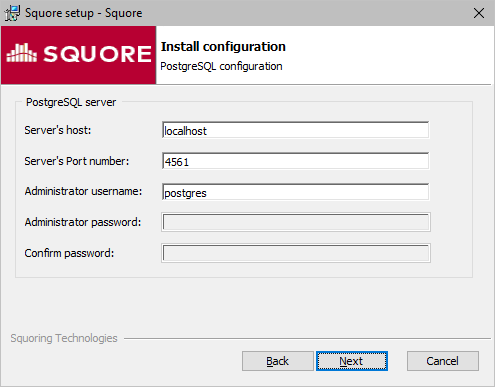 The PostgreSQL server configuration screen
This screen is only displayed if you checked the Advanced configuration box in step 6 and are using a local PostgreSQL database.
On the PostgreSQL server configuration screen, you can provide details about the PostgreSQL server to be used with Squore Server
-
Server’s host: the hostname of the machine running the PostgreSQL server
-
Server’s port number: the running port of the PostgreSQL server
-
Administrator user name: the user name of the PostgreSQL server admin user
Note that the Administrator password cannot be set. After adjusting your settings, click the Next button to continue.
-
-
The Squore database configuration screen
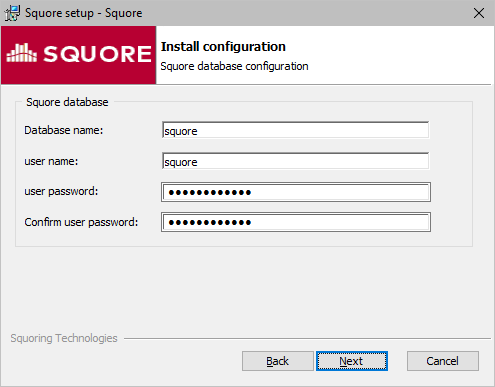 The Squore database configuration screen
This screen is only displayed if you checked the Advanced configuration box in step 6 and are using a local PostgreSQL database.
On the Squore database configuration screen, you can specify the desired name and user for the Squore database:
-
Database name: the name of the database that will be created for this installation of Squore
-
user name: the name of the user that will be created as the owner of the database
-
user password: the password for the specified database user
After adjusting your settings, click the Next button to continue.
-
-
The WildFly and PhantomJS Configuration screen
 The WildFly and PhantomJS Configuration screen
This screen is only displayed if you checked the Advanced configuration box in step 6.
On the WildFly and PhantomJS Configuration screen, you can specify the desired bind address and ports for Squore Server, as well as the port to use for the PhantomJS server:
-
Bind address: the bind-address configuration for the WildFly Server
If you want to restrict access to Squore Server from the server itself, leave localhost. If you want your server to be accessible from anywhere on your network, set the bind address to 0.0.0.0.
-
Service binding offset: the offset added to the value of the default WildFly ports (as described on https://docs.jboss.org/author/display/WFLY10/Interfaces+and+ports#Interfacesandports-SocketBindingGroups) for this installation of Squore, resulting in the following ports being assigned for the following offset values:
-
100 (default): http: 8180, https: 8543, management: 10090
-
200: http: 8280, https: 8643, management: 10190
-
300: http: 8380, https: 8743, management: 10290
The offset is mainly used to install several instances of Squore using different ports on the same machine, or to configure the installation to use a different pour when 8180 is already by another application used on the machine.
-
-
PhantomJS port number: Choose the port used for the PhantomJS server. Not that all communication between Squore Server and PhantomJS happens on the same machine. This port therefore does not need to be open on your firewall, except in very specific scenarios described in Advanced PhantomJS Settings.
After adjusting your settings, click the Next button to continue.
-
-
The Windows Service screen
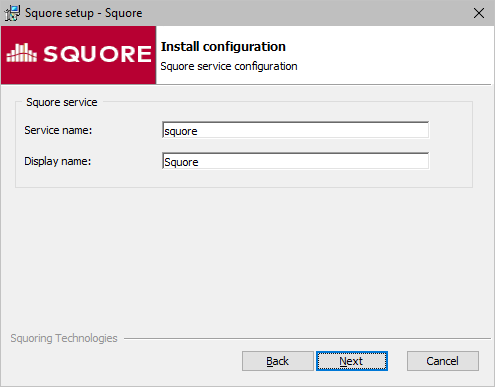 The Windows Service screen
This screen is only displayed if you checked the Install as Windows service box in step 6.
On the Windows Service screen, you can specify the desired name and display name for service that controls Squore Server.
For a Windows Service, the name is the alias used in the command line (for example:
net start squore), and the display name (Squore) is the name displayed in the graphical Windows Services Console.Set the name and display name for the service according to you needs and click the Next button to continue.
-
The Confirmation screen
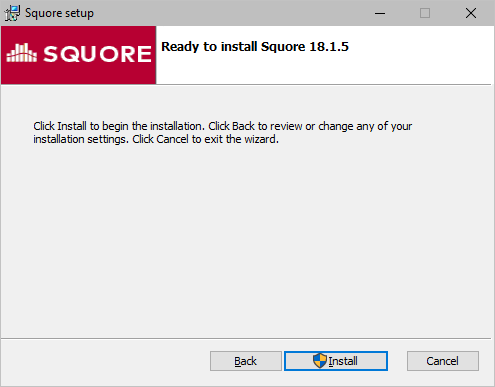 The Confirmation screen
The Confirmation screen is the last screen displayed before the installation starts. Go back and verify your selections if needed, otherwise click Install to start installing Squore. The installation process lasts a few minutes.
-
The Installation progress screen
 The Installation progress screen
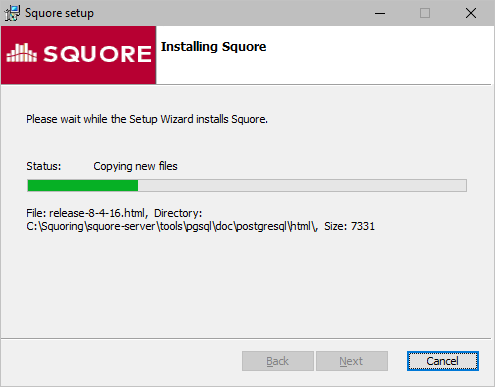
During the installation, a progress bar is displayed while files are copied to your hard drive.
The installation cannot be cancelled after it has started.
-
The Squore installation completed screen
 The Squore installation completed screen
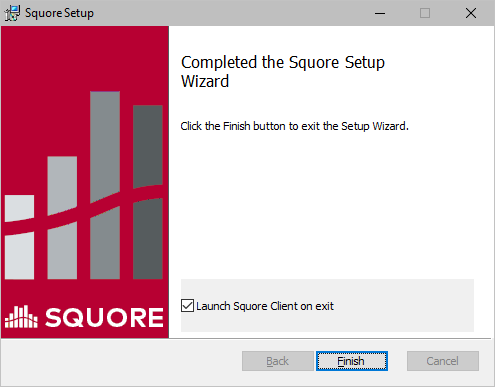
When the installation completes, the installation completed screen is displayed. Click the Finish button to close the Squore Installation Wizard. You can use the Start Client shortcut on your desktop to open the Squore Login page in your browser.
If you check the Launch Squore Client on exit box on this screen, Squore will open automatically in your browser.
Squore is now ready for use and can be accessed via http://localhost:8180/SQuORE_Server. Refer to Starting and Stopping Squore if you need more information about how to start and stop Squore and, if applicable, change the default configuration.
Installing Squore Server on Linux
Before installing Squore on a Linux platform, verify that all prerequisites are met, as described in Installation Prerequisites
If you use all the default settings, the installer will deploy the following components in the specified locations:
-
<SQUORE_HOME>
-
<SQUORE_DATA>/projects
-
<SQUORE_DATA>/workspace
-
<SQUORE_DATA>/cluster
-
<SQUORE_DATA>/backup
-
/tmp/squore
-
/tmp/squore/sources
Ensure that the user that installs and runs Squore has read and write access to these locations.
|
The installation script will try to guess the amount of memory to allocate for the database on your system. If it cannot do it, you will get an error message about setting kernel.shmall. In this case, you need to set the value of kernel.shmall to a value that suits your need, based on which other applications are running on your system. The script will only suggest a minimum value. |
Follow these instructions to install Squore Server:
|
Do not run the installation script as root, as this causes the installation of PostgreSQL to fail. Ensure that the user performing the installation has write-access to the folder used for installation. |
-
Copy the installation package (squore-19.0.17-linux-x86_64.tar.bz2) into the location where you want to install Squore Server (For example: /opt/squore/).
-
Extract the contents of the archive into the selected installation directory.
The folder now contains a new folder called squore-server, which we will refer to as <SQUORE_HOME>.
-
Run the Squore installation script in a command shell. The full list of options accepted by the
installscript can be found in install(1), but the command below is usually enough for most installations:<SQUORE_HOME>/bin/install -b 0.0.0.0 -k /path/to/squore-license.p7s /path/to/project/dataYou can perform the installation even if you do not have a licence file yet. For more information, consult Obtaining a Licence File.
-
Read and accept the licence agreement
If you want Squore Server to use a remote database backend, consult install(1) to find out more about the parameters available to set the remote database type, name and location.
Third-Party Plugins and Applications
End users can run third-party static code analysers or rule checkers that are not shipped with the Squore installer for licencing reasons. In this case, it is necessary to download the extra binaries from https://support.squoring.com/download_area.php and deploy them on the server.
The list of third party plugins to be downloaded separately is as follows:
-
Checkstyle 5.6
-
FindBugs 3.0
-
Cppcheck 1.61
-
PMD 5.0.5
-
Polyspace Export
-
Stylecop 4.7
Here is a full example of how to deploy Checkstyle into Squore
-
Download the Checkstyle binary from https://support.squoring.com/download_area.php.
-
Extract the contents of the zip file onto Squore Server.
-
Copy the extracted checkstyle-5.6 folder into <SQUORE_HOME>/addons/tools/CheckStyle_auto.
-
Instruct all client installations to synchronise with the server so that they get the newly deployed third-party binaries.
If you have deployed some third-party tools on Squore Server, they will automatically be downloaded to your client when you launch the client synchronisation script.
|
AntiC and Cppcheck on Linux also require special attention: Cppcheck must be installed and available in the path, and antiC must be compiled with the command: For more information, refer to the Command Line Interface Manual, which contains the full details about special installation procedures for Data Providers and Repository Connectors. |
Upgrading from a Previous Version
The Squore installation package can be used to upgrade an existing Squore installation from Squore 2013-B-SP3.
When an installation is upgraded, the following happens:
-
The new version of Squore Server overwrites the previous one in the same installation directory
-
The database is upgraded
-
The web server configuration is upgraded
-
The data files are migrated
-
All of your settings are kept, and a clean version of some configuration files is placed on your system next the original file, with a .new extension. This is useful if you want to compare your file with the defaults from a clean installation. The files in question are:
-
<CLUSTER_DIR>/postgresql.conf
-
<SQUORE_HOME>/config.xml
-
<SQUORE_HOME>/server/bin/standalone.conf on linux or <SQUORE_HOME>/server/bin/standalone.conf.bat on Windows
-
<SQUORE_HOME>/server/standalone/configuration/standalone.xml
-
<SQUORE_HOME>/server/standalone/configuration/squore-server.properties
-
<SQUORE_HOME>/server/standalone/configuration/application-users.properties
-
On Windows
|
Follow these steps to upgrade your Windows installation:
|
Running the Windows installer generates a log file in "<SQUORE_HOME>\install.log", which you can consult if you think there is an issue with your installation. When an installation or upgrade fails, the operation is rolled back in an attempt to remove all files in the selected installation folder. When this happens, the log file can be found in "%LOCALAPPDATA%\Temp\install_squore.log" instead. |
-
Run the Windows installer.
-
Click the Next button to get to the Licence Agreement screen.
-
If your previous version was at least Squore 18.0, the previous installation will detected and migrated automatically when you click Next. If your previous version is older, you will have to tell the installer where your old installation is located. Click the Next button to get to the Destination Folder screen.
-
Browse for the folder containing the old installation and click the Next button.
-
On the Upgrade screen, the installer confirms that the selected folder contains an older Squore installation.
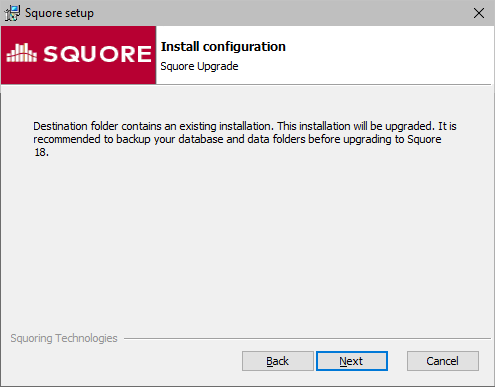 The Upgrade screen
Click the the Next button button to continue with the upgrade.
-
If you are running an unsupported Java version, you will see the following screen, where you can specify the path to the new Java version:
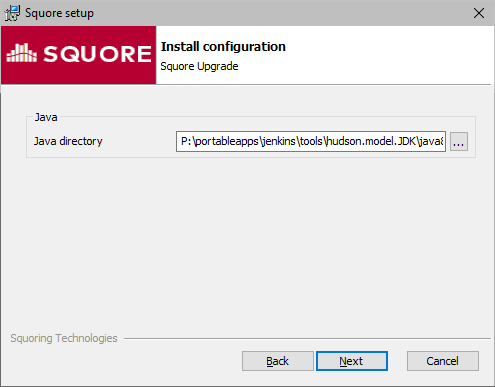 The Squore Setup screen for the new Java directory
Specify the path to the new Java installation and click the Next button to continue with the upgrade.
-
If you are migrating from a pre-17.0 version and used Windows services, you will see the following screen, where you can choose the name of the new Squore service:
The Windows Service screenSpecify the name and display name of the Windows service and click the Next button to continue with the upgrade.
-
The Confirmation screen is the final step before the upgrade starts. If you are satisfied with your selections and have enough free space to proceed, click Install.
The Confirmation screen -
Wait for the upgrade process to complete and close the wizard by clicking on Finish.
The Installation Complete screen
On Linux
|
Follow these steps to upgrade your Linux installation:
-
Download the Linux installation package.
-
Extract the archive by running the command:
cd /tmp /usr/bin/tar xjf squore-19.0.17-linux-x86_64.tar.bz2 -
Manually backup your current <SQUORE_HOME>/server/bin/standalone.conf.
-
Run the upgrade by executing:
cd /tmp/squore-server/bin ./install -U /path/to/old/installation [options...] -
Redeploy your backed-up <SQUORE_HOME>/server/bin/standalone.conf if necessary to reapply your custom configurations.
Manual Upgrade
If the upgrade cannot be performed with the installation package, it is possible to upgrade Squore manually on both Windows and Linux.
Before proceding with the upgrade :
-
Create a backup of your current Squore installation
-
Install a fresh Squore, from scratch, in the version you wish to upgrade to.
|
If you are using a remote database, backup and restore operations cannot be done automatically and are of the DB administrator responsability. |
Then, follow the procedure below :
-
Stop Squore :
<SQUORE_HOME>/bin/sqctl stop -
Start database :
<SQUORE_HOME>/bin/pgctl start -
Restore your backup : refer to the Restoring Squore Data section.
-
Upgrade your database :
<SQUORE_HOME>/bin/sqadm upgrade-db --from <squore_version_of_backup>This command runs silently. See the upgrade section of your new Squore version Release Notes page to get an estimation of the upgrade time (https://wiki.squoring.com).
|
Equivalent Windows commands are :
|
|
The manual upgrade procedure will not keep your configuration changes such as LDAP, JAVA XMX parameter and such. Be sure to report manually all theses changes afterwards. Here is a non-exhaustive list of configuration files that are usually modified :
|
Uninstalling Squore Server
On Windows
Squore Server, can be removed from your system from Windows' Add/Remove Programs dialog in the control panel.
-
Stop Squore Server by running <SQUORE_HOME>/stop.bat or stopping the Squore service.
-
Launch the installer. The wizard opens:
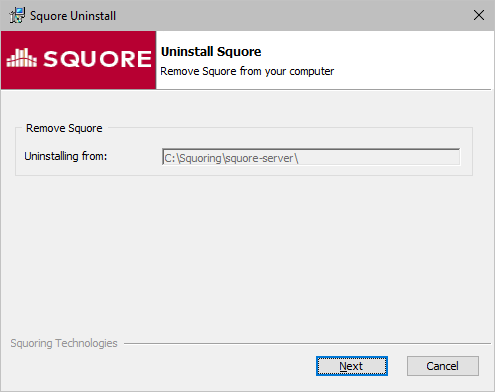 The Squore Server uninstallation wizard
Click the Next button to go to the next screen.
-
The wizard will prompt you which of the data folders created by Squore Server to remove from your machine:
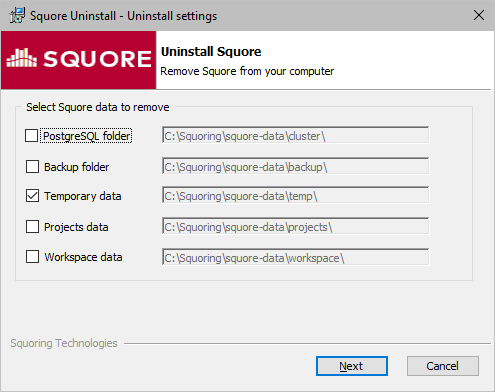 The Folder Selection screen
The data generated by Squore Server is left on the machine by default. If you do not need it, check all the boxes to delete all the folders.
Click the Next button and Remove on the confirmation screen to procede with the removal of the software and the selected data.
This operation cannot be interrupted or rolled-back.
-
The wizard will notify you when the uninstallation finishes, as shown below:
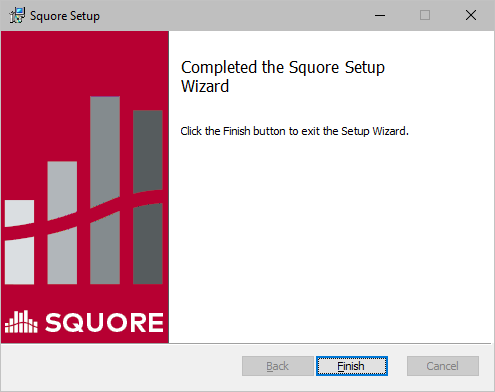 The Setup Complete screen
Click Finish to exit the wizard.
On Linux
There is no uninstallation script for Squore Server on linux. In order to completely remove Squore Server from your system:
-
Ensure that Squore Server is completely stopped by running:
cd <SQUORE_HOME>/bin/sqctl stop -
Delete the folders where Squore Server generated data:
-
The database cluster
-
The projects folder
-
The temp folder
-
The sources folder
-
The workspace folder
You can identify these locations by looking at <SQUORE_HOME>/config.xml, as described in Understanding config.xml.
-
-
Delete <SQUORE_HOME> (i.e.: the folder containing config.xml and the Squore binaries).
4. Starting and Stopping Squore
On Windows
If you installed Squore as a Windows service, you can start and stop Squore from the Services Console:
-
Open the Control Panel
-
Go to Administrative Tools > Services
-
Find the Squore service and select the start or stop command
If you did not install Squore as a Windows service, you can use the start and stop scripts in <SQUORE_HOME>\bin:
-
start-db.bat starts the database
-
start-server.bat starts the web server
-
start.bat performs the two previous operations in succession
-
stop-server.bat terminates the web server
-
stop-db.bat stops the database
-
stop.bat performs the two previous operations in succession
On Linux
-
Go to the Squore bin directory cd <SQUORE_HOME>/bin
-
Use the sqctl launcher to start and stop Squore:
./sqctl start|stop|restart|statusIf you need to start the database only, use
./pgctl start|stop|restart
Your First Login
After starting Squore, you can access the login page by typing the following address in a web browser: http://localhost:8180/SQuORE_Server
|
For more information about what to try out next in Squore, consult our Getting Started Guide.
5. Squore Administration
Getting to Know the Installation Folder
During the installation process, the Squore Installation Wizard creates several folders and files in the Squore installation directory <SQUORE_HOME>:
-
<SQUORE_HOME>/addons contains the Data Providers and Repository Connectors available in Squore
-
<SQUORE_HOME>/bin contains scripts to start, stop and manage Squore.
-
<SQUORE_HOME>/configuration contains folders and files that provide the default analysis and decision models, as well as the default dashboards for these models. For more details on how to understand and use these configuration files, refer to the Squore Configuration Guide.
-
<SQUORE_HOME>/database contains scripts used to create and reset the database.
-
<SQUORE_HOME>/deploy contains a copy of the web applications deployed during the installation.
-
<SQUORE_HOME>/docs contains licences for third party libraries included in Squore and a copy of the Squore documentation.
-
<SQUORE_HOME>/eclipse contains the Squore Eclipse plugin that developers can install in their IDE. For more information, consult the Eclipse Plugin Guide.
-
<SQUORE_HOME>/lib contains runtime libraries used by Squore Server.
-
<SQUORE_HOME>/samples contains some sample source code in various programming languages that can be used as examples when getting to know Squore. This folder can safely be deleted if you do not need it.
-
<SQUORE_HOME>/server contains the Squore application server. See The Squore Application Server for more information.
-
<SQUORE_HOME>/share contains some custom perl modules and other files needed to run the web applications.
-
<SQUORE_HOME>/tools contains the local instances of perl, tclsh, PostgreSQL and PhantomJS.
-
<SQUORE_HOME>/util (Windows-only) contains scripts used during the installation.
-
<SQUORE_HOME>/config.xml is used to specify the location of some configuration folders. See Understanding config.xml for more information.
Understanding config.xml
|
This section deals with editing the configuration of the installed instance of Squore. For more information about how to edit analysis models and wizards, refer to the Squore Configuration Guide. |
Default Configuration
The initial contents of <SQUORE_HOME>/config.xml are as follows:
<?xml version="1.0" encoding="utf-8" standalone="yes"?>
<squore type="server" version="1.3">
	<paths>
		<path name="perl.dir" path="C:\squoring\squore-server\tools\perl\perl"/>
		<path name="tclsh.dir" path="C:\squoring\squore-server\tools\tclsh"/>
	</paths>
	<database>
		<postgresql directory="C:\squoring\squore-server\tools\pgsql"/>
		<cluster directory="C:\squoring\squore-data\cluster"/>
		<backup directory="C:\squoring\squore-data\backup"/>
		<security>
			<user-name>postgres</user-name>
		</security>
	</database>
	<phantomjs>
		<socket-binding port="3003"/>
	</phantomjs>
	<configuration>
		<path directory="C:\squoring\squore-server\configuration"/>
	</configuration>
	<addons>
		<path directory="C:\squoring\squore-server\addons"/>
	</addons>
	<tmp directory="C:\squoring\squore-data\temp"/>
	<projects directory="C:\squoring\squore-data\projects"/>
	<workspace directory="C:\squoring\squore-data\workspace"/>
</squore>|
You can find the XML schema for <SQUORE_HOME>/config.xml in config-1.3.xsd. |
Here is a description of each element:
-
paths/path name="perl.dir" (mandatory) is the path to the perl installation used by Squore. It is detected automatically on Linux and set to <SQUORE_HOME>/tools/perl/perl on Windows.
-
paths/path name="tclsh.dir" (mandatory) is the path to the tcl installation used by Squore. It is detected automatically on Linux and set to <SQUORE_HOME>/tools/tclsh on Windows.
-
database/postgresql directory="…" (for installations using PostgreSQL only) is the path to the PostgreSQL installation used by Squore It is detected automatically on Linux (or passed as a parameter to ./install) and set to <SQUORE_HOME>/tools/pgsql on Windows.
-
database/cluster directory="…" (for installations using a local PostgreSQL cluster only) is the path to the PostgreSQL cluster defined at installation to hold the Squore Database.
-
database/backup directory="…" (mandatory) is the path to the folder used by Squore by default to store backups. It can be overridden by passing a path to the backup script.
-
phantomjs (optional) allows you to specify the port used by Squore Server to communicate with the local instance of PhantomJS.
-
configurations/path directory="…" (mandatory): Paths to one or more configuration folders. The first path listed in the list takes precedence over the next one.
-
addons/path directory="…" (mandatory): Paths to one or more addons folders. The first path listed in the list takes precedence over the next one.
-
tmp directory="…" (mandatory) is the path to the temporary folder used to hold temporary analysis and user session data created while the server is running (this folder is emptied at startup).
-
projects directory="…" (mandatory) is the path to the project folder that holds analysis results. Files in this folder are included in a backup, along with the contents of the database.
-
workspace directory="…" (mandatory) is the path to the folder where any configuration changes carried out in the user interface are saved (for example charts and dashboards modified in the Dashboard Editor).
Adding a Configuration Folder
In order to add a custom addons or configuration folder, simply add a path element in the configuration file:
<?xml version="1.0" encoding="utf-8" standalone="yes"?>
<squore type="server" version="1.3">
	<paths>
		...
	</paths>
	<database>
		...
	</database>
	<configuration>
		<path directory="C:\MyModels\configuration"/>
		<path directory="C:\squoring\squore-server\configuration"/>
	</configuration>
	<addons>
		<path directory="C:\MyModels\addons"/>
		<path directory="C:\squoring\squore-server\addons"/>
	</addons>
	<tmp directory="C:\squoring\squore-data\temp"/>
	<projects directory="C:\squoring\squore-data\projects"/>
	<workspace directory="C:\squoring\squore-data\workspace"/>
</squore>
By adding your own custom configuration and addons folder on top of the standard configuration, you ensure that the modifications you make override the definitions from the standard configuration and are not overwritten when upgrading your Squore version.
|
The workspace folder (which contains modifications to the configuration made via the web interface) always takes precedence over the configuration folders when loading the configuration. |
The Sources Folder
Inside of Squore’s tmp folder is a folder called sources which is used to store source code that users are viewing in the web interface, and to store source code uploaded in zip files for analyses.
You can move it outside the tmp folder by editing your <SQUORE_HOME>/config.xml as follows:
<?xml version="1.0" encoding="utf-8" standalone="yes"?>
<squore type="server" version="1.3">
	<paths>
		...
	</paths>
	<database>
		...
	</database>
	<configuration>
		...
	</configuration>
	<addons>
		...
	</addons>
	...
	<tmp directory="..."/>
	<project directory="..."/>
	<sources directory="..."/>
	<workspace directory="..."/>
</squore>
By adding a sources element, you can specify a directory where source files are stored.
Content of sources folder is deleted whenever Squore Server is restarted, because it is contained in tmp folder.
|
You can tailor this behavior for each Repository Connector using tag deleteTmpSrc. For more information refer to the end of Creating Repository Connectors section. |
Giving Each User Their Own Temporary Folder
When several users run analyses using the command line on the server machine, Squore uses temporary tmp, sources and data folders for each users. By default, they are located in "${java.io.tmpdir}/squore-${user.name}" and "${user.home}/.squore/projects".
If needed, theses paths can be overriden by adding a client node in the server configuration file.
<?xml version="1.0" encoding="utf-8" standalone="yes"?>
<squore type="server" version="1.3">
	<paths>
        ...
	</paths>
	<database>
        ...
	</database>
	<configuration>
        ...
	</configuration>
	<addons>
        ...
	</addons>
	<client>
		<!-- java system properties are supported under the client node only -->
		<tmp directory="${java.io.tmpdir}/squore-${user.name}"/>
		<projects directory="${user.home}/.squore/projects"/>
		<sources directory="${java.io.tmpdir}/sources"/>
	</client>
	<tmp directory="..."/>
	<projects directory="..."/>
	<workspace directory="..."/>
</squore>
As stated in the example, java system properties are supported in this section of <SQUORE_HOME>/config.xml.
|
All three elements are optional, and their default value if missing are the ones described in the XML snippet above. |
Backup Tools
Your installation of Squore includes some scripts designed to help save and restore snapshots of your analysis data. These scripts will allow you to:
-
Backup the current Squore data (See Backing-Up the Squore Data)
-
Restore a previously saved snapshot (See Restoring Squore Data)
The scripts are located in the <SQUORE_HOME>/bin folder of the Squore installation directory.
The backup and restore scripts accept a parameter that is used as the path to store the backup file or to read the backup file from when restoring. This makes it possible to use a scheduled task on Windows or a cron job on Linux to automate your backups. If you do not specify this parameter, the default backup folder will be used and each new backup will replace the previous one.
|
Backing-Up the Squore Data
The contents of the Squore Database and file system can be saved using the backup script from the <SQUORE_HOME>/bin folder.
In order to create a backup, run the backup script for your system, followed optionally by the path where the backup should be created.
-
<SQUORE_HOME>/bin\backup.bat [%BACKUP_FOLDER%] on Windows
-
<SQUORE_HOME>/bin/backup [$BACKUP_FOLDER] on Linux
|
If you do not pass a BACKUP_FOLDER in your command, the |
Executing this script creates a folder with a compressed database dump and a a backup of the projects and workspace folders. This backup can later be used by a script that restores database and file system snapshots, which we will cover in the next section.
Restoring Squore Data
A previously backed-up Squore snapshot can be restored using the restore script from the <SQUORE_HOME>/bin folder.
In order to restore a backup, run the restore script for your system, followed optionally by the path where the backup to restore is located.
-
<SQUORE_HOME>/bin\restore.bat [%BACKUP_FOLDER%] on Windows
-
<SQUORE_HOME>/bin/restore [$BACKUP_FOLDER] on Linux
|
If you do not pass a BACKUP_FOLDER in your command, data is restored from the |
The script will clear your current database, projects and workspace folders and replace them with the contents of the backed up data.
Resetting the Squore Installation
You can reset the Squore installation to its initial state using the sqadm utility from the command line. The tool is located in the <SQUORE_HOME>/bin folder of the Squore installation directory.
|
This operation cannot be undone. All the projects, roles, users, groups and profiles you created will be lost. |
-
Stop Squore Server
-
Ensure that the Squore Database is started
-
From a terminal, launch the following command:
sqadm reset -
Confirm, and allow the command to finish
-
Start Squore Server
|
More information about sqadm reset can be found in sqadm reset(1). |
Advanced PhantomJS Settings
In order to handle cases where the URL configured in Administration > System is not accessible to PhantomJS, you can configure a different URL for the communication between Squore and PhantomJS. This is useful when you need to bypass a proxy on your network, or when the Squore Server URL just cannot be resolved from the machine it runs on itself.
In those cases, you can force PhantomJS to make requests to Squore Server by adding the squore-url attribute to your <SQUORE_HOME>/config.xml, as shown below:
<phantomjs>
	<socket-binding port="3003" squore-url="http://127.0.0.1:8180/SQuORE_Server/" />
</phantomjs>
When using Microsoft Edge, extra configuration is needed in order to use the Save as … menu items in the Chart Viewer.
In this specific case, PhantomJS must be reachable on your network so that the end user’s browser calls it directly to generate a downloadable chart on the fly.
The PhantomJS URL needs to be specified in the distant-url attribute:
<phantomjs>
	<socket-binding port="3003" distant-url="http://servername:3003" />
</phantomjs>
Creating a Linux Service
This section describes how you can create a service to start and stop Squore using the sqctl launcher script from the installation’s bin folder.
|
The examples below assume that:
|
After creating a service, you can configure it to launch Squore at boot, or you can start and stop Squore on your system by running the following commands:
sudo service squore start
sudo service squore stop
CentOS 6.6, OpenSUSE 13.2
-
Create a Squore service description file in /etc/init.d/squore
#!/bin/sh # # Squore Server Service # # chkconfig: 2345 20 80 # description: Squore launcher ### BEGIN INIT INFO # Provides: squore-server # Required-Start: # Required-Stop: # Should-Start: # Should-Stop: # Default-Start: # Default-Stop: # Short-Description: # Description: ### END INIT INFO # Source function library . /etc/rc.d/init.d/functions exec="/opt/squoring/squore-server/bin/sqctl" user="squore" prog="squore" config="" [ -e /etc/sysconfig/$prog ] && . /etc/sysconfig/$prog lockfile=/var/lock/subsys/$prog start() { #[ -x $exec ] || exit 5 #[ -f $config ] || exit 6 echo -n $"Starting $prog: " # if not running, start it up here, usually something like "daemon $exec" su $user -c "$exec start" #retval=$? #echo #[ $retval -eq 0 ] && touch $lockfile #return $retval } stop() { echo -n $"Stopping $prog: " # stop it here, often "killproc $prog" su $user -c "$exec stop" #retval=$? #echo #[ $retval -eq 0 ] && rm -f $lockfile #return $retval } restart() { su $user -c "$exec restart" } reload() { restart } force_reload() { restart } rh_status() { su $user -c "$exec status" } case "$1" in start) $1 ;; stop) $1 ;; restart) $1 ;; reload) $1 ;; force-reload) force_reload ;; status) rh_status ;; condrestart|try-restart) restart ;; *) echo $"Usage: $0 {start|stop|status|restart}" exit 2 esac exit $? -
Make the service description file executable
chmod a+x /etc/init.d/squore -
Add it to chkconfig
chkconfig --add squore -
instruct chkconfig to start the service at boot
chkconfig squore on
CentOS 7.1
-
Create a Squore service description file in /etc/systemd/system/squore.service
[Unit] Description=Squore Server Service After=network.target [Service] Type=forking User=squore ExecStart=/opt/squoring/squore-server/bin/sqctl start ExecStop=/opt/squoring/squore-server/bin/sqctl stop [Install] WantedBy=multi-user.target -
Enable the service
systemctl enable squore.service
Managing the Squore Windows Service
During the installation of Squore Server on Windows, the installer provides the option to register a service to control Squore’s startup and shutdown. This section covers the functionality of the prunmgr utility that allows you to further configure some aspects of the Squore Windows service. Note that when you install the Windows service, you should no longer use the start and stop scripts described in On Windows
Windows Service Configuration
After installing Squore Server as a Windows service, you can use the service manager to change some of the settings.
|
The Windows service uses Apache Commons Daemon. Consult https://commons.apache.org/proper/commons-daemon/index.html for more information about the framework and the available installation options. |
Start the utility by typing the following in a command window as administrator:
<SQUORE_HOME>\bin\prunmgr.exe //ES/squore|
squore is the service name you chose during the installation. |
The service manager opens in a new window and allows you to change the following settings:
-
General Settings
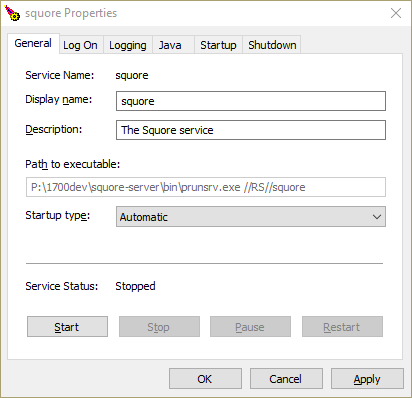 The General Tab
From the General tab, you can adjust the Service display name, description and startup type (Automatic to start at boot, Manual to start interactively, Disabled to stop using the service). You can also see and change the current state of the service.
-
Log On
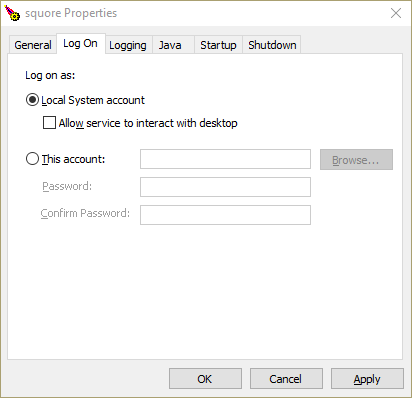 The Log On Tab
From the Log On tab, you can control which Windows account runs the service. Note that any change takes affect after the service is restarted.
The service is set to run under the local system account by default. Depending on your security requirements you may need to manually set the account to a real Windows user to run the services. For more information, consult the Microsoft Windows documentation at https://technet.microsoft.com/en-us/library/cc755249.aspx.
-
Logging
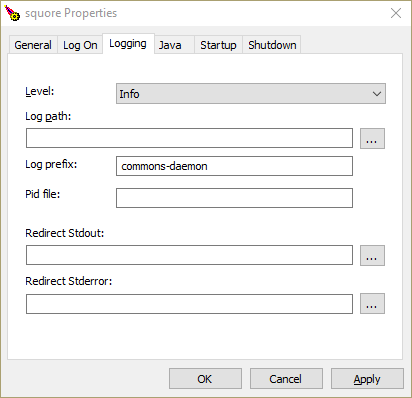 The Logging Tab
On the Logging tab, you can define paths to log files where the startup and shutdown activities of the service will be saved. The default location for the log file is %SystemRoot%\System32\LogFiles\Apache and generally does not need to be changed, unless you are noticing issues starting and stopping the service.
-
Java
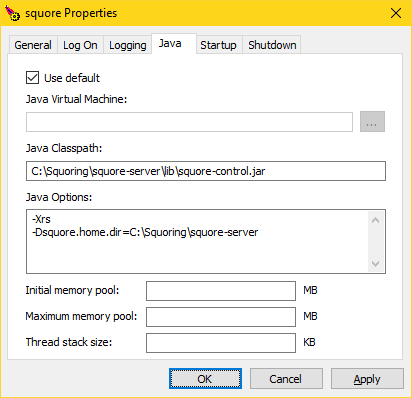 The Java Tab
The Java tab is useful if you need to change the path to your JRE. You can use jvm.dll from the system’s %PATH%, or you can point to a specific %JAVA_HOME%\bin\server\jvm.dll if needed.
The settings on this tab have no effect over the Java settings for Squore Server. If you want to change the path to the Java installation or the amount of memory used by Squore, refer to Changing the path to the Java Installation and Changing the Java Heap Size instead.
-
Startup and Shutdown
There are no useful settings to be modified on these tabs.
Managing Project Visibility
Squore users can only have access to a project when they are added to the project’s team by the project manager or an administrator. Until this happens, users are unaware of the projects that others have created. In situations where you wish users to be able to see the list of projects that exist on the server, you can configure Squore Server to provide users with a list of projects they do not currently have access to, so that they contact the project owner and ask to be added to the project’s team.
As an administrator, your role is to define which projects should appear on this public list. The list includes all project whose group matches the value set up in the administration settings. The procedure below shows how you can automatically list all projects that were created within the public group to the public list.
-
Log into Squore as an administrator and click on Administration > System
-
Locate the option called Allow Visibility and check the box to make projects visible
-
Locate the option called Pattern to filter list by project group and set it to public
-
Click on Apply at the bottom of the page to save your changes
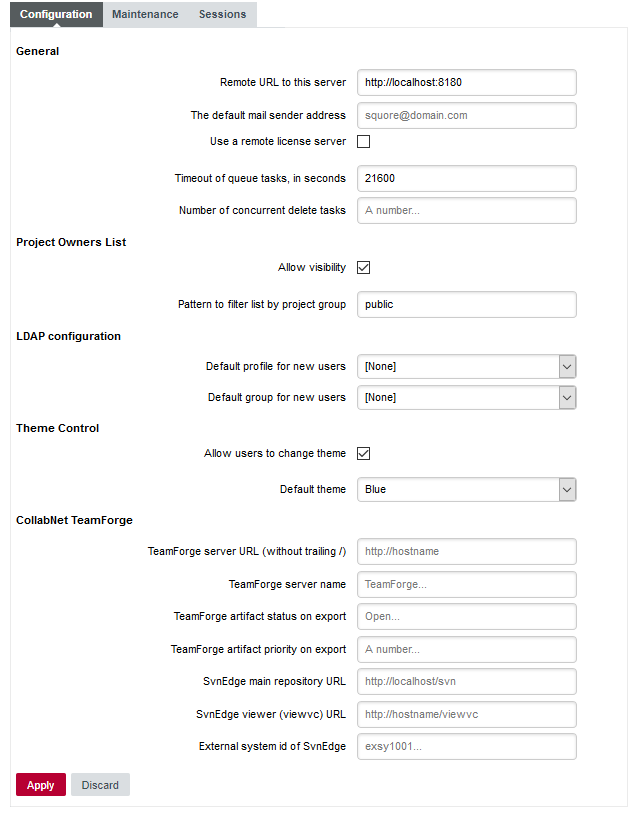
|
The Pattern to filter list by project group option accepts a regular expression. As a result, you can display projects from any group by setting its value to .*, or projects from the public and demo groups by setting it to public|demo. By leaving the field empty, all the existing projects on the server will be visible. |
After saving your changes, the Projects page will display a new button labelled Ask access to Project Owners, as shown below:

When clicking the button, you will see the list of projects in the specified groups, together with their owner. Users can click on a user’s e-mail address to ask the project owner if they can add them to the project team.
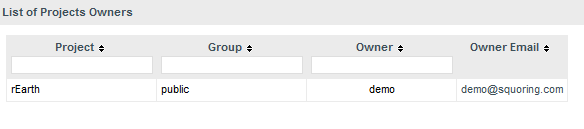
Find out your Squore Version
Squore versions use the following naming convention: major.minor.patch - buildId - scmInfo. Major and minor releases usually introduce new functionality, while patch releases normally only contain bugfixes.
There are two ways to find out which version of Squore you are running:
-
From the web interface via ? > About
-
From the command line by running
sqadm version
|
More information about sqadm version can be found in sqadm version(1). |
Changing Squore Server Port Number
You can change Squore Server port number after installation. The procedure involves modifying some configuration files in a text editor and restarting the server.
-
Shutdown Squore Server
-
Edit <SQUORE_HOME>/server/standalone/configuration/standalone.xml and search for the element socket-binding-group. The attribute port-offset="${jboss.socket.binding.port-offset:100}" defines the offset chosen at installation. Modify the value as needed.
-
Start Squore Server.
|
The offset is the value added to the default WildFly port values:
|
Changing Squore Database Port Number
You can change the port used by the Squore Database by editing PostgreSQL’s configuration file and modifying Squore Server’s <SQUORE_HOME>/server/standalone/configuration/standalone.xml to point to the new port. The procedure involves modifying some configuration files in a text editor and restarting the server.
-
Shutdown Squore Server and stop the database
-
Open <CLUSTER_DIR>/postgresql.conf in a text editor and search for the line where the port option is defined:
port = 4561 # (change requires restart) -
Change the port value to the desired one for your system
-
Open <SQUORE_HOME>/server/standalone/configuration/standalone.xml in a text editor and search for the database connection URL:
<connection-url>jdbc:postgresql://localhost:4561/squore</connection-url> -
Change the port value to match the change you made in <CLUSTER_DIR>/postgresql.conf.
-
Start Squore Server.
|
If you do not know where <CLUSTER_DIR> is located on your server, you can find its location by reading the value of the cluster setting in <SQUORE_HOME>/config.xml. |
Changing the PhantomJS port
The port used by PhantomJS can be changed by editing <SQUORE_HOME>/config.xml to change the port value in the following line:
<phantomjs>
	<socket-binding port="3003"/>
</phantomjs>|
After changing the port, restart Squore Server for the changes to take effect. |
Changing the Java Heap Size
The maximum amount of memory used by Squore Server’s Java process at runtime is defined at installation time. If you have not specified any value, the maximum amount of memory used will be 25% of the RAM available on the machine. It is recommended to keep the memory allocated to Squore under 25% of the total physical RAM so that other Squore modules (especially the database) or external processes (the OS and some Data Providers like Checkstyle or FindBugs) still have enough resources available.
This setting can be changed by following this procedure:
-
Stop Squore Server
-
Edit <SQUORE_HOME>/server/bin/standalone.conf on Linux or <SQUORE_HOME>/server/bin/standalone.conf.bat on Windows
-
Change the value of the Xmx parameter, as shown below:
JAVA_OPTS="$JAVA_OPTS -Xms64m -Xmx1512mor
set "JAVA_OPTS=%JAVA_OPTS% -Xms64M -Xmx1512M -XX:MaxPermSize=256M"In the example above, 1512M is the default value for a machine with 6Gb RAM, i.e. 25% of 6048Mb.
-
Start Squore Server
|
Please note that all other parameters (as "MaxPermSize") are advanced settings. These do not have to be modified as part of a classic use of Squore. |
Changing the path to the Java Installation
The path to the Java installation on your server can be updated by following the procedure below:
-
Stop Squore Server
-
Edit <SQUORE_HOME>/server/bin/standalone.conf on Linux or <SQUORE_HOME>/server/bin/standalone.conf.bat on Windows
-
Change the value of the JAVA_HOME, as shown below:
JAVA_HOME="/opt/java/jre8"or
set "JAVA_HOME=C:\jre8" -
Start Squore Server
Concurrent Tasks and Task Queue
This section explains how to manage the number of executors and how to configure task timeouts on a Squore Server installation.
Number of Concurrent Tasks
You can change the number of tasks that can run concurrently on a Squore Server installation. The default value is 8, which means that up to 8 long running tasks can be executed in parallel, while others will be placed in a queue to wait until an executor becomes free. A task may be an analysis, a project deletion, etc.
If your hardware can handle a higher number of concurrent tasks, you can increase the number of executors by editing the file <SQUORE_HOME>/server/standalone/configuration/standalone.xml, and set the maxSession key to the desired number, as explained below:
-
Stop Squore Server
-
Edit <SQUORE_HOME>/server/standalone/configuration/standalone.xml
-
Find the
managed-executor-servicecalled squore:<managed-executor-service name="squore" jndi-name="java:jboss/ee/concurrency/executor/squore" context-service="default" long-running-tasks="true" core-threads="8"/> -
Set
core-threadsto the number of concurrent tasks you want to allow on the server -
Start Squore Server to apply the changes
|
There is no definitive answer as to what the right number of executors is for a particular environment. The maximum number of concurrent tasks depends on:
As a rule of thumb, limit the number of concurrent analyses to half the maximum number of threads on the target platform. Since this is platform and project-dependent, some tests should be performed on the target platform in an environment close to production conditions to fine tune this configuration. |
Number of Concurrent Delete Tasks
You can change the number of delete tasks running concurrently by changing the setting on Administration > System. This is useful on systems where you run into errors when deleting multiple versions and projects at the same time.
|
This setting defines how many of the tasks running concurrently can be deletions. It does not override the number of concurrent tasks defined in Number of Concurrent Tasks |

Leaving the field empty allows using all the executors available as defined in Number of Concurrent Tasks to launch several deletions in parallel. If you encounter errors when deleting projects, notably ORA-00060 errors when using an Oracle database, setting the parameter to 1 helps reducing the occurrences of these errors.
Configuring Timeouts
The timeout period defines how long a task can execute before being aborted. This means that the waiting time - the time waiting for a free executor - is not part of the timeout. You can change the main timeout value for a task on a Squore Server installation. The default value is six hours and is generally fine: if an analysis runs for six hours, it is assumed that something went wrong or will go wrong for reasons regarding memory consumption.
If you decide that the timeout does not suit your workflow, you can change the default timeout value from the Administration pages:
-
Log into Squore Server as a user with administrative privileges.
-
Click Administration > System to view the advanced configuration options.
-
Set the value of the timeout in seconds in the Timeout of queue tasks, in seconds field.
|
Projects created using the web interface or from the command line using the DELEGATE_CREATION command is as defined by the parameter above. Projects created from the command line using the PROCESS_CREATION command only become subject to timeout when the analysis is finished on the client and the results are sent to the server for processing. There is no built-in timeout for the part of the analysis carried out on the client machine. |
Theme Control
Squore’s web interface allows users to choose between several UI themes: default, gray, green, orange, turquoise. When a user selects a theme, their preference is saved and this theme is applied each time they log into Squore. As an administrator, you can manage theme functionality in two ways:
-
Define what the default theme for all users is
-
Prevent users from using a theme other than the default one
You can access these options from Administration > System in the Theme Control section.
|
You can also configure these settings by specifying values for the options ui.theme.default and ui.theme.changeable in <SQUORE_HOME>/server/standalone/configuration/squore-server.properties. The default values are shown below: |
Updating the Squore Licence File
A Squore licence key file named squore-license.p7s should have been provided to you by Vector Informatik GmbH under the applicable Squore licencing agreement.
Follow these steps to deploy the Squore licence file:
-
Log into Squore Server as an administrator
-
Click on ? > License
-
On the License Management page, click I already have a license file
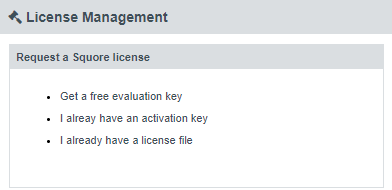
-
Upload your new licence file and click Deploy. If the new licence file is valid, you are automatically redirected to the Home page.
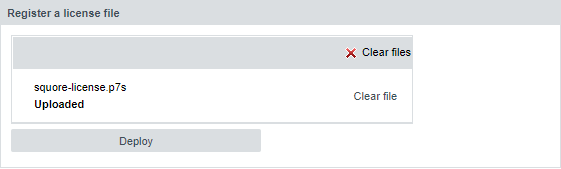
|
You can access the License Management without logging in if you are accessing http://localhost:8180/SQuORE_Server from the machine running Squore Server itself. |
Connecting to a Remote Licence Server
In this section, you will learn to configure Squore to rely on a remote licence server instead of using the licence server embedded into your local installation. This is useful when you run a production server and a development server, and you want the licence to be shared between both installations.
|
Before you follow these steps, ensure that the two Squore servers are installed and start up correctly as described in Installing Squore Server and Starting and Stopping Squore and that the remote licence server listens to requests from remote machines: |
|
If both servers are running on the same machine, then each server must be identified as a specific instance for this configuration to work.
You can achieve this by editing the Assign a different name for each server installation before you start following the procedure below. |
|
This procedure involves modifying <SQUORE_HOME>/server/standalone/configuration/standalone.xml and removing one of the default applications deployed automatically by the installation or upgrade script. These changes therefore have to be applied again after upgrading Squore. |
In order to point a local Squore server to a licence served by a remote Squore installation, carry out the following steps:
-
On the remote license server (optional):
By default, the password of the ejb user is changeme. If you want to change the password, then:
-
Generate a new password with this command:
echo -n "ejb:ApplicationRealm:new_password" | md5sumwhere new_password is the password to assign to the user.
-
Edit <SQUORE_HOME>/server/standalone/configuration/application-users.properties to specify the new password as shown below:
# # Properties declaration of users for the realm 'ApplicationRealm' which is the default realm # for application services on a new AS 7.1 installation. # (...) ejb=bc0deae7c29cd133a2de015f36ab6132 -
Restart Squore Server.
-
-
On the local server:
-
Stop Squore Server.
-
Edit <SQUORE_HOME>/server/standalone/configuration/squore-server.properties. Add the property:
license.remote = true -
Edit <SQUORE_HOME>/server/standalone/configuration/standalone.xml
-
Find the remote-ejb
outbound-socket-bindingelement and edit itsremote-destinationdefinition accordingly so that thehostandportmatch the hostname and http port of the remote server (8080 plus the offset you defined during installation, so 8180 by default). Here is an example of the complete configuration block:<outbound-socket-binding name="remote-ejb"> <remote-destination host="remoteLicenceServer" port="8180"/> </outbound-socket-binding> -
Optionally, if you have changed the default password for the ejb user on the remote server, look for the `ejb-security-realm
`security-realm element, and modify the secret value with the output of the commandecho -n "new_password" | openssl base64Here is an example of the complete block:
<security-realm name="ejb-security-realm"> <server-identities> <secret value="bmV3X3Bhc3N3b3Jk"/> </server-identities> </security-realm> -
Restart Squore Server
-
Run the following command, with
portmatching the controller port of the installation (9990 plus the offset defined at install time, so 10090 by default):<SQUORE_HOME>/server/bin/jboss-cli.sh -c \ --controller=localhost:10090 \ --command="undeploy squore-license.ear"
-
The local Squore Server is now using a remote licence server.
Managing Squore User Accounts
Blocking and Deleting Accounts
This section covers the three ways to remove unwanted user accounts in Squore: blocking, deleting and purging.
All options can be accessed from Administration > Users, where all user accounts are presented in table form.

When you block an account:
-
The user cannot access Squore anymore to view or create projects
-
The user’s data and contributions are left untouched and are still visible to other users in the web UI.
-
You can unblock the account at any time to allow the user to log in again.
-
A licence token is freed up when the account becomes inactive (usually 6 months after the last recorded activity of the user).
When you delete an account:
-
The user cannot access Squore anymore to view or create projects
-
This action is irreversible.
-
Personal user data, like favourites, links, API tokens will be removed.
-
User contributions, like comments, created projects, state changes will be assigned to a system "Ghost" user, in order to maintain system integrity.
-
A licence token is freed up for another user immediately.
When you purge an account:
-
The user cannot access Squore anymore to view or create projects
-
This action is irreversible.
-
All of the user’s personal data and contributions are removed.
-
All of the user’s personal projects (i.e. not visible to other users) are removed.
-
A licence token is freed up for another user immediately.
|
Blocking and unblocking can be achieved from the Enabled Account column of the Users table. Deleting options are accessible via a menu in the Delete column of the Users table. |
Automating User Management Tasks
Squore lets you manage users, groups and project teams via a REST API. The same permissions apply as when using the web interface:
-
User management tasks require a profile with the Manage Groups, User and Roles privilege
-
Project management tasks can only be performed on projects you are allowed to view and manage
|
The user management functions of the sqexport.pl and sqimport.pl have been discontinued. |
By building your own scripts that use the user management API, you can automate account creation and permission assignment in Squore, as well as manage the visibility of projects for particular users and groups.
API requests need to use an API token, which each user can create from their own Account Settings page, as shown below:
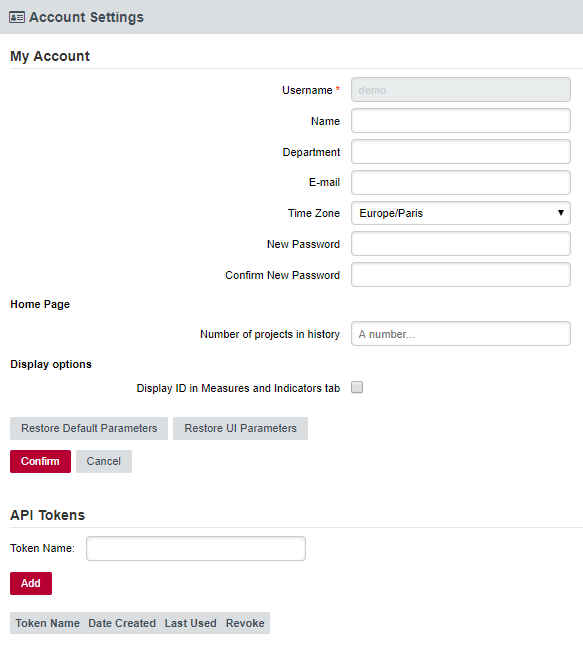
To create an API token, set a label and click Add. The token is generated and added to the list of API tokens for the user. The table shows when each token was created and last used. Clicking Revoke cancels the API token and prevents it from being used again.
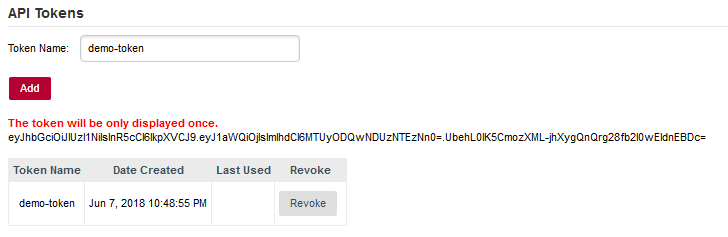
|
The token is only displayed once to the user, when it is created. If users lose their token, there is no way to find it again. The old token should be revoked and a new should be created. |
When calling the API, the token must be passed in the Authorization header. Here is an example command line that retrieves the list of users on the server with the token created earlier:
curl -H "Authorization: Bearer eyJhbGciOiJIUzI1NiIsInR5cCI6IkpXVCJ9.eyJ1aWQiOjIsImlhdCI6MTUyODQwNDUzNTEzNn0=.UbehL0lK5CmozXML-jhXygQnQrg28fb2l0wEIdnEBDc=" http://localhost:8180/SQuORE_Server/api/users|
The base URL for the API is http://localhost:8180/SQuORE_Server/api. You can access the full API documentation online at https://support.squoring.com/documentation/api/v1/. |
Setting Perl Environment
This section is useful if you want to manually execute Perl scripts that are usually internally used by Squore.
Windows
If you have installed the Portable Strawberry Perl with Squore, locate and execute this file (skip this step otherwise):
<SQUORE_HOME>\Tools\perl\portableshell.batThen type all commands in the new command prompt window.
SET SQUORE_HOME=<SQUORE_HOME>
SET PERL5LIB=%SQUORE_HOME%\share\perl
Linux
SQUORE_HOME=<SQUORE_HOME>
export SQUORE_HOME
PERL5LIB=$SQUORE_HOME/share/perl
export PERL5LIB
Usage Statistics
As a Squore administrator, you may need to keep track of the usage of the platform and report on its overall performance. This information is now available directly within Squore via Administration > Statistics. If you are also a model developer or a project manager and wish to fine-tune the layout of your dashboards, you will find more statistical data about how users consult analysis results via Models > Statistics and the Manage Project page. This section describes the information you can access from these pages. Note that statistics are collected locally, saved in the Squore database, and never sent anywhere. Statistics collection cannot be turned off. Viewing the statistics collected on the server is subject to licence.
|
Before you can view statistics on these pages, a date range must be selected in order to display information about the activity on the server during this period. You can also select whether the information is aggregated by day, week, month or year by adjusting the granularity setting. 
|
Application Usage Statistics for Administrators
The application usage statistics are broken down into five sections where you can view information about users, projects, hardware resources, pages response time and dashboard usage.
Users
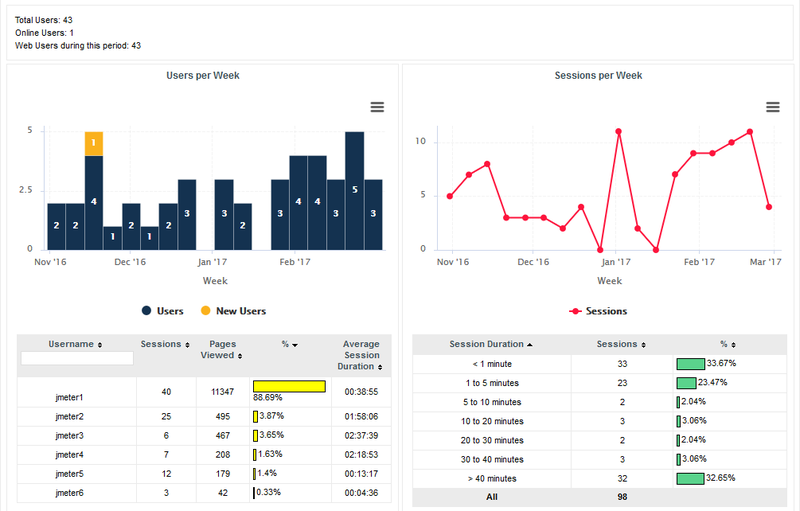
The Users tab displays the following information:
-
Global statistics about user accounts for this Squore Server installation
-
Information about current Web Users Web Users during the selected period
-
A series of charts containing information about the number of users, new users and overall connections to the server during the selected period
-
A table detailing session information per user
-
A table displaying session duration statistics
Projects
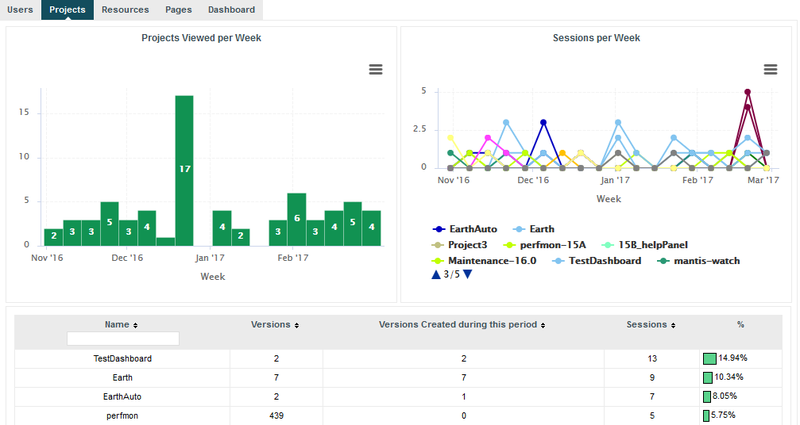
The Projects tab displays information about the number of projects viewed. You can get overall numbers of visits for all the projects on the server, or select specific projects to compare their number of views. The data is rendered as:
-
A chart showing a trend of the total number of projects viewed for the selected reporting period
-
A chart where you can consult detailed view statistics about the projects of your choice. You can click on a project name to show or hide it from the chart.
-
Information about the number of sessions per project during the selected period
Resources
The Resources tab helps administrators in monitoring the memory and disk consumption and the performance of the application.
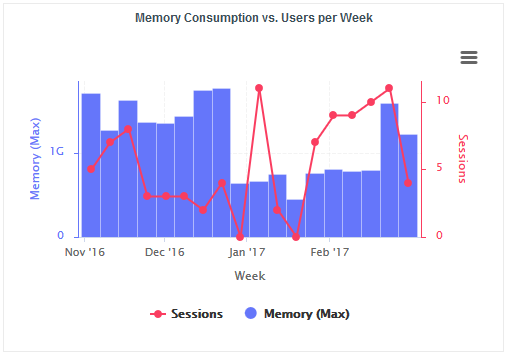
Memory Consumption vs. Users: displays a history of the amount of memory used by the java process running the application and a line indicating the number of users who logged in during the selected period.
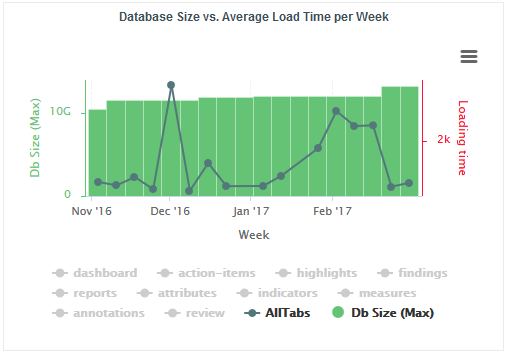
Database Size vs Average Load Time: displays a history of the size of the database on disk. Trend lines displaying the average page or tab load times can be displayed on the chart.
Pages
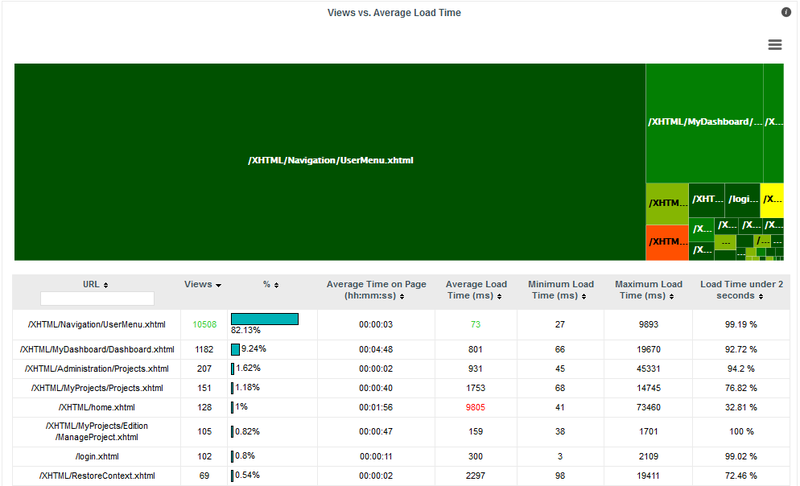
The Pages tab, shows statistics about page views and load times in tabular form and graphical form. The table automatically highlights the best result in green and the worst result in red.
Dashboard

The Dashboard tab allows analysing the usage of each tab on the dashboard. Each tab is represented in a treemap according to how many views it receives. This information can be used to adjust the default display status of each tab or their availability to end users.
Statistics for Model Developers
You can learn more about the usage of particular features of a model by clicking Models > Statistics. For each analysis model, find out how many users consult results, which projects are the most popular and which regions and charts of the dashboard are the most useful for users.
Users
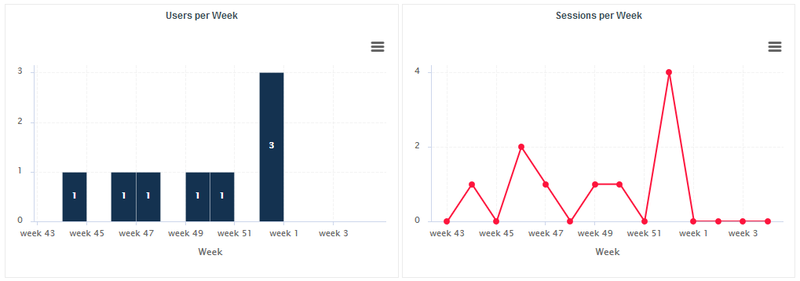
The Users tab displays the information about the number of users and overall connections to the server for projects in this analysis model.
Projects
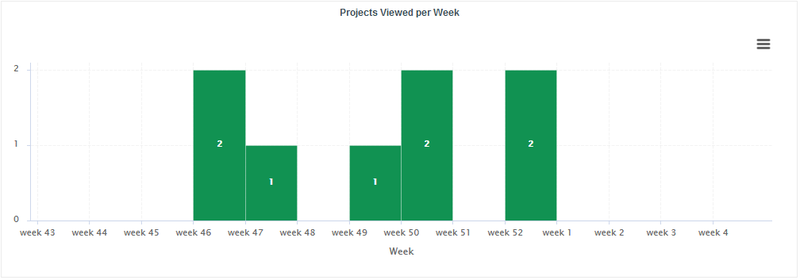
On the Projects tab, you can check how many projects had visitors over the selected period.
Dashboard
The Dashboard tab allows analysing the usage of each tab on the dashboard. Each tab is represented in a treemap according to how many views it receives. This information can be used to adjust the default display status of each tab or their availability to end users.
Charts
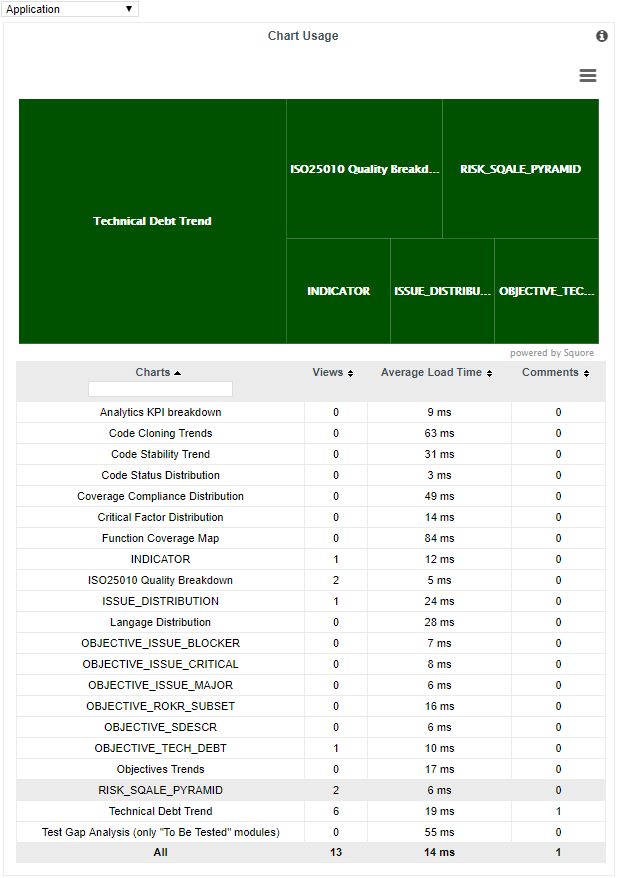
The Charts tab provides information about chart usage in your model: The number of views per chart (per artefact type or for all artefact types), the average loading time and the number of comments.
Statistics for Project Managers
As a project manager, you can use project statistics to investigate the popularity of your project by going to Manage > Statistics.
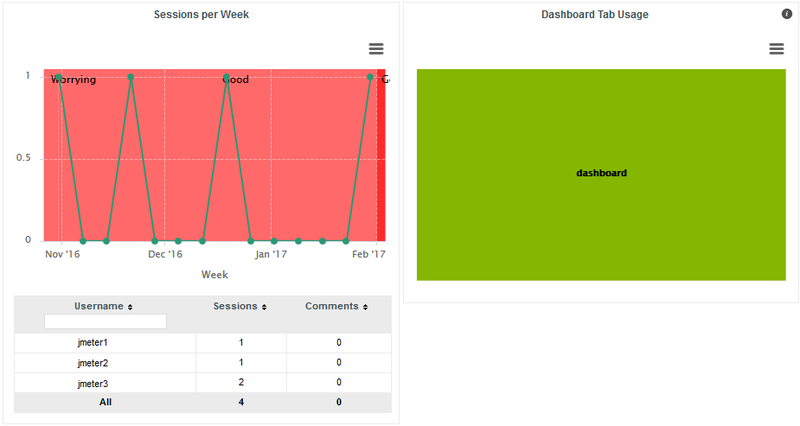
When you select a reporting period, the following information is displayed:
-
The trend of the number of views for this project uses the colours from the scale of the root indicator as background to help you correlate the project rating with the number of visits.
-
The treemap helps you understand which of the dashboard tabs is the most visited for this project.
-
A table summarises the breakdown of views per user, as well as the number of comments left by each user.
6. Integrating Squore on Your Network
Accessing Squore via HTTPS
You can configure WildFly to allow https access to Squore Server instead of http by following the instructions below.
|
These instructions are based on the standard WildFly instructions from https://docs.jboss.org/author/display/WFLY10/Security+Realms#SecurityRealms-DetailedConfiguration for securing the web server and use a self-signed certificate managed in the Java keystore, which may show a warning in users' browsers. If your company supply their own certificate and you want to import it instead of generating one, refer to the instructions in Key and Certificate Management. |
|
It is recommended to store configuration files outside of <SQUORE_HOME> to avoid losing them when upgrading your installation. |
|
It is also possible to use Apache as a reverse proxy on top of Squore Server to achieve the same result. For more information, consult Proxying Squore Server with Apache. |
-
Generate a secret key/certificate and store it in a file called a "key store" (foo.keystore in the current directory). The certificate is valid for 30 years (10950 days). The password use for encryption is "secret". One important issue is the common name (CN) of the certificate. For some reason this is referred to as "first and last name". It should however match the name of the web server, or some browsers like IE will claim the certificate to be invalid although you may have accepted it already.
$ keytool -genkey -alias foo -keyalg RSA -keystore foo.keystore -validity 10950 Enter keystore password: secret Re-enter new password: secret What is your first and last name? [Unknown]: foo.acme.com What is the name of your organizational unit? [Unknown]: Foo What is the name of your organization? [Unknown]: acme corp What is the name of your City or Locality? [Unknown]: Duckburg What is the name of your State or Province? [Unknown]: Duckburg What is the two-letter country code for this unit? [Unknown]: WD Is CN=foo.acme.com, OU=Foo, O=acme corp, L=Duckburg, ST=Duckburg, C=WD correct? [no]: yes Enter key password for <deva> secret (RETURN if same as keystore password): Re-enter new password: secret -
Create a new security realm in WildFly’s <SQUORE_HOME>/server/standalone/configuration/standalone.xml to configure an SSL Server identity:
<management> <security-realms> <security-realm name="SslRealm"> <server-identities> <ssl> <keystore path="/path/to/foo.keystore" keystore-password="keystore_password" alias="foo" key-password="key_password" /> </ssl> </server-identities> </security-realm> <security-realm name="ManagementRealm"> ... </security-realm> </security-realms> </management> -
Add a HTTPS listener next to the default HTTP listener in <SQUORE_HOME>/server/standalone/configuration/standalone.xml:
<http-listener [...] name="default" socket-binding="http" [...] /> <https-listener name="default-ssl" socket-binding="https" max-post-size="0" security-realm="SslRealm"/> -
Configure safe session cookies by editing the default
servlet-containerSkip this step if your server redirects HTTP to HTTPS.
Add the secure="true" to
session-cookieelement:<servlet-container name="default"> <jsp-config/> <session-cookie http-only="true" secure="true"/> <websockets/> </servlet-container> -
Start Squore Server. The SSL port is 8443 plus the offset selected at installation. By default you should therefore be able to access the web interface via https://localhost:8543 in your browser.
To automatically redirect insecure traffic to HTTPS, modify <SQUORE_HOME>/server/standalone/configuration/standalone.xml:
-
Find the
hostsection of the undertowsubsystemand add afilter-refelement to match URLs using the server’s HTTP port (please note that Squore uses (8080 + offset) internally, so do not redirect all traffic to HTTPS):<host name="default-host" alias="localhost"> <location name="/" handler="welcome-content"/> <filter-ref name="http-to-https" predicate="not(equals(%A,'127.0.0.1')) and equals(%p,8180)"/> </host> -
Add a
filterssection to the undertowsubsystemsection and add arewriteelement to redirect insecure requests to HTTPS:<filters> <rewrite name="http-to-https" target="https://myhost:8543%U" redirect="true"/> </filters> -
Start Squore Server and access http://myhost:8180 to verify that you are automatically redirected to https://myhost:8543, where
myhostis one of the hostnames pointed to by your certificate.
Proxying Squore Server with Apache
It is possible to use Apache in a proxy/reverse proxy role on top of Squore Server. This approach makes use of the proxy and proxy_wstunnel modules to handle web and websocket traffic between client browsers and Squore Server and is compatible with Apache starting from version 2.4.
|
For more information about the Apache modules, consult http://httpd.apache.org/docs/2.4/mod/mod_proxy.html and http://httpd.apache.org/docs/2.4/mod/mod_proxy_wstunnel.html. |
The following configuration can be used to proxy Squore Server traffic in your Apache configuration file:
<VirtualHost *:80>
  ServerName   squore.example.com
  ProxyPass / http://localhost:8180/SQuORE_Server
  ProxyPassReverse / http://localhost:8180/SQuORE_Server
  <Location />
    RewriteEngine on
    RewriteCond %{HTTP:UPGRADE} ^WebSocket$ [NC]
    RewriteCond %{HTTP:CONNECTION} Upgrade$ [NC]
    RewriteRule .* ws://localhost:8180%{REQUEST_URI} [P]
  </Location>
</VirtualHost>
These lines of configuration are the minimum required to guarantee that the necessary traffic to and from Squore. For more complex scenarios, including SSL and certificate configuration, refer to official Apache documentation on http://httpd.apache.org/docs/2.4/.
Key and Certificate Management
Keystore and truststore are files used by Java in order to authenticate both client and server when using the HTTPS protocol.
A keystore is used for storing private keys and associated certificate. Whereas a truststore is a pool of trusted certificates used by the client to authenticate/trust connection with third-parties.
Java default truststore is a cacert file located in the java.home/lib/security directory. Where java.home is the runtime environment’s directory.
|
The default password of Java default truststore is changeit. |
For more details on keys and certificates management
with the keytool utility, please refer to the keytool man page, or online documentation.
Import a private key and a certificate
The Java keytool utility does not support importing a private key directly from a file.
First convert the private key into PKCS12 format, then merge that file with the Java keystore:
 $ openssl pkcs12 -export -in server.crt -inkey server.key -name -out file.p12
 $ keytool -importkeystore -srckeystore file.p12 -destkeystore  file.keystore -srcstoretype PKCS12 -destalias company
Import a certificate
To import a certificate into a keystore/truststore:
$ keytool -importcert -keystore file.keystore -file file.crt -alias companyYou can now use the keystore and certificate alias to configure HTTPS access to your Squore installation following the instructions in Accessing Squore via HTTPS.
Using the LDAP Authentication Module
By default, Squore Server uses its own authentication mechanism, storing user information in the Squore database. An existing directory can be used in addition, so that all existing users your the directory can log into Squore without having to create accounts manually, and the user’s full name, e-mail address and department can be imported automatically. The process described in this section explains how to configure a Squore administrator, set up the server to authenticate all new users as standard users when they log in via with their LDAP credentials and finally lists the configuration files that need to be modified to turn on LDAP authentication . After you integrate with LDAP, you will still be able to create and use users that are only known to Squore and do not exist in your directory.
|
Before you start, ensure that you know:
|
In order to enable LDAP authentication, follow these steps:
-
Decide which role will be associated to a user the first time they log into Squore. The default choices are:
-
STANDARD_USER: Standard users can view projects.
-
ADVANCED_USER: Advanced users can projects and create new ones.
-
ADMINISTRATOR: Administrators can view projects and administer the server. They cannot create projects.
-
-
Decide which group new users will be part of the first time they log into Squore. The default choices are:
-
users: Users from this group can view and create projects.
-
admin: Users from this group can administer Squore and view projects but they cannot create projects.
If none of these choices fit your needs, you can create a specific group later by logging into Squore and going to Administration > Groups. If no group is specified, then the user will not be added to any group.
-
-
Configure WildFly: Edit <SQUORE_HOME>/server/standalone/configuration/standalone.xml, and locate the section providing the squore-policy security domain, which by default looks like this:
<security-domain name="squore-policy" cache-type="default"> <authentication> <login-module code="Database" flag="sufficient"> (...) </login-module> </authentication> </security-domain> -
Paste in the configuration for LDAP or Active Directory before the default login module. Here is a full
security-domainwith both login modules:<security-domain name="squore-policy" cache-type="default"> <authentication> <!-- LDAP login module --> <login-module code="com.squoring.squore.server.security.LdapLoginModule" flag="sufficient"> <module-option name="java.naming.factory.initial" value="com.sun.jndi.ldap.LdapCtxFactory"/> <module-option name="java.naming.provider.url" value="ldaps://domain-controller:636/"/> <module-option name="java.naming.security.authentication" value="simple"/> <module-option name="baseCtxDN" value="ou=people,dc=example,dc=com"/> <module-option name="bindDN" value="cn=admin,dc=domain,dc=com"/> <module-option name="bindCredential" value="password"/> <module-option name="baseFilter" value="(uid={0})"/> <module-option name="rolesCtxDN" value="ou=groups,dc=example,dc=com"/> <module-option name="roleFilter" value="(member={1})"/> <module-option name="roleAttributeIsDN" value="false"/> <module-option name="roleAttributeID" value="cn"/> <module-option name="userCompositeName" value="cn"/> <module-option name="userMail" value="mail"/> <module-option name="userOrganizationUnit" value="ou"/> <module-option name="userId" value="uid"/> </login-module> <!-- Active Directory login module --> <login-module code="com.squoring.squore.server.security.LdapLoginModule" flag="sufficient"> <module-option name="java.naming.factory.initial" value="com.sun.jndi.ldap.LdapCtxFactory"/> <module-option name="java.naming.provider.url" value="ldap://domain-controller:389/"/> <module-option name="java.naming.security.authentication" value="simple"/> <module-option name="baseCtxDN" value="OU=Users,DC=EXAMPLE,DC=COM"/> <module-option name="bindDN" value="CN=Administrator,OU=Administrators,DC=EXAMPLE,DC=COM"/> <module-option name="bindCredential" value="password"/> <module-option name="baseFilter" value="(sAMAccountName={0})"/> <module-option name="rolesCtxDN" value="OU=Users,DC=EXAMPLE,DC=COM"/> <module-option name="roleFilter" value="(sAMAccountName={0})"/> <module-option name="roleAttributeIsDN" value="true"/> <module-option name="roleAttributeID" value="memberOf"/> <module-option name="roleNameAttributeID" value="CN" /> <module-option name="searchScope" value="ONELEVEL_SCOPE"/> <module-option name="userCompositeName" value="sAMAccountName"/> <module-option name="userMail" value="mail"/> <module-option name="userOrganizationUnit" value="department"/> <module-option name="userId" value="sAMAccountName"/> </login-module> <login-module code="Database" flag="sufficient"> (...) </login-module> </authentication> </security-domain> -
Edit the security domain properties to reflect your setup (LDAP or Active Directory). The LDAP administrator shall provide the following information:
-
java.naming.provider.url: The URL of the directory server.
-
baseCtxDN: The fixed DN of the context to start the user search from.
-
bindDN: The DN used to bind against the ldap server for the user and roles queries. This is some DN with read/search permissions on the baseCtxDN and rolesCtxDN values.
-
bindCredential: The password for the bindDN
-
baseFilter: The search query sent by Squore to the LDAP server when authentificating. If the password is correct and the search returns true, the user is allowed to log into Squore. The default query checks that the login exists, but you can change it to check that the login is valid and that the user is part of a specific group for example, using the syntax &condition1) (condition2. For more information about LDAP query syntax, refer to https://technet.microsoft.com/en-us/library/aa996205(v=exchg.65).aspx. Note that the & characters must be written as an entity (&) in the settings file.
-
rolesCtxDN: The fixed DN of the context to search for user roles. This is required to exist, even though it is not used by Squore at the moment.
-
userCompositeName (optional): the field in the LDAP account that Squore will import and user as the user’s full name.
-
userMail (optional): the field in the LDAP account that Squore will import and user as the user’s e-mail address.
-
userOrganizationUnit (optional): the field in the LDAP account that Squore will import and user as the user’s department.
-
userId (optional): the field in the LDAP account that Squore will use as a the final user login to create the account or log into the application. When no value is specified for this field, Squore uses the login as typed by the user on the login page.
Using this field helps avoiding confusion with mixed-case logins. Squore Server considers demo and Demo as two separate users by default. By specifying that the login is taken from a specific field from your directory, you ensure that the same account is used no matter what case was used in the login form.
Note that for Active Directory, OU, DC and other keywords are all uppercase. For more details on the WildFly configuration of the LDAP module and the more details about the available options, please refer to http://community.jboss.org/wiki/LdapExtLoginModule.
-
-
Start Squore Server.
-
Log in as administrator and configure the default group and profile information for users who log in for the first time in the LDAP configuration section of Administration > System.
|
Note: It is highly recommended to use LDAPS instead of LDAP. In the <SQUORE_HOME>/server/standalone/configuration/standalone.xml configuration file, configure the java.naming.provider.url property to use an LDAPS server. The URL of an LDAPS Server will look like the following: ldaps://host:port/. The java instance used by WildFly shall be able to check the certificate of the LDAP server. If the LDAP certificate has not been signed by an "official" CA (self-signed certificate, or the company issued its own root CA), please refer to Import a certificate. |
|
User accounts created before you configured the connection to the directory still exist and can still log in. |
|
If you need to authenticate users on more than one branch in your directory, duplicate the |
|
The login module used has changed in Squore 2014-A-SP1 to support the import of extra user information, but you can still revert to the legacy authentication module if you are experiencing compatibility issues.
To do so, change the login module to When using the legacy login module, you should set the following module option if you are using Active Directory: This option prevents users from authenticating successfully when sending a blank password, as is the case when using some versions of Active Directory. |
Using the Single Sign-On Authentication Module
This section details how to configure Squore Server to delegate user authentication to an external identity provider by going through the following steps:
-
Creating a client in the identity provider software
-
Configuring the SSO login module in Squore Server
|
This section uses the Keycloak identity provider as an example, but any identity provider implementing the SAML 2.0 protocol for SSO is supported. Squore SSO support was tested with Keycloak, SSOCircle and samlidp, and is assumed to be compatible with enterprise solutions like PingFederate for example. |
Creating a Client for the Identity Provider
Information about the endpoints for the communication between the identity provider and Squore Server can be configured by creating a new client.
The following information may be required:
-
Client ID is a unique identifier for your Squore Server installation (e.g.: localhost-8180)
-
Client Protocol should be set to SAML
-
Client SAML Endpoint is the URL to Squore Server’s Home page for authenticated users (e.g.: http://localhost:8180/SQuORE_Server/XHTML/home.xhtml)
-
Root URL is the the root URL used to access Squore Server (e.g.: http://localhost:8180/SQuORE_Server)
-
Valid Redirect URIs is a list of URLs that the identity provider is allowed to redirect to after authenticating the user successfully (e.g.: http://localhost:8180/SQuORE_Server/XHTML/home.xhtml, /SQuORE_Server/*)
-
Base URL is the default URL used then the identity provider needs to link back to the client (e.g.: http://localhost:8180/SQuORE_Server)
-
Assertion Consumer Service POST Binding URL is the SAML POST Binding URL for the client’s login responses (e.g.: http://localhost:8180/SQuORE_Server/XHTML/home.xhtml)
-
Logout Service POST Binding URL is the SAML POST Binding URL for the client’s single logout service (e.g.: http://localhost:8180/SQuORE_Server/squore/security/samlunauthenticate)
-
Encrypt Assertions is an optional setting that forces encryption of SAML messages. It requires extra configuration later in Squore Server to export and copy the public/private key pair on the machine running Squore Server.
Keycloak offers the following screens where you can enter this information:
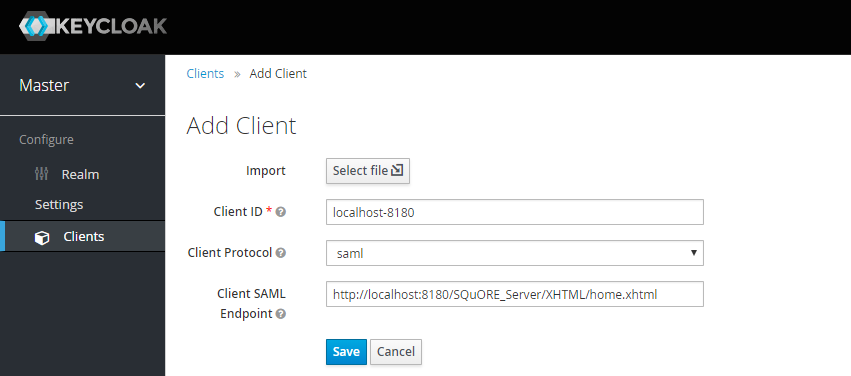
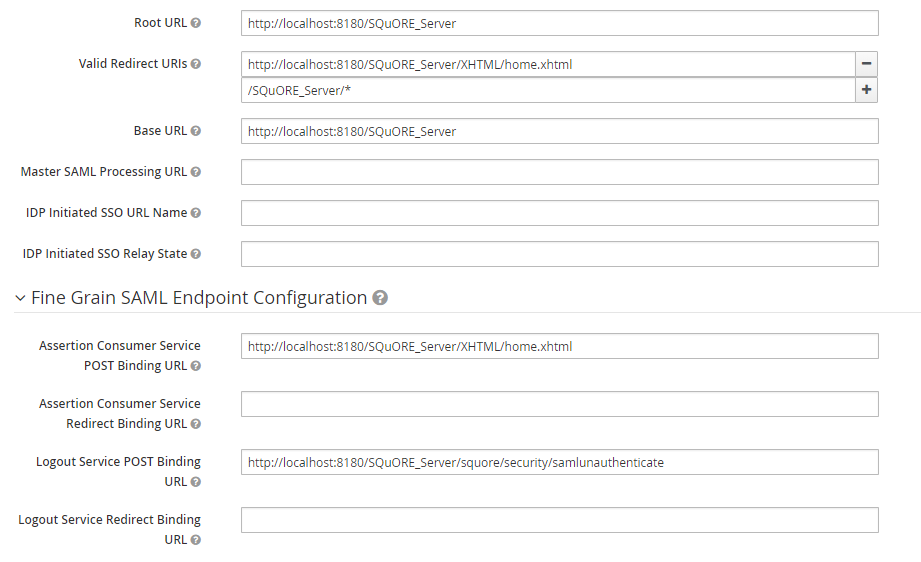
The key used to sign and decrypt messages is configurable in the SAML Keys tab of the client configuration.
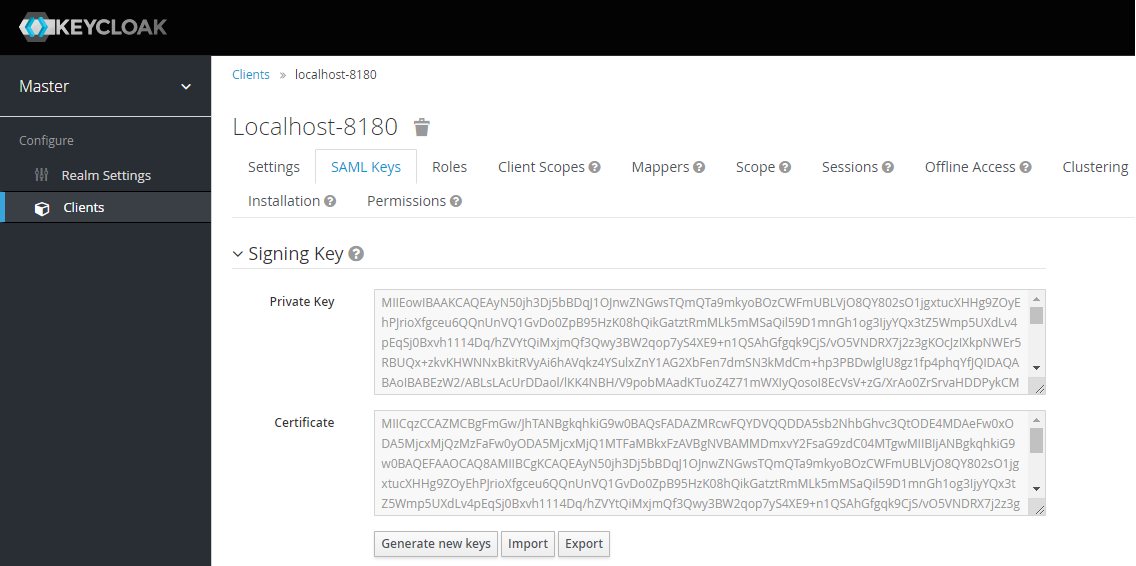
|
To generate and use your own keys, install openssl and generate the keys with the following commands: |
After creating and configuring your client, download the SAML Metadata IDPSSODescriptor generated by the identity provider so it can be deployed in Squore Server. Keycloak has an Installation tab that allows you do download the file, as shown below:
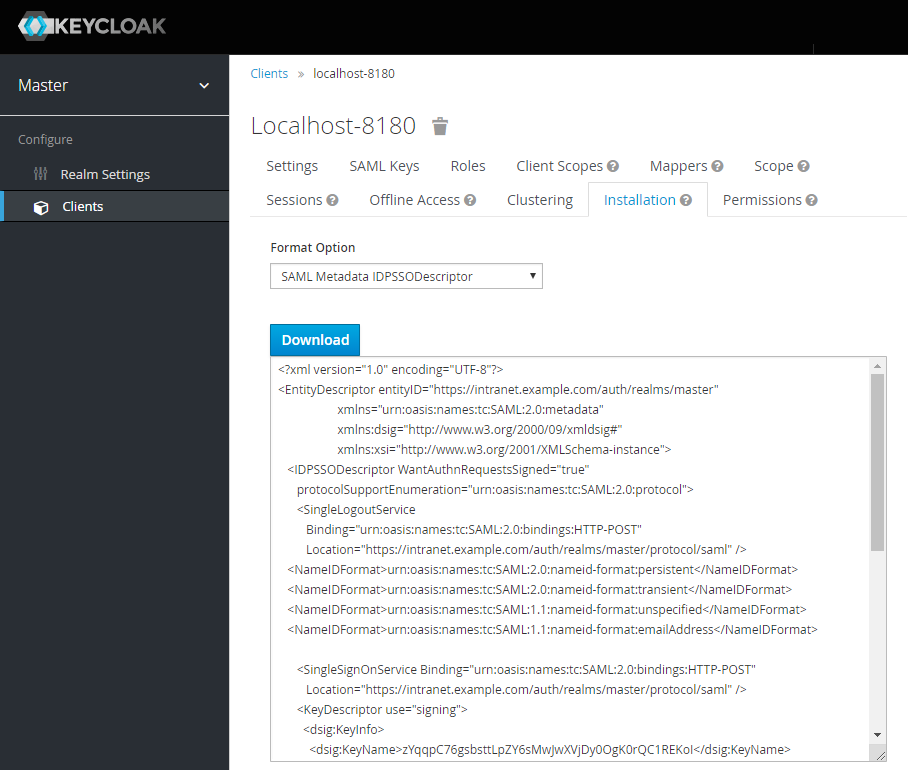
Configuring the Squore Installation
The rest of the configuration is carried out on the machine where Squore Server is installed and consists in editing WildFly’s <SQUORE_HOME>/server/standalone/configuration/standalone.xml to add and configure the new login module.
-
Edit <SQUORE_HOME>/server/standalone/configuration/standalone.xml, and locate the section providing the squore-policy security domain, which by default looks like this:
<security-domain name="squore-policy" cache-type="default"> <authentication> <login-module code="Database" flag="sufficient"> (...) </login-module> </authentication> </security-domain> -
Paste in the configuration for SSO before the default login module:
<security-domain name="squore-policy" cache-type="default"> <authentication> <!-- SSO login module --> <login-module code="com.squoring.squore.server.security.SamlLoginModule" flag="sufficient"> <module-option name="entity-id" value="localhost-8180" /> <module-option name="idp-metadata-file" value="/path/to/idp-metadata.xml"/> <module-option name="saml-public-key" value="/path/to/saml-public-key.crt"/> <module-option name="saml-private-key" value="/path/to/saml-private-key.pk8"/> <module-option name="user-last-name" value="lastname"/> <module-option name="user-first-name" value="firstname"/> <module-option name="user-mail" value="email"/> <module-option name="user-organization-unit" value="orgarnisation"/> <module-option name="logout-init-by-sp" value="false"/> </login-module> <login-module code="Database" flag="sufficient"> (...) </login-module> </authentication> </security-domain> -
Configure the
entity-idattribute so it matches the ID of the client you created in the identity provider. -
Edit the configuration to set the paths to the identity provider metadata file (
idp-metadata-file, mandatory), public key file (saml-public-key, optional) and private key file (saml-private-key, optional).It is recommended to store configuration files outside of <SQUORE_HOME> to avoid losing them when upgrading your installation.
-
Set up the user attributes returned in the SAML response that are imported into the Squore user account.
Depending on your setup, you may need to configure mappers in your identity provider to return the desired key/value pairs.
-
Set up the desired behaviour of Squore’s logout button with the
logout-init-by-spattribute:-
false (default): logs the user out of Squore and reconnects them immediately if they are still connected to the identity provider. Logging out of the identity provider automatically invalidates the Squore session.
-
true: logs the user out of Squore and redirects them to the identity provider login screen
-
A restart of Squore Server is necessary for the changes to be taken into account.
Configuring E-Mail Notifications
Squore allows users to configure automatic sending of e-mail notifications at the end of an analysis. In order to use this feature, Squore Server must be configured to communicate with an SMTP server.
Before you start, ensure that the following details are available:
-
The URL and port of your SMTP server
-
The username and password used to authenticate against the SMTP server
-
The e-mail address that you want to see used in the from field of the e-mails.
In order to configure the SMTP server integration:
-
Edit <SQUORE_HOME>/server/standalone/configuration/standalone.xml, find the
mail-sessionconfiguration, which by default looks like this:<smtp-server outbound-socket-binding-ref="mail-smtp"/> -
Complete the element to add in the username and password for the smtp server, and optionally turn on ssl:
<mail-session name="default" jndi-name="java:jboss/mail/Default"> <smtp-server outbound-socket-binding-ref="mail-smtp" ssl="false" username="login" password="password"/> </mail-session> -
Find the
outbound-socket-bindingelement with thenameattribute mail-smtp and edit theremote-destinationsub-element as needed:<outbound-socket-binding name="mail-smtp"> <remote-destination host="localhost" port="25"/> </outbound-socket-binding> -
Start Squore Server.
-
Log in as administrator and go to Administration > System.
-
Set the value of the FROM e-mail address for notifications, as well as the Squore Server URL to be used in body of the e-mails, for example squore@domain.com and http://localhost:8180/SQuORE_Server.
Notifying Users by E-Mail
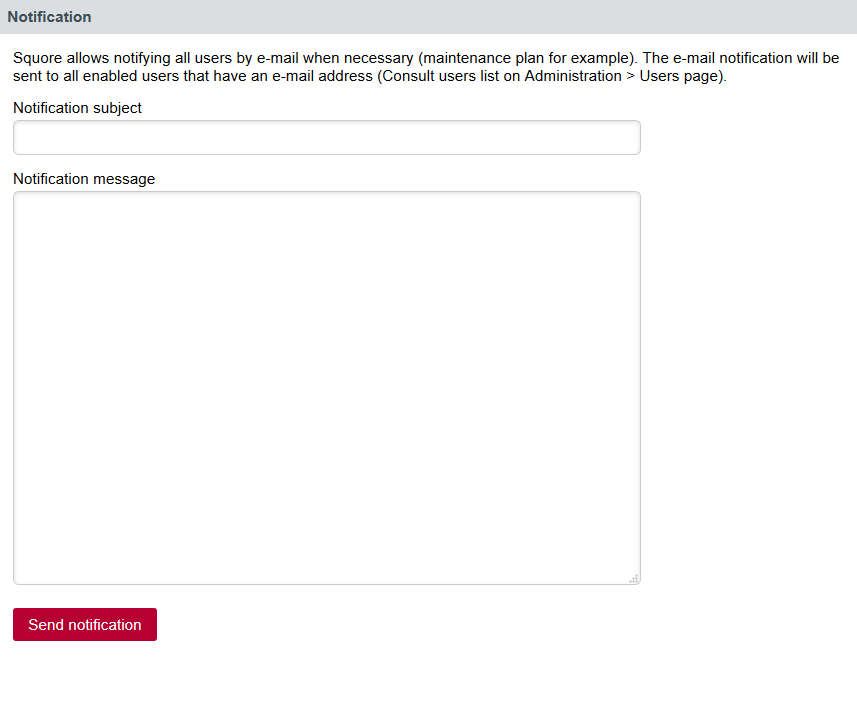
Squore allows notifying all users by e-mail when planned maintenance is necessary. If you have already configured e-mail notification as explained in Configuring E-Mail Notifications, follow these steps to send a maintenance e-mail:
-
Log in as administrator.
-
Click Administration > System
-
Click on Notify users by e-mail.
-
Type a message subject and content and click Send to e-mail users.
The e-mail notification will be sent to all enabled users that have an e-mail address.
|
Squore will actually limit the amount of recipients to 100 per e-mail, and send more than one e-mail if necessary. If this number of recipients is too high for your SMTP server, you can configure the maximum number of recipients to include in a single e-mail by setting the mail.recipients property in <SQUORE_HOME>/server/standalone/configuration/squore-server.properties: |
Linking to Projects
There are two ways to build direct links to projects in Squore:
-
using IDs with the RestoreContext page
-
using names with the LoadDashboard page
Each method supports different parameters to build direct links to a tab of the Explorer for the specified project, as explained below.
RestoreContext
Links to the Squore Explorer using IDs. The URL accepts the following parameters:
-
modelId to link to a model node in the portfolio
-
projectId to link to the latest version of the specified project
-
versionId to link to a specific version of a project
-
artefactId to link to a specific artefact in a project (can be combined with projectId and versionId)
-
tabName to display a specific tab of the Explorer. This parameter can be combined with any of the ones above and must be one of:
-
dashboard (default)
-
action-items
-
highlights
-
findings
-
reports
-
attributes (Forms)
-
indicators
-
measures
-
annotations
Users can copy a RestoreContext link from the Home page, the Projects page, or generate one using the Share… dialog in an artefact’s context menu, which is the only way to find an artefactId. Model IDs are not exposed anywhere in the web interface.
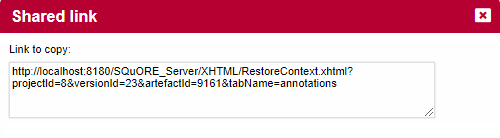 The sharing dialog from the web UI with a full RestoreContext URL
Project and version IDs are printed in the project’s output XML file, making it easy to parse and build a URL dynamically when using continuous integration to launch analyses.
-
LoadDashboard
Links to the Squore Explorer using names instead of IDs. The URL accepts the following parameters:
-
application (mandatory) to specify the project to link to
-
version (optional) to specify which version of the project to display. When not specified, the latest version fo the project is displayed
-
artefactId (optional) to link to a specific artefact in the project
-
tabName to display a specific tab of the Explorer. This parameter can be combined with any of the ones above and must be one of:
-
dashboard (default)
-
action-items
-
highlights
-
findings
-
reports
-
attributes (Forms)
-
indicators
-
measures
-
annotations
The following is a URL that links to the version called V5 in the project called Earth. Since no artefactId and tabName are specified, the Dashboard tab will be displayed for the root node of the project: http://localhost:8180/SQuORE_Server/XHTML/MyDashboard/dashboard/LoadDashboard.xhtml?application=Earth&version=V5.
-
Embedding Dashboard Elements
All the charts displayed on the Squore Dashboard have a unique URL, so they can be embedded into other sites.
In order to find out the URL of a chart, follow these steps:
-
Log into Squore and view the dashboard of the project you want to get information from.
-
Click a chart to view it.
-
Click the Share… entry in the Chart Viewer menu to get the chart’s URL, as shown in the picture below:
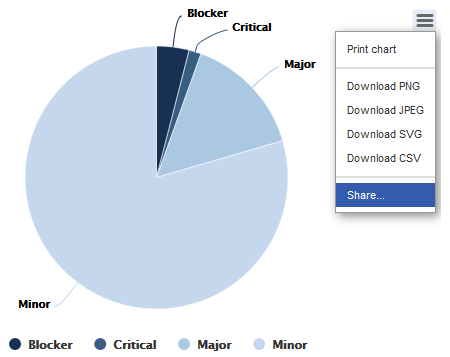 Getting a chart permalink from the Chart Viewer
The URL http://localhost:8180/SQuORE_Server/squore/resource/chart/<CHART_UID>.png is a permalink to this chart for this version of the project.
|
When generating a permalink, Squore includes two extra parameters in the URL ( |
Integration with Atlassian Confluence
It is possible to extract some elements from the Squore dashboard and integrate them into a Confluence page. This section details how to configure Squore Server and Confluence to trust each other and how to extract the URLs to display charts.
Squore Server Configuration
In order to allow Confluence to connect to Squore Server:
-
Edit <SQUORE_HOME>/server/standalone/configuration/standalone.xml
-
Find the
security-domainelement named squore-policy. -
Add a new
login-moduleelement, as shown below:<security-domain name="squore-policy" cache-type="default"> <authentication> <login-module code="com.squoring.squore.server.security.TrustedLoginModule" flag="sufficient"/> (...) </authentication> </security-domain> -
Restart Squore Server to take the new configuration into account.
|
Because Confluence does not offer a single sign-on mechanism or authentication delegation, Confluence has to connect to Squore without using a password. This does not, however constitute a security risk, as the Squore user still has to exist and be allowed to view the target project in order for any information to be retrieved. |
Confluence Admin Configuration
In order to allow Confluence users to add Squore elements, a Confluence administrator can create a user macro to make it easier to include Squore elements into a page. This macro can be included in the category External Content in the Confluence administration pages and has no macro body. You can find the macro template macro below.
## Macro title: Squore Chart
## Macro category: External Content
## Macro has a body: N
## Body processing: No Body
##
## Developed by: Vector Informatik GmbH
## Date created: 2013/07/28

## @param squrl:title=Squore Server URL|type=string|required=true|desc=The Squore Server URL
## @param sqport:title=Squore Server Port|type=string|required=true|desc=The Squore Server Port
## @param chart:title=Squore Element URL|type=string|required=true|desc=The URL of the Squore Dashboard Element
## @param sizex:title=Squore Element Width|type=string|required=true|desc= The Squore Element Width
## @param sizey:title=Squore Element Height|type=string|required=true|desc= The Squore Element Height
## @param version:title=Version|type=enum|enumValues=This version,Latest draft,Latest Baseline|default=Latest draft
#if ("Latest draft"==$paramversion)
    #set($pversion="?version=last")
#elseif ("Latest Baseline"==$paramversion)
    #set($pversion="?version=last-baseline")
#else
    #set($pversion="")
#end
#set($login=$action.remoteUser.name)
<IFRAME frameborder="0" src="$paramsqurl:$paramsqport/SQuORE_Server/Export/ChartExport.xhtml?user=$login&width=$paramsizex&height=$paramsizey&chart=$paramchart$pversion" scrolling="no" width="$paramsizex" height="$paramsizey">
</IFRAME>
Adding Dashboard Elements
The macro you added in the previous section should be available to other Confluence users as the form show below from External Content.
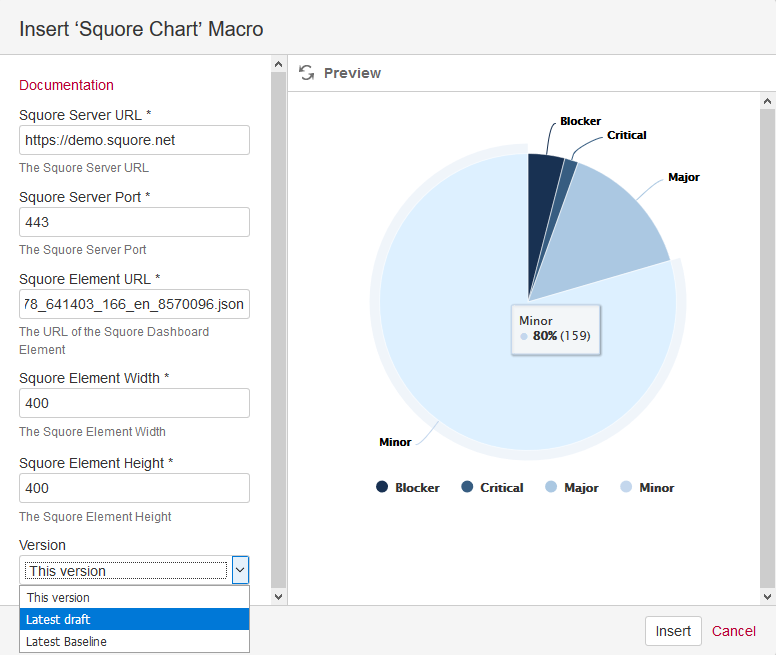
Users need to fill in the following details:
-
the Squore Server URL
-
the Squore Server port
-
the chart permalink (as retrieved according to the instructions in Embedding Dashboard Elements)
-
the desired width and height of the iframe containing the chart
-
the version of the project used to generate the data on the chart
-
This version displays the chart for the exact version you copied the permalink from
-
Latest draft displays the chart with the data from the latest draft version of the project
-
Latest Baseline displays the chart with the data from the latest baseline version of the project
-
|
You can either link to the chart URL ending in .png or .json. Using the link ending with .json allows you to embed a fully interactive chart with tooltips and zoom functionality in Confluence, while the link ending in .png only displays a static image of the chart. |
|
You can add several charts on the same Confluence page. |
Integration with CollabNet TeamForge
Squore for TeamForge Integration does not require any additional installation procedure.
Squore Configuration
The connection module must be configured in the file <SQUORE_HOME>/server/standalone/configuration/standalone.xml by adding to the security-domain (name="squore-policy") / authentication section (before the Database login-module):
<login-module code="com.squoring.squore.server.security.CollabNetLoginModule" flag="sufficient"/>Restart Squore Server to apply the changes, and log in as administrator to finish configuring the integration via Administration > System. In the Configuration tab, fill in the information in the CollabNet section according to the values found in TeamForge.
-
TeamForge Server URL (without / at the end), for example http://localhost.
-
TeamForge Server Name (will appear in Squore export format list), for example TeamForge.
-
TeamForge artifact default status at export, for example Open.
-
TeamForge artifact default priority at export, for example 4.
-
SvnEdge Main Repository URL, for example http://localhost/svn.
-
SvnEdge Viewer (viewvc) URL, for example http://localhost/viewvc.
-
External System Id of SvnEdge (for ex: exsy1001), for example exsy1011.
TeamForge Configuration
Squore is integrated into TeamForge as a "linked application". Steps to add a Squore access to a TeamForge project are:
Tab Configuration
Project Admin > Project Toolbar > Linked Application > Create
-
Application Name: Squore
-
URL: http://localhost:8180/SQuORE_Server/Export/CollabNet.xhtml (+ parameters)
-
Single Sign On Enabled: yes
Possible parameters are:
-
squoreProjectId (the related Squore project Id)
-
squoreVersionId (the related Squore project version Id)
-
trackerId (The Id of the TeamForge project tracker)
If the squoreVersionId is not defined, the last version of the project will be automatically loaded.
Some Examples: (if Squore is running on localhost and on port 8180)
-
Squore project Id 13 (last version) and TeamForge tracker Id tracker1004
-
Squore project Id 13, Squore project version 14 and TeamForge tracker Id tracker1004
Tracker configuration
In order to see all fields of the Squore defect reports after export, the corresponding TeamForge tracker should have the following additional fields (individually optionals) with the "Text Entry" input type:
-
SQ_Status
-
SQ_Since
-
SQ_Reasons
-
SQ_Scope
-
SQ_Artefact
-
SQ_Path
-
SQ_Comment
Integration Characteristics
Accessing Squore through TeamForge
The access to Squore is done through a new URL: http://localhost:8180/SQuORE_Server/Export/CollabNet.xhtml
Automatic connexion
When clicking on the Squore tab in TeamForge, the TeamForge user is automatically identified into Squore. If he is not a Squore user, the connexion is forbidden (error message).
The dashboard is shown and points directly on the specified project with the specified version. (or last version if the corresponding parameter is not defined)
Defect Report exports
If the user is on the specified project, a new export format is available (name: see Squore Configuration: cntf.server.name). The export button will directly export the selected defect reports under the form of new artifacts into the corresponding TeamForge tracker.
Source Code View
When visualising a source code, Squore retrieves the corresponding file using the viewvc application of the CollabNet SvnEdge server without asking the user a login and a password.
To use this functionality, the cntf.svn.url, cntf.viewvc.url and cntf.svn.exsy keys must be correctly set in the configuration file
If this functionality is not activated, the user has to use its own SVN login and password to access the source codes from Squore.
Squore Server Monitoring
Squore Server can be monitored with external tools on your network by connecting to administration URLs to retrieve information about the status of projects and users on the server.
-
Access http://localhost:8180/SQuORE_Server/servlets/state/sessions to get a report of the current user sessions on Squore Server. The information is extracted as in CSV format as
session;login;session creation;session access;client 1;demo;2019-02-04 09:57:05.933;2019-02-04 14:32:21.007;127.0.0.1:51722 -
Access http://localhost:8180/SQuORE_Server/servlets/data-providers?project-id=X&version-id=Y to get a report of the existing data-providers with configuration on Squore Server. The information is extracted as in CSV format as
"id";"type";"tool-id";"alias";"parameter";"value"
1;"DP";"SQUORE";;"languages";"c:.c,.C,.h,.H;cpp:.cpp,.CPP,.hpp,.HPP"
2;"RC";"FROMPATH";;"path";"C:\SQuORE\squore-server\samples\c\earth\v6"
Please note that you have to replace the X value by your project-id and the Y value by your version-id.
-
Access http://localhost:8180/SQuORE_Server/servlets/state/projects to get a report of the existing projects on Squore Server. The information is extracted as in CSV format as
id;project name;model id;owner;creation time;number of versions;last version;last build;status;step start;step
1;Earth;software_analytics;demo;2018-12-11 09:17:54.005;7;2018-12-11 09:20:56.949;V7;3;Database Management;
2;Neptune;software_analytics;demo;2018-12-11 09:21:12.816;1;2018-12-11 09:21:12.816;W25;0;;
The possible values of the status field are:
-
0 Finished: the version has been successfully created.
-
1 Warning: some warnings were raised during the last analysis.
-
2 Error: the analysis finished with an error.
-
3 Processing: the version is being created. When this status is returned, the current phase of the analysis will be specified in the step field and the time at which this step started will be specified in the step start.
-
4 Offline: this project has no versions.
-
5 Pending: this project is waiting for a free slot to start an analysis.
Note that in order to access these URLs you must be either:
-
A logged-in user with the Administrator profile, in which case you can access the URL from anywhere.
-
Requesting the URL from the computer that runs Squore Server, in which case the information is available without logging in.
|
By writing your own script that queries the monitoring URLs regularly and saving the output to a CSV file, you can feed the information into monitoring tools like Nagios and monitor the health of Squore Server. |
7. Sizing Squore Server and Database
This chapter provides information about the resource utilisation and impact of running a Squore server over time.
Project Size and Growth
The disk space necessary for analyses varies depending on your analysis model as well as the amount of information analysed.
As a result, it is difficult to predict accurately the amount of space that your Squore installation will use. After a few runs, you should be able to estimate disk space requirements by working out the space required to analyse an artefact with your analysis model. Keep in mind that the first version of a project is always more costly than subsequent analyses, and that an analysis with only a few changes will use a lot less space than an analysis where there are a lot of changes.
Here is an example based on the Risk Index model, one of the standard multi-language models shipped in Squore 16.1.
| First Code Snapshot | Second Code Snapshot | |
|---|---|---|
Language Distribution |
C (13%), C++ (14%), Java (73%) |
C (9%), C++ (11%), Java (80%) |
Source Files |
20000 |
30000 10% of previous code changed |
Classes |
28000 |
47000 |
Methods and Functions |
181000 |
296000 |
Lines of Code |
5.2M |
7.6M |
Effective Lines of Code |
2.6M |
3.6M |
Findings |
157000 |
234000 |
Action Items |
7700 |
6300 |
Average metrics per artefact |
160 |
Average indicators per artefact |
15 |
| Database Growth | Project Folder Growth | |
|---|---|---|
V1 (Snapshot 1) |
+3.5GB |
+839MB |
V2 (Snapshot 1) |
+100MB |
+1MB |
V3 (Snapshot 2) |
+3GB |
+1.1GB |
Saving Space by Deleting Old Data Files
You can save disk space by keeping data files generated by Squore only for the last baseline version. This behaviour is enabled by default and can be overridden either by using a setting in your <SQUORE_HOME>/config.xml, or by changing the behaviour for each project. This can be useful when you want to debug the analysis data later.
-
In order to save all data files for all versions by default for every project, open <SQUORE_HOME>/config.xml and
projectselement as shown below:<projects directory="/path/to/data/folder"> <data-providers keep-data-files="true"/> </projects>The behaviour is applied after a server restart, and the old files are deleted when a new version is created.
-
In order to override the behaviour for a particular project in the web interface, check or uncheck the Keep old versions data files box when creating a new version of the project or when managing the project.
-
In order to override the behaviour for a particular project from the command line, use the parameter keepDataFiles=true|false when creating a new version of the project.
Appendix A: Man pages
Download man pages:
install(1)
support@squoring.com Vector Informatik GmbH
NAME
install - installation script
SYNOPSIS
install [options …] <SQUORE_DATA>
install -C [options …] <SQUORE_DATA>
install -U <SQUORE_HOME> [options …]
DESCRIPTION
Installs and configures Squore.
The most common options when installing Squore are :
-
-b, to open Squore to the network (specify 0.0.0.0 to open the server to connections from all clients on the network).
-
-k, to deploy a licence file.
Alternatively, when upgrading an existing installation, use :
-
-U, to specify the directory to upgrade.
-
Existing installation settings can be overriden by providing options after the -U switch.
Squore data is stored in the <SQUORE_DATA> directory.
OPTIONS
-C
Configure files only, does not create any database schema. This option may be used to reconfigure Squore after installation.
-U <SQUORE_HOME>
Upgrade the installation pointed to by the <SQUORE_HOME> folder.
-v
Increase verbosity level.
-S
Use remote PostgreSQL server. This option may be used to point on an existing server (no cluster is created).
-P pg_dir
Location of PostgreSQL executables.
-D cluster_dir
PostgreSQL cluster directory to create (default <SQUORE_DATA>/cluster).
-s size
PostgreSQL shared buffers size, in MB. Defaults to 25% of the memory available on the server.
-r dbms
Supported DBMS vendor (default: postgresql). Valid values: postgresql, oracle.
-h db_host
Database server’s host name (default: localhost).
-p db_port
Database server’s port number (default: DMBS dependent, 4561 for postgresql).
-A db_admin
Database administrator name (default: DMBS dependent, postgres for postgresql).
-d db_name
Squore database name (default: squore).
-u db_user
Squore database user (default: squore).
-e
Pick existing user and database (recommended for Oracle Database).
-J java_home
Specify the Java home to use. Defaults to JAVA_HOME, and, if this variable is not set, to an OS specific value.
-x size
Java memory allocation pool, in MB (Xmx option). Defaults to 25% of the memory available on the server, with a minimum of 512 MB.
-b bind_address
WildFly bind address (default: localhost). If you plan to use Squore from your local network, use 0.0.0.0 for the bind address. Otherwise access is restricted to connections from localhost only.
-o binding_offset
WildFly binding port offset (default: 100). This number is added to the default (8080 for http) to calculate the set of ports used for Squore Server. An offset of 100 means that Squore is accessible via http://localhost:8180/SQuORE_Server
-g PhantomJS port
PhantomJS port. The port to use for the embedded installation of PhantomJS. (default: 3003)
-T tmp_dir
Squore temporary directory (default: /tmp/squore)
-k squore-license.p7s
Squore licensing key.
ARGUMENTS
<SQUORE_DATA>
The Squore data directory, where Squore data is stored. That is, the database cluster (when managed by Squore), projects related files, and backups.
BUGS
Contact support at support@squoring.com or report bugs at https://support.squoring.com/.
RESOURCES
Full documentation is available at https://support.squoring.com/documentation/latest.
COPYRIGHT
© 2019 Vector Informatik GmbH - All rights reserved - https://www.vector.com/ - This material may not be reproduced, displayed, modified or distributed without the express prior written permission of the copyright holder. Squore is protected by an Interdeposit Certification registered with Agence pour la Protection des Programmes under the Inter Deposit Digital Number IDDN.FR.001.390035.001.S.P.2013.000.10600.
sqadm reset(1)
support@squoring.com Vector Informatik GmbH
NAME
sqadm reset - reset installation
SYNOPSIS
sqadm reset [-P]
DESCRIPTION
This command clears both the database content, and internal storage files used by Squore. So far, the -P and -D options are mandatory. The sqadm reset command shall be executed on a stopped Squore server, but a running database.
OPTIONS
-h, --help
Display help information and exit.
-P, --project-only
Reset project related data only. Not supported for installations that use an Oracle database backend. Use this option to keep management related settings, like roles, users, global settings, etc.
-y, --no-prompt
Do not prompt for confirmation.
--jdbc-url url
Database url of the form jdbc:subprotocol:subname.
--jdbc-user user
Database user.
-D dir, --data-dir dir
Squore projects directory.
BUGS
Contact support at support@squoring.com or report bugs at https://support.squoring.com/.
RESOURCES
Full documentation is available at https://support.squoring.com/documentation/latest.
COPYRIGHT
© 2019 Vector Informatik GmbH - All rights reserved - https://www.vector.com/ - This material may not be reproduced, displayed, modified or distributed without the express prior written permission of the copyright holder. Squore is protected by an Interdeposit Certification registered with Agence pour la Protection des Programmes under the Inter Deposit Digital Number IDDN.FR.001.390035.001.S.P.2013.000.10600.
sqadm version(1)
support@squoring.com Vector Informatik GmbH
NAME
sqadm version - Display version
SYNOPSIS
sqadm version
DESCRIPTION
This command displays the version of Squore installed on your system and exits.
BUGS
Contact support at support@squoring.com or report bugs at https://support.squoring.com/.
RESOURCES
Full documentation is available at https://support.squoring.com/documentation/latest.
COPYRIGHT
© 2019 Vector Informatik GmbH - All rights reserved - https://www.vector.com/ - This material may not be reproduced, displayed, modified or distributed without the express prior written permission of the copyright holder. Squore is protected by an Interdeposit Certification registered with Agence pour la Protection des Programmes under the Inter Deposit Digital Number IDDN.FR.001.390035.001.S.P.2013.000.10600.
sqctl(1)
support@squoring.com Vector Informatik GmbH
NAME
sqctl - launcher
SYNOPSIS
sqctl [-c config.xml] start
sqctl [-c config.xml] stop
sqctl [-c config.xml] status
sqctl [-c config.xml] restart
DESCRIPTION
This launcher script is used to start and stop Squore Server, or query the status of the Squore Server processes.
OPTIONS
-c config.xml
Specifies the config.xml file to read to start the server. Using this parameter is normally not needed.
start
Starts Squore Server by launching the following processes:
-
PostgreSQL (if Squore Server uses a local PostgreSQL cluster)
-
PhantomJS
-
WildFly
stop
Stops Squore Server by stopping the following processes:
-
WildFly
-
PhantomJS
-
PostgreSQL (if Squore Server uses a local PostgreSQL cluster)
status
Reports whether the PostgreSQL, PhantomJS and WildFly processes are running or stopped and exits.
restart
Stops and then starts Squore Server by stopping and starting the following processes:
-
WildFly
-
PhantomJS
-
PostgreSQL (if Squore Server uses a local PostgreSQL cluster)
-
PostgreSQL (if Squore Server uses a local PostgreSQL cluster)
-
PhantomJS
-
WildFly
BUGS
Contact support at support@squoring.com or report bugs at https://support.squoring.com/.
RESOURCES
Full documentation is available at https://support.squoring.com/documentation/latest.
COPYRIGHT
© 2019 Vector Informatik GmbH - All rights reserved - https://www.vector.com/ - This material may not be reproduced, displayed, modified or distributed without the express prior written permission of the copyright holder. Squore is protected by an Interdeposit Certification registered with Agence pour la Protection des Programmes under the Inter Deposit Digital Number IDDN.FR.001.390035.001.S.P.2013.000.10600.
Appendix B: Squore XML Schemas
input-data-2.xsd
<?xml version="1.0" encoding="UTF-8"?>
<xs:schema xmlns:xs="http://www.w3.org/2001/XMLSchema" elementFormDefault="qualified">

  <xs:simpleType name="id">
    <xs:restriction base="xs:string">
      <xs:pattern value="[A-Z_][A-Z0-9_]+" />
    </xs:restriction>
  </xs:simpleType>

  <xs:simpleType name="relax-status">
	<xs:restriction base="id">
		<xs:enumeration value="RELAXED_DEROGATION"/>
		<xs:enumeration value="RELAXED_LEGACY"/>
		<xs:enumeration value="RELAXED_FALSE_POSITIVE"/>
	</xs:restriction>
</xs:simpleType>

  <xs:element name="bundle">
    <xs:complexType>
      <xs:choice maxOccurs="unbounded">
        <xs:element ref="artifact"/>
        <xs:element ref="finding"/>
        <xs:element ref="info"/>
        <xs:element ref="link"/>
        <xs:element ref="metric"/>
      </xs:choice>
      <xs:attribute name="version" use="required" type="xs:integer" fixed="2"/>
    </xs:complexType>
  </xs:element>

  <xs:element name="artifact">
    <xs:complexType>
      <xs:sequence>
        <xs:choice minOccurs="0" maxOccurs="unbounded">
          <xs:element ref="artifact"/>
		  <xs:element ref="finding"/>
          <xs:element ref="metric"/>
          <xs:element ref="key"/>
		  <xs:element ref="info"/>
		  <xs:element ref="link"/>
		  <xs:element ref="milestone"/>
        </xs:choice>
      </xs:sequence>
      <xs:attribute name="alias"/>
      <xs:attribute name="art-location"/>
      <xs:attribute name="id"/>
      <xs:attribute name="local-art-location"/>
      <xs:attribute name="local-key"/>
      <xs:attribute name="local-parent"/>
      <xs:attribute name="location"/>
      <xs:attribute name="name"/>
      <xs:attribute name="parent"/>
      <xs:attribute name="path"/>
      <xs:attribute name="type" use="required" type="id"/>
      <xs:attribute name="view-path"/>
    </xs:complexType>
  </xs:element>

  <xs:element name="info">
    <xs:complexType>
      <xs:attribute name="local-ref"/>
      <xs:attribute name="name" use="required" type="id"/>
      <xs:attribute name="ref"/>
      <xs:attribute name="tool"/>
      <xs:attribute name="value" use="required"/>
    </xs:complexType>
  </xs:element>

  <xs:element name="key">
    <xs:complexType>
      <xs:attribute name="value" use="required"/>
    </xs:complexType>
  </xs:element>

  <xs:element name="metric">
    <xs:complexType>
      <xs:attribute name="local-ref"/>
      <xs:attribute name="name" use="required" type="id"/>
      <xs:attribute name="ref"/>
      <xs:attribute name="tool"/>
      <xs:attribute name="value" type="xs:decimal" use="required"/>
    </xs:complexType>
  </xs:element>

  <xs:element name="link">
    <xs:complexType>
      <xs:attribute name="dst"/>
      <xs:attribute name="local-dst" type="xs:integer"/>
      <xs:attribute name="local-src" type="xs:integer"/>
      <xs:attribute name="name" use="required" type="id"/>
      <xs:attribute name="src"/>
    </xs:complexType>
  </xs:element>

  <xs:element name="finding">
    <xs:complexType>
      <xs:sequence>
        <xs:element minOccurs="0" maxOccurs="unbounded" ref="location"/>
        <xs:element minOccurs="0" maxOccurs="1" ref="relax"/>
      </xs:sequence>
      <xs:attribute name="descr"/>
      <xs:attribute name="local-ref"/>
      <xs:attribute name="location" use="required"/>
      <xs:attribute name="name" use="required" type="id"/>
      <xs:attribute name="p0"/>
      <xs:attribute name="p1"/>
      <xs:attribute name="p2"/>
      <xs:attribute name="p3"/>
      <xs:attribute name="p4"/>
      <xs:attribute name="p5"/>
      <xs:attribute name="p6"/>
      <xs:attribute name="p7"/>
      <xs:attribute name="p8"/>
      <xs:attribute name="p9"/>
      <xs:attribute name="q0"/>
      <xs:attribute name="q1"/>
      <xs:attribute name="q2"/>
      <xs:attribute name="q3"/>
      <xs:attribute name="q4"/>
      <xs:attribute name="q5"/>
      <xs:attribute name="q6"/>
      <xs:attribute name="q7"/>
      <xs:attribute name="q8"/>
      <xs:attribute name="q9"/>
      <xs:attribute name="ref"/>
      <xs:attribute name="tool"/>
    </xs:complexType>
  </xs:element>

  <xs:element name="location">
    <xs:complexType>
      <xs:attribute name="local-ref"/>
      <xs:attribute name="location" use="required"/>
      <xs:attribute name="ref"/>
    </xs:complexType>
  </xs:element>

  <xs:element name="relax">
    <xs:complexType>
      <xs:simpleContent>
        <xs:extension base="xs:string">
          <xs:attribute name="status" type="relax-status"/>
        </xs:extension>
      </xs:simpleContent>

    </xs:complexType>
  </xs:element>

  <xs:element name="milestone">
    <xs:complexType>
	  <xs:sequence>
        <xs:element minOccurs="0" maxOccurs="unbounded" ref="goal"/>
      </xs:sequence>
      <xs:attribute name="date" use="required" type="xs:string"/>
      <xs:attribute name="name" use="required" type="id"/>
      <xs:attribute name="displayName" type="xs:string"/>
    </xs:complexType>
  </xs:element>

  <xs:element name="goal">
    <xs:complexType>
      <xs:attribute name="name" use="required" type="id"/>
      <xs:attribute name="value" use="required" type="xs:decimal"/>
    </xs:complexType>
  </xs:element>
</xs:schema>
form.xsd
<?xml version="1.0" encoding="UTF-8"?>
<xs:schema xmlns:xs="http://www.w3.org/2001/XMLSchema" elementFormDefault="qualified">

	<xs:simpleType name="id">
		<xs:restriction base="xs:string">
			<xs:pattern value='[A-Z_][A-Z0-9_]+' />
		</xs:restriction>
	</xs:simpleType>

	<xs:simpleType name="project-status">
		<xs:restriction base="id">
			<xs:enumeration value="IGNORE"/>
			<xs:enumeration value="WARNING"/>
			<xs:enumeration value="ERROR"/>
		</xs:restriction>
	</xs:simpleType>

	<xs:element name="tags">
		<xs:complexType>
			<xs:sequence>
				<xs:element maxOccurs="0" ref="tag"/>
				<xs:element maxOccurs="0" ref="exec-phase"/>
			</xs:sequence>
			<xs:attribute name="baseName"/>
			<xs:attribute name="deleteTmpSrc" type="xs:boolean"/>
			<xs:attribute name="image"/>
			<xs:attribute name="needSources" type="xs:boolean"/>
			<xs:attribute name="projectStatusOnFailure" type="project-status"/>
		</xs:complexType>
	</xs:element>

	<xs:element name="tag">
		<xs:complexType>
			<xs:sequence>
				<xs:element minOccurs="0" maxOccurs="unbounded" ref="values"/>
				<xs:element minOccurs="0" maxOccurs="unbounded" ref="value"/>
				<xs:element minOccurs="0" maxOccurs="unbounded" ref="displayIf"/>
			</xs:sequence>
			<xs:attribute name="changeable" type="xs:boolean"/>
			<xs:attribute name="credentialType"/>
			<xs:attribute name="defaultValue"/>
			<xs:attribute name="displayType"/>
			<xs:attribute name="key" use="required"/>
			<xs:attribute name="optionTitle"/>
			<xs:attribute name="required" type="xs:boolean"/>
			<xs:attribute name="style"/>
			<xs:attribute name="type" use="required"/>
			<xs:attribute name="hide" type="xs:boolean"/>
			<xs:attribute name="converter"/>
			<xs:attribute name="image"/>
			<xs:attribute name="inverted" type="xs:boolean"/>
			<xs:attribute name="acceptedTypes"/>
		</xs:complexType>
	</xs:element>

	<xs:element name="value">
		<xs:complexType>
			<xs:attribute name="key" use="required"/>
			<xs:attribute name="name"/>
			<xs:attribute name="option"/>
		</xs:complexType>
	</xs:element>

	<xs:element name="values">
		<xs:complexType>
			<xs:attribute name="type" use="required"/>
		</xs:complexType>
	</xs:element>

	<xs:element name="displayIf">
		<xs:complexType>
			<xs:sequence>
				<xs:element minOccurs="0" maxOccurs="unbounded" ref="and"/>
				<xs:element minOccurs="0" maxOccurs="unbounded" ref="or"/>
				<xs:element minOccurs="0" maxOccurs="unbounded" ref="notEmpty"/>
				<xs:element minOccurs="0" maxOccurs="unbounded" ref="equals"/>
			</xs:sequence>
		</xs:complexType>
	</xs:element>

	<xs:element name="and">
		<xs:complexType>
			<xs:sequence>
				<xs:element minOccurs="0" maxOccurs="unbounded" ref="and"/>
				<xs:element minOccurs="0" maxOccurs="unbounded" ref="or"/>
				<xs:element minOccurs="0" maxOccurs="unbounded" ref="notEmpty"/>
				<xs:element minOccurs="0" maxOccurs="unbounded" ref="equals"/>
			</xs:sequence>
		</xs:complexType>
	</xs:element>

	<xs:element name="or">
		<xs:complexType>
			<xs:sequence>
				<xs:element minOccurs="0" maxOccurs="unbounded" ref="and"/>
				<xs:element minOccurs="0" maxOccurs="unbounded" ref="or"/>
				<xs:element minOccurs="0" maxOccurs="unbounded" ref="notEmpty"/>
				<xs:element minOccurs="0" maxOccurs="unbounded" ref="equals"/>
			</xs:sequence>
		</xs:complexType>
	</xs:element>

	<xs:element name="notEmpty">
		<xs:complexType>
			<xs:attribute name="key" use="required"/>
		</xs:complexType>
	</xs:element>

	<xs:element name="equals">
		<xs:complexType>
			<xs:attribute name="key" use="required"/>
			<xs:attribute name="value"/>
		</xs:complexType>
	</xs:element>

	<xs:element name="exec-phase">
		<xs:complexType>
			<xs:sequence>
				<xs:element minOccurs="0" ref="exec"/>
				<xs:element minOccurs="0" ref="exec-tool"/>
			</xs:sequence>
			<xs:attribute name="id" use="required"/>
		</xs:complexType>
	</xs:element>

	<xs:element name="exec">
		<xs:complexType>
			<xs:sequence>
				<xs:element maxOccurs="0" ref="arg"/>
			</xs:sequence>
			<xs:attribute name="name" use="required"/>
		</xs:complexType>
	</xs:element>

	<xs:element name="arg">
		<xs:complexType>
			<xs:attribute name="tag"/>
			<xs:attribute name="value"/>
			<xs:attribute name="defaultValue"/>
		</xs:complexType>
	</xs:element>

	<xs:element name="exec-tool">
		<xs:complexType>
			<xs:sequence>
				<xs:element maxOccurs="0" ref="param"/>
			</xs:sequence>
			<xs:attribute name="name" use="required"/>
		</xs:complexType>
	</xs:element>

	<xs:element name="param">
		<xs:complexType>
			<xs:attribute name="key" use="required"/>
			<xs:attribute name="tag"/>
			<xs:attribute name="value"/>
			<xs:attribute name="defaultValue"/>
		</xs:complexType>
	</xs:element>
</xs:schema>
properties-1.2.xsd
<?xml version="1.0" encoding="UTF-8"?>
<xs:schema xmlns:xs="http://www.w3.org/2001/XMLSchema" version="1.0">

	<xs:element name="Bundle" type="bundleType"/>

	<xs:complexType name="bundleType">
		<xs:sequence>
			<xs:choice minOccurs="0" maxOccurs="unbounded">
				<xs:element name="help" type="helpType" minOccurs="0" maxOccurs="unbounded"/>
				<xs:element name="hideObsoleteModels" type="obsoleteType" minOccurs="0" maxOccurs="1"/>
				<xs:element name="hideModel" type="hiddenType" minOccurs="0" maxOccurs="unbounded"/>
				<xs:element name="explorerTabs" type="tabsType" minOccurs="0" maxOccurs="1"/>
				<xs:element name="explorerTrees" type="treesType" minOccurs="0" maxOccurs="1"/>
				<xs:element name="option" type="optionType" minOccurs="0" maxOccurs="unbounded"/>
			</xs:choice>
		</xs:sequence>
		<xs:attribute name="version" use="required" type="xs:string"/>
	</xs:complexType>

	<xs:complexType name="helpType">
		<xs:attribute name="label" use="required" type="xs:string"/>
		<xs:attribute name="url" use="required" type="xs:anyURI"/>
		<xs:attribute name="profiles" use="optional" type="xs:string"/>
	</xs:complexType>

	<xs:complexType name="optionType">
		<xs:attribute name="name" use="required" type="xs:string"/>
		<xs:attribute name="value" use="required" type="xs:string"/>
	</xs:complexType>

	<xs:complexType name="obsoleteType">
		<xs:attribute name="value" use="optional" default="false" type="xs:boolean"/>
	</xs:complexType>

	<xs:complexType name="hiddenType">
		<xs:attribute name="name" use="required" type="xs:string"/>
	</xs:complexType>

	<xs:complexType name="tabsType">
		<xs:sequence maxOccurs="unbounded">
			<xs:element name="tab" type="tabType" maxOccurs="unbounded"/>
		</xs:sequence>
		<xs:attribute name="hideSettings" use="optional" default="false" type="xs:boolean"/>
	</xs:complexType>

	<xs:complexType name="tabType">
		<xs:attribute name="name" use="required" type="xs:string"/>
		<xs:attribute name="default" use="optional" default="false" type="xs:boolean"/>
		<xs:attribute name="mandatory" use="optional" default="false" type="xs:boolean"/>
		<xs:attribute name="rendered" use="optional" default="true" type="xs:boolean"/>
	</xs:complexType>

	<xs:complexType name="treesType">
		<xs:sequence maxOccurs="unbounded">
			<xs:element name="tree" type="treeType" maxOccurs="unbounded"/>
		</xs:sequence>
	</xs:complexType>

	<xs:complexType name="treeType">
		<xs:attribute name="name" use="required" type="xs:string"/>
		<xs:attribute name="rendered" use="optional" default="true" type="xs:boolean"/>
	</xs:complexType>

</xs:schema>
config-1.3.xsd
<?xml version="1.0" encoding="UTF-8"?>
<xs:schema xmlns:xs="http://www.w3.org/2001/XMLSchema" version="1.0">

	<xs:element name="squore" type="squoreType"/>

	<xs:complexType name="squoreType">
		<xs:sequence>
			<xs:element name="paths" type="pathsType"/>
			<xs:element name="database" type="databaseType" minOccurs="0"/>
			<xs:element name="phantomjs" type="phantomjsType" minOccurs="0"/>
			<xs:element name="configuration" type="directoriesType"/>
			<xs:element name="addons" type="directoriesType"/>
			<xs:element name="client" type="dataDirectoriesType" minOccurs="0"/>
			<xs:element name="tmp" type="directoryType" minOccurs="0"/>
			<xs:element name="projects" type="projectType" minOccurs="0"/>
			<xs:element name="sources" type="directoryType" minOccurs="0"/>
			<xs:element name="workspace" type="directoryType" minOccurs="0"/>
		</xs:sequence>
		<xs:attribute name="type" use="required" type="xs:string"/>
		<xs:attribute name="version" use="required" type="xs:string"/>
	</xs:complexType>

	<xs:complexType name="pathsType">
		<xs:sequence maxOccurs="unbounded">
			<xs:element name="path" type="pathType"/>
		</xs:sequence>
	</xs:complexType>

	<xs:complexType name="pathType">
		<xs:attribute name="name" use="required" type="xs:string"/>
		<xs:attribute name="path" use="required" type="xs:string"/>
	</xs:complexType>

	<xs:complexType name="directoriesType">
		<xs:sequence maxOccurs="unbounded">
			<xs:element name="path" type="directoryType"/>
		</xs:sequence>
	</xs:complexType>

	<xs:complexType name="directoryType">
		<xs:attribute name="directory" use="required" type="xs:string"/>
	</xs:complexType>

	<xs:complexType name="databaseType">
		<xs:sequence>
			<xs:element name="postgresql" type="directoryType" minOccurs="0"/>
			<xs:element name="cluster" type="directoryType" minOccurs="0"/>
			<xs:element name="backup" type="directoryType"/>
			<xs:element name="security" type="securityType" minOccurs="0"/>
		</xs:sequence>
	</xs:complexType>

	<xs:complexType name="phantomjsType">
		<xs:sequence>
			<xs:element name="socket-binding" type="socketBindingType" minOccurs="0"/>
		</xs:sequence>
	</xs:complexType>

	<xs:complexType name="socketBindingType">
		<xs:attribute name="address" type="xs:string" default="127.0.0.1"/>
		<xs:attribute name="port" type="xs:short" default="3003"/>
		<xs:attribute name="squore-url" type="xs:string" default=""/>
		<xs:attribute name="distant-url" type="xs:string" default=""/>
	</xs:complexType>

	<xs:complexType name="securityType">
		<xs:sequence>
			<xs:element name="user-name" type="xs:string"/>
		</xs:sequence>
	</xs:complexType>

	<xs:complexType name="dataDirectoriesType">
		<xs:sequence>
			<xs:element name="tmp" type="directoryType" minOccurs="0"/>
			<xs:element name="projects" type="projectType" minOccurs="0"/>
			<xs:element name="sources" type="directoryType" minOccurs="0"/>
		</xs:sequence>
	</xs:complexType>

	<xs:complexType name="projectType">
		<xs:sequence>
			<xs:element name="data-providers" type="dpType" minOccurs="0"/>
		</xs:sequence>
		<xs:attribute name="directory" use="required" type="xs:string"/>
	</xs:complexType>

	<xs:complexType name="dpType">
		<xs:attribute name="keep-data-files" use="required" type="xs:boolean"/>
	</xs:complexType>

</xs:schema>
analysis.xsd
<?xml version="1.0" encoding="UTF-8"?>
<xs:schema xmlns:xs="http://www.w3.org/2001/XMLSchema" elementFormDefault="qualified">

	<xs:simpleType name="id">
		<xs:restriction base="xs:string">
			<xs:pattern value='[A-Z_][A-Z0-9_]+' />
		</xs:restriction>
	</xs:simpleType>

	<xs:simpleType name="list-id">
		<xs:restriction base="xs:string">
			<xs:pattern value='[A-Z_][A-Z0-9_]+(;[A-Z_][A-Z0-9_]+)*' />
		</xs:restriction>
	</xs:simpleType>

	<xs:simpleType name="families">
		<xs:restriction base="xs:string">
			<xs:pattern value='[A-Z0-9_]+(;[A-Z_][A-Z0-9_]+)*' />
		</xs:restriction>
	</xs:simpleType>

	<xs:simpleType name="categories">
		<xs:restriction base="xs:string">
			<xs:pattern value='[A-Z_][A-Z0-9_]+\.[A-Z_][A-Z0-9_]+(;[A-Z_][A-Z0-9_]+\.[A-Z_][A-Z0-9_]+)*' />
		</xs:restriction>
	</xs:simpleType>

	<xs:simpleType name="measure-type">
		<xs:restriction base="id">
			<xs:enumeration value="METRIC"/>
			<xs:enumeration value="RULE"/>
		</xs:restriction>
	</xs:simpleType>

	<xs:simpleType name="format">
		<xs:restriction base="id">
			<xs:enumeration value="NUMBER"/>
			<xs:enumeration value="PERCENT"/>
			<xs:enumeration value="INTEGER"/>
			<xs:enumeration value="DATE"/>
			<xs:enumeration value="DATETIME"/>
			<xs:enumeration value="TIME"/>
			<xs:enumeration value="DAYS"/>
			<xs:enumeration value="HOURS"/>
			<xs:enumeration value="MINUTES"/>
			<xs:enumeration value="SECONDS"/>
			<xs:enumeration value="MILLISECONDS"/>
			<xs:enumeration value="MAN_DAYS"/>
			<xs:enumeration value="MAN_HOURS"/>
			<xs:enumeration value="MAN_MINUTES"/>
			<xs:enumeration value="MAN_SECONDS"/>
			<xs:enumeration value="MAN_MILLISECONDS"/>
		</xs:restriction>
	</xs:simpleType>

	<xs:simpleType name="datetime-style">
		<xs:restriction base="id">
			<xs:enumeration value="DEFAULT"/>
			<xs:enumeration value="SHORT"/>
			<xs:enumeration value="MEDIUM"/>
			<xs:enumeration value="LONG"/>
			<xs:enumeration value="FULL"/>
		</xs:restriction>
	</xs:simpleType>

	<xs:simpleType name="rounding-mode">
		<xs:restriction base="id">
			<xs:enumeration value="UP"/>
			<xs:enumeration value="DOWN"/>
			<xs:enumeration value="CEILING"/>
			<xs:enumeration value="FLOOR"/>
			<xs:enumeration value="HALF_UP"/>
			<xs:enumeration value="HALF_DOWN"/>
			<xs:enumeration value="HALF_EVEN"/>
		</xs:restriction>
	</xs:simpleType>

	<xs:simpleType name="bounds-type">
		<xs:restriction base="xs:string">
			<xs:pattern value='[\[\]]((-)*[0-9](\.[0-9]+)?)*;((-)*[0-9](.[0-9]+)?)*[\[\]]' />
		</xs:restriction>
	</xs:simpleType>

	<xs:simpleType name="path-scope">
		<xs:restriction base="id">
			<xs:enumeration value="CHILDREN"/>
			<xs:enumeration value="DESCENDANTS"/>
		</xs:restriction>
	</xs:simpleType>

	<xs:complexType name="elements">
		<xs:sequence>
			<xs:choice minOccurs="0" maxOccurs="unbounded">
				<xs:element ref="ArtefactType"/>
				<xs:element ref="Indicator"/>
				<xs:element ref="Measure"/>
				<xs:element ref="Package"/>
				<xs:element ref="package"/>
				<xs:element ref="Scale"/>
				<xs:element ref="ScaleMacro"/>
				<xs:element ref="Constant"/>
				<xs:element ref="RootIndicator"/>
				<xs:element ref="UpdateRules"/>
				<xs:element ref="UpdateRule"/>
				<xs:element ref="Link"/>
				<xs:element ref="ComputedLink"/>
			</xs:choice>
		</xs:sequence>
		<xs:attribute name="providedBy"/>
		<xs:attribute name="name"/>
		<xs:attribute name="storedOnlyIfDisplayed" type="xs:boolean"/>
	</xs:complexType>

	<xs:element name="Bundle" type="elements" />

	<xs:element name="Package" type="elements"/>
	<xs:element name="package" type="elements"/>

	<xs:element name="Constant">
		<xs:complexType>
			<xs:attribute name="id" use="required" type="id"/>
			<xs:attribute name="value" use="required"/>
		</xs:complexType>
	</xs:element>

	<xs:element name="RootIndicator">
		<xs:complexType>
			<xs:attribute name="artefactTypes" use="required" type="list-id"/>
			<xs:attribute name="indicatorId" use="required" type="id"/>
		</xs:complexType>
	</xs:element>

	<xs:element name="UpdateRules">
		<xs:complexType>
			<xs:sequence>
				<xs:element minOccurs="0" maxOccurs="unbounded" ref="UpdateRule"/>
			</xs:sequence>
		</xs:complexType>
	</xs:element>

	<xs:element name="UpdateRule">
		<xs:complexType>
			<xs:attribute name="categories" type="categories"/>
			<xs:attribute name="disabled" type="xs:boolean"/>
			<xs:attribute name="measureId" use="required" type="id"/>
		</xs:complexType>
	</xs:element>

	<xs:element name="Measure">
		<xs:complexType>
			<xs:sequence>
				<xs:element minOccurs="0" maxOccurs="unbounded" ref="Computation"/>
			</xs:sequence>
			<xs:attribute name="acceptMissingValue" type="xs:boolean"/>
			<xs:attribute name="categories" type="categories"/>
			<xs:attribute name="dataBounds" type="bounds-type"/>
			<xs:attribute name="dateStyle" type="datetime-style"/>
			<xs:attribute name="decimals" type="xs:integer"/>
			<xs:attribute name="defaultValue" type="xs:decimal"/>
			<xs:attribute name="excludingTypes" type="list-id"/>
			<xs:attribute name="invalidValue"/>
			<xs:attribute name="families" type="families"/>
			<xs:attribute name="format" type="format"/>
			<xs:attribute name="manual" type="xs:boolean"/>
			<xs:attribute name="measureId" use="required" type="id"/>
			<xs:attribute name="noValue"/>
			<xs:attribute name="pattern"/>
			<xs:attribute name="roundingMode" type="rounding-mode"/>
			<xs:attribute name="suffix"/>
			<xs:attribute name="targetArtefactTypes"/>
			<xs:attribute name="timeStyle" type="datetime-style"/>
			<xs:attribute name="toolName"/>
			<xs:attribute name="toolVersion"/>
			<xs:attribute name="type" type="measure-type"/>
			<xs:attribute name="usedForRelaxation" type="xs:boolean"/>
		</xs:complexType>
	</xs:element>

	<xs:element name="Computation">
		<xs:complexType>
			<xs:attribute name="continueOnRelaxed" type="xs:boolean"/>
			<xs:attribute name="excludingTypes" type="list-id"/>
			<xs:attribute name="result" use="required"/>
			<xs:attribute name="stored" type="xs:boolean"/>
			<xs:attribute name="targetArtefactTypes" use="required" type="list-id"/>
		</xs:complexType>
	</xs:element>

	<xs:element name="Indicator">
		<xs:complexType>
			<xs:attribute name="displayedScale" type="id"/>
			<xs:attribute name="displayedValue" type="id"/>
			<xs:attribute name="displayTypes" type="list-id"/>
			<xs:attribute name="excludingTypes" type="list-id"/>
			<xs:attribute name="families" type="families"/>
			<xs:attribute name="indicatorId" use="required" type="id"/>
			<xs:attribute name="measureId" type="id"/>
			<xs:attribute name="scaleId" type="id"/>
			<xs:attribute name="targetArtefactTypes" type="list-id"/>
		</xs:complexType>
	</xs:element>

	<xs:element name="Scale">
		<xs:complexType>
			<xs:sequence>
				<xs:element minOccurs="0" maxOccurs="unbounded" ref="ScaleLevel"/>
			</xs:sequence>
			<xs:attribute name="isDynamic" type="xs:boolean"/>
			<xs:attribute name="macro" type="id"/>
			<xs:attribute name="scaleId" use="required" type="id"/>
			<xs:attribute name="targetArtefactTypes" type="list-id"/>
			<xs:attribute name="excludingTypes" type="list-id"/>
			<xs:attribute name="vars"/>
		</xs:complexType>
	</xs:element>

	<xs:element name="ScaleMacro">
		<xs:complexType>
			<xs:sequence>
				<xs:element maxOccurs="unbounded" ref="ScaleLevel"/>
			</xs:sequence>
			<xs:attribute name="id" use="required" type="id"/>
			<xs:attribute name="isDynamic" type="xs:boolean"/>
		</xs:complexType>
	</xs:element>

	<xs:element name="ArtefactType">
		<xs:complexType>
			<xs:attribute name="heirs" type="list-id"/>
			<xs:attribute name="id" use="required" type="id"/>
			<xs:attribute name="manual" type="xs:boolean"/>
			<xs:attribute name="parents" type="list-id"/>
		</xs:complexType>
	</xs:element>

	<xs:element name="ScaleLevel">
		<xs:complexType>
			<xs:attribute name="bounds" use="required"/>
			<xs:attribute name="levelId" use="required" type="id"/>
			<xs:attribute name="rank" use="required"/>
		</xs:complexType>
	</xs:element>

	<xs:element name="Link">
		<xs:complexType>
			<xs:attribute name="id" use="required" type="id"/>
			<xs:attribute name="inArtefactTypes" type="list-id"/>
			<xs:attribute name="outArtefactTypes" type="list-id"/>
			<xs:attribute name="srcArtefactTypes" type="list-id"/>
			<xs:attribute name="dstArtefactTypes" type="list-id"/>
		</xs:complexType>
	</xs:element>

	<xs:element name="ComputedLink">
		<xs:complexType>
			<xs:sequence>
				<xs:element minOccurs="1" maxOccurs="1" ref="StartPath"/>
				<xs:element minOccurs="0" maxOccurs="unbounded" ref="NextPath"/>
			</xs:sequence>
			<xs:attribute name="id" use="required" type="id"/>
		</xs:complexType>
	</xs:element>

	<xs:element name="StartPath">
		<xs:complexType>
			<xs:attribute name="link" type="id"/>
			<xs:attribute name="scope" type="path-scope"/>
			<xs:attribute name="srcArtefactTypes" type="list-id"/>
			<xs:attribute name="dstArtefactTypes" type="list-id"/>
			<xs:attribute name="srcCondition"/>
			<xs:attribute name="dstCondition"/>
			<xs:attribute name="recurse" type="xs:boolean"/>
			<xs:attribute name="keepIntermediateLinks" type="xs:boolean"/>
		</xs:complexType>
	</xs:element>

	<xs:element name="NextPath">
		<xs:complexType>
			<xs:attribute name="link" type="id"/>
			<xs:attribute name="scope" type="path-scope"/>
			<xs:attribute name="dstArtefactTypes" type="list-id"/>
			<xs:attribute name="dstCondition"/>
			<xs:attribute name="recurse" type="xs:boolean"/>
			<xs:attribute name="keepIntermediateLinks" type="xs:boolean"/>
		</xs:complexType>
	</xs:element>
</xs:schema>
decision.xsd
<?xml version="1.0" encoding="UTF-8"?>
<xs:schema xmlns:xs="http://www.w3.org/2001/XMLSchema" elementFormDefault="qualified">

	<xs:simpleType name="id">
		<xs:restriction base="xs:string">
			<xs:pattern value='[A-Z_][A-Z0-9_]+' />
		</xs:restriction>
	</xs:simpleType>

	<xs:simpleType name="list-id">
		<xs:restriction base="xs:string">
			<xs:pattern value='[A-Z_][A-Z0-9_]+(;[A-Z_][A-Z0-9_]+)*' />
		</xs:restriction>
	</xs:simpleType>

	<xs:simpleType name="categories">
		<xs:restriction base="xs:string">
			<xs:pattern value='[A-Z_][A-Z0-9_]+\.[A-Z_][A-Z0-9_]+(;[A-Z_][A-Z0-9_]+\.[A-Z_][A-Z0-9_]+)*' />
		</xs:restriction>
	</xs:simpleType>

	<xs:simpleType name="criterion-type">
		<xs:restriction base="id">
			<xs:enumeration value="BENEFIT"/>
			<xs:enumeration value="COST"/>
		</xs:restriction>
	</xs:simpleType>

	<xs:simpleType name="preference-level">
		<xs:restriction base="id">
			<xs:enumeration value="VERY_LOW"/>
			<xs:enumeration value="LOW"/>
			<xs:enumeration value="MEDIUM"/>
			<xs:enumeration value="HIGH"/>
			<xs:enumeration value="VERY_HIGH"/>
		</xs:restriction>
	</xs:simpleType>

	<xs:complexType name="elements">
		<xs:sequence>
			<xs:choice minOccurs="0" maxOccurs="unbounded">
				<xs:element ref="Package"/>
				<xs:element ref="package"/>
				<xs:element ref="DecisionCriteria"/>
				<xs:element ref="DecisionCriterion"/>
				<xs:element ref="FindingsActionPlan"/>
			</xs:choice>
		</xs:sequence>
	</xs:complexType>

	<xs:element name="Bundle" type="elements"/>
	<xs:element name="Package" type="elements"/>
	<xs:element name="package" type="elements"/>
	<xs:element name="DecisionCriteria" type="elements"/>

	<xs:element name="DecisionCriterion">
		<xs:complexType>
			<xs:sequence>
				<xs:element ref="Triggers"/>
			</xs:sequence>
			<xs:attribute name="categories" type="categories"/>
			<xs:attribute name="dcId" use="required" type="id"/>
			<xs:attribute name="excludingTypes" type="list-id"/>
			<xs:attribute name="families" type="list-id"/>
			<xs:attribute name="roles" type="list-id"/>
			<xs:attribute name="targetArtefactTypes" use="required" type="list-id"/>
		</xs:complexType>
	</xs:element>

	<xs:element name="Triggers">
		<xs:complexType>
			<xs:sequence>
				<xs:element maxOccurs="unbounded" ref="Trigger"/>
			</xs:sequence>
		</xs:complexType>
	</xs:element>

	<xs:element name="Trigger">
		<xs:complexType>
			<xs:sequence>
				<xs:element maxOccurs="unbounded" ref="Test"/>
			</xs:sequence>
		</xs:complexType>
	</xs:element>

	<xs:element name="Test">
		<xs:complexType>
			<xs:attribute name="bounds"/>
			<xs:attribute name="descrId" type="id"/>
			<xs:attribute name="expr" use="required"/>
			<xs:attribute name="p0"/>
			<xs:attribute name="p1"/>
			<xs:attribute name="p2"/>
			<xs:attribute name="p3"/>
			<xs:attribute name="p4"/>
			<xs:attribute name="p5"/>
			<xs:attribute name="p6"/>
			<xs:attribute name="p7"/>
			<xs:attribute name="p8"/>
			<xs:attribute name="p9"/>
			<xs:attribute name="suspect"/>
		</xs:complexType>
	</xs:element>

	<xs:element name="FindingsActionPlan">
		<xs:complexType>
			<xs:sequence>
				<xs:choice minOccurs="0" maxOccurs="unbounded">
					<xs:element ref="CategoryCriterion"/>
					<xs:element ref="OccurrencesCriterion"/>
					<xs:element ref="VariableCriterion"/>
				</xs:choice>
			</xs:sequence>
			<xs:attribute name="limit" type="xs:integer"/>
			<xs:attribute name="priorityScaleId" type="id"/>
		</xs:complexType>
	</xs:element>

	<xs:element name="CategoryCriterion">
		<xs:complexType>
			<xs:attribute name="type" type="criterion-type"/>
			<xs:attribute name="preferenceLevel" type="preference-level"/>
			<xs:attribute name="scaleId" use="required" type="id"/>
			<xs:attribute name="excludeLevels" type="list-id"/>
		</xs:complexType>
	</xs:element>

	<xs:element name="OccurrencesCriterion">
		<xs:complexType>
			<xs:attribute name="type" type="criterion-type"/>
			<xs:attribute name="preferenceLevel" type="preference-level"/>
			<xs:attribute name="scaleId" type="id"/>
			<xs:attribute name="excludeLevels" type="list-id"/>
		</xs:complexType>
	</xs:element>

	<xs:element name="VariableCriterion">
		<xs:complexType>
			<xs:attribute name="type" type="criterion-type"/>
			<xs:attribute name="preferenceLevel" type="preference-level"/>
			<xs:attribute name="indicatorId" use="required" type="id"/>
			<xs:attribute name="excludeLevels" type="list-id"/>
		</xs:complexType>
	</xs:element>
</xs:schema>
description.xsd
<?xml version="1.0" encoding="UTF-8"?>
<xs:schema xmlns:xs="http://www.w3.org/2001/XMLSchema" elementFormDefault="qualified">

	<xs:complexType name="elements">
		<xs:sequence>
			<xs:choice minOccurs="0" maxOccurs="unbounded">
				<xs:element ref="Package"/>
				<xs:element ref="package"/>
				<xs:element ref="Properties"/>
			</xs:choice>
		</xs:sequence>
	</xs:complexType>

	<xs:element name="Bundle">
		<xs:complexType>
			<xs:sequence>
				<xs:choice minOccurs="0" maxOccurs="unbounded">
					<xs:element ref="Package"/>
					<xs:element ref="package"/>
					<xs:element ref="Properties"/>
				</xs:choice>
			</xs:sequence>
			<xs:attribute name="available"/>
			<xs:attribute name="default"/>
		</xs:complexType>
	</xs:element>

	<xs:element name="Package" type="elements"/>
	<xs:element name="package" type="elements"/>

	<xs:element name="Properties">
		<xs:complexType>
			<xs:attribute name="src" use="required"/>
		</xs:complexType>
	</xs:element>
</xs:schema>
exports.xsd
<?xml version="1.0" encoding="UTF-8"?>
<xs:schema xmlns:xs="http://www.w3.org/2001/XMLSchema" elementFormDefault="qualified">

	<xs:simpleType name="type-id">
		<xs:restriction base="xs:string">
			<xs:pattern value='[A-Z0-9_]*' />
		</xs:restriction>
	</xs:simpleType>

	<xs:element name="Package">
		<xs:complexType>
			<xs:sequence>
				<xs:choice minOccurs="0" maxOccurs="unbounded">
					<xs:element ref="Package" />
					<xs:element ref="Role" />
					<xs:element ref="ExportScript" />
					<xs:element ref="ExportDef" />
				</xs:choice>
			</xs:sequence>
		</xs:complexType>
	</xs:element>

	<xs:element name="Bundle">
		<xs:complexType>
			<xs:sequence>
				<xs:choice minOccurs="0" maxOccurs="unbounded">
					<xs:element ref="Package" />
					<xs:element ref="Role" />
					<xs:element ref="ExportScript" />
					<xs:element ref="ExportDef" />
				</xs:choice>
			</xs:sequence>
		</xs:complexType>
	</xs:element>

	<xs:element name="Role">
		<xs:complexType>
			<xs:sequence minOccurs="0" maxOccurs="unbounded">
				<xs:element ref="Export" />
			</xs:sequence>
			<xs:attribute name="name" use="required" type="xs:string" />
		</xs:complexType>
	</xs:element>

	<xs:element name="Export">
		<xs:complexType>
			<xs:sequence>
				<xs:choice minOccurs="0" maxOccurs="unbounded">
					<xs:element ref="ExportScript" />
					<xs:element ref="ExportDef" />
				</xs:choice>
			</xs:sequence>
			<xs:attribute name="type" use="required" type="type-id" />
		</xs:complexType>
	</xs:element>

	<xs:element name="ExportScript">
		<xs:complexType>
			<xs:sequence>
				<xs:element minOccurs="0" maxOccurs="unbounded" ref="arg" />
			</xs:sequence>
			<xs:attribute name="name" use="required" type="xs:string" />
			<xs:attribute name="script" use="required" type="xs:string" />
			<xs:attribute name="onArtefactTypes" />
			<xs:attribute name="onExcludingTypes" />
			<xs:attribute name="roles" />
			<xs:attribute name="groups" />
		</xs:complexType>
	</xs:element>

	<xs:element name="arg">
		<xs:complexType>
			<xs:attribute name="value" use="required" type="xs:string" />
			<xs:attribute name="optional" use="optional" type="xs:boolean" default="false" />
		</xs:complexType>
	</xs:element>

	<xs:element name="ExportDef">
		<xs:complexType>
			<xs:attribute name="name" use="required" />
			<xs:attribute name="onArtefactTypes" />
			<xs:attribute name="onExcludingTypes" />
			<xs:attribute name="roles" />
			<xs:attribute name="groups" />
		</xs:complexType>
	</xs:element>

</xs:schema>
highlights.xsd
<?xml version="1.0" encoding="UTF-8"?>
<xs:schema xmlns:xs="http://www.w3.org/2001/XMLSchema">

	<xs:simpleType name="id">
		<xs:restriction base="xs:string">
			<xs:pattern value='[A-Z0-9_]*' />
		</xs:restriction>
	</xs:simpleType>

	<xs:simpleType name="measure-id">
		<xs:restriction base="xs:string">
			<xs:pattern value='([BD].)?[A-Z0-9_]*' />
		</xs:restriction>
	</xs:simpleType>

	<xs:simpleType name="info-id">
		<xs:restriction base="xs:string">
			<xs:pattern value='[A-Z0-9_]*' />
		</xs:restriction>
	</xs:simpleType>

	<xs:simpleType name="indicator-id">
		<xs:restriction base="xs:string">
			<xs:pattern value='([I].)?[A-Z0-9_]*' />
		</xs:restriction>
	</xs:simpleType>

	<xs:simpleType name="bounds-type">
		<xs:restriction base="xs:string">
			<xs:pattern value='[\[\]]((-)*[0-9](\.[0-9]+)?)*;((-)*[0-9](.[0-9]+)?)*[\[\]]' />
		</xs:restriction>
	</xs:simpleType>

	<xs:simpleType name="top-order">
		<xs:restriction base="xs:string">
			<xs:enumeration value="ASC" />
			<xs:enumeration value="DESC" />
		</xs:restriction>
	</xs:simpleType>

	<xs:simpleType name="link-direction">
		<xs:restriction base="xs:string">
			<xs:enumeration value="IN" />
			<xs:enumeration value="OUT" />
		</xs:restriction>
	</xs:simpleType>

	<xs:simpleType name="result-size">
		<xs:union>
			<xs:simpleType>
				<xs:restriction base="xs:positiveInteger" />
			</xs:simpleType>
			<xs:simpleType>
				<xs:restriction base="xs:string">
					<xs:enumeration value="*" />
				</xs:restriction>
			</xs:simpleType>
		</xs:union>
	</xs:simpleType>

	<xs:simpleType name="header-display-type">
		<xs:restriction base="xs:string">
			<xs:enumeration value="MNEMONIC" />
			<xs:enumeration value="NAME" />
		</xs:restriction>
	</xs:simpleType>

	<xs:simpleType name="display-type">
		<xs:restriction base="xs:string">
			<xs:enumeration value="VALUE" />
			<xs:enumeration value="RANK" />
			<xs:enumeration value="ICON" />
			<xs:enumeration value="DATE" />
			<xs:enumeration value="DATETIME" />
			<xs:enumeration value="TIME" />
			<xs:enumeration value="NAME" />
			<xs:enumeration value="MNEMONIC" />
		</xs:restriction>
	</xs:simpleType>

	<xs:simpleType name="date-style">
		<xs:restriction base="xs:string">
			<xs:enumeration value="SHORT" />
			<xs:enumeration value="MEDIUM" />
			<xs:enumeration value="DEFAULT" />
			<xs:enumeration value="LONG" />
			<xs:enumeration value="FULL" />
		</xs:restriction>
	</xs:simpleType>

	<xs:complexType name="elements">
		<xs:sequence>
			<xs:choice minOccurs="0" maxOccurs="unbounded">
				<xs:element ref="Package" />
				<xs:element ref="Role" />
				<xs:element ref="Filters" />
				<xs:element ref="TopArtefacts" />
				<xs:element ref="TopDeltaArtefacts" />
				<xs:element ref="TopNewArtefacts" />
			</xs:choice>
		</xs:sequence>
	</xs:complexType>

	<xs:element name="Bundle" type="elements" />
	<xs:element name="Package" type="elements"/>
	<xs:element name="TopDeltaArtefacts" type="top-artefacts" />
	<xs:element name="TopNewArtefacts" type="top-artefacts" />

	<xs:element name="TopArtefacts">
		<xs:complexType>
			<xs:sequence maxOccurs="unbounded">
				<xs:choice>
					<xs:element minOccurs="0" maxOccurs="unbounded" ref="Column" />
					<xs:element minOccurs="0" maxOccurs="unbounded" ref="Where" />
					<xs:element minOccurs="0" maxOccurs="1" ref="where" />
					<xs:element minOccurs="0" maxOccurs="unbounded" ref="OrderBy" />
				</xs:choice>
			</xs:sequence>
			<xs:attribute name="id" use="required" type="id" />
			<xs:attribute name="hideRating" use="optional" type="xs:boolean" />
			<xs:attribute name="hidePath" use="optional" type="xs:boolean" />
			<xs:attribute name="name" use="optional" type="xs:string" />
			<xs:attribute name="onArtefactTypes" use="optional" type="xs:string" />
			<xs:attribute name="roles" use="optional" type="xs:string" />
			<xs:attribute name="groups" use="optional" type="xs:string" />
			<xs:attribute name="artefactTypes" use="optional" type="xs:string" />
			<xs:attribute name="excludingTypes" use="optional" type="xs:string" />
			<xs:attribute name="measureId" use="optional" default="LEVEL" type="measure-id" />
			<xs:attribute name="order" use="optional" default="ASC" type="top-order" />
			<xs:attribute name="altMeasureId" use="optional" type="measure-id" />
			<xs:attribute name="altOrder" use="optional" type="top-order" />
			<xs:attribute name="resultSize" use="required" type="result-size" />
			<xs:attribute name="linkType" use="optional" type="id" />
			<xs:attribute name="linkDirection" use="optional" type="link-direction" />
		</xs:complexType>
	</xs:element>

	<xs:complexType name="top-artefacts">
		<xs:sequence maxOccurs="unbounded">
			<xs:choice>
				<xs:element minOccurs="0" maxOccurs="unbounded" ref="Column" />
				<xs:element minOccurs="0" maxOccurs="unbounded" ref="Where" />
				<xs:element minOccurs="0" maxOccurs="1" ref="where" />
				<xs:element minOccurs="0" maxOccurs="unbounded" ref="OrderBy" />
			</xs:choice>
		</xs:sequence>
		<xs:attribute name="id" use="required" type="id" />
		<xs:attribute name="hideRating" use="optional" type="xs:boolean" />
		<xs:attribute name="hidePath" use="optional" type="xs:boolean" />
		<xs:attribute name="name" use="optional" type="xs:string" />
		<xs:attribute name="onArtefactTypes" use="optional" type="xs:string" />
		<xs:attribute name="roles" use="optional" type="xs:string" />
		<xs:attribute name="groups" use="optional" type="xs:string" />
		<xs:attribute name="artefactTypes" use="optional" type="xs:string" />
		<xs:attribute name="excludingTypes" use="optional" type="xs:string" />
		<xs:attribute name="measureId" use="optional" default="LEVEL" type="measure-id" />
		<xs:attribute name="order" use="optional" default="ASC" type="top-order" />
		<xs:attribute name="resultSize" use="required" type="result-size" />
		<xs:attribute name="linkType" use="optional" type="id" />
		<xs:attribute name="linkDirection" use="optional" type="link-direction" />
	</xs:complexType>

	<xs:element name="Role">
		<xs:complexType>
			<xs:sequence maxOccurs="unbounded">
				<xs:element ref="Filters" />
			</xs:sequence>
			<xs:attribute name="name" use="required" type="xs:string" />
			<xs:attribute name="preSelectedType" use="optional" type="xs:string" />
		</xs:complexType>
	</xs:element>

	<xs:element name="Filters">
		<xs:complexType>
			<xs:sequence maxOccurs="unbounded">
				<xs:choice>
					<xs:element ref="TopArtefacts" />
					<xs:element ref="TopDeltaArtefacts" />
					<xs:element ref="TopNewArtefacts" />
				</xs:choice>
			</xs:sequence>
			<xs:attribute name="type" use="required" type="xs:string" />
		</xs:complexType>
	</xs:element>

	<xs:element name="Column">
		<xs:complexType>
			<xs:attribute name="measureId" use="optional" type="measure-id" />
			<xs:attribute name="infoId" use="optional" type="info-id" />
			<xs:attribute name="indicatorId" use="optional" type="indicator-id" />
			<xs:attribute name="artefactTypes" use="optional" type="xs:string" />
			<xs:attribute name="excludingTypes" use="optional" type="xs:string" />
			<xs:attribute name="headerDisplayType" use="optional" default="NAME" type="header-display-type" />
			<xs:attribute name="displayType" use="optional" default="VALUE" type="display-type" />
			<xs:attribute name="decimals" use="optional" default="2" type="xs:integer" />
			<xs:attribute name="dateStyle" use="optional" default="DEFAULT" type="date-style" />
			<xs:attribute name="timeStyle" use="optional" default="DEFAULT" type="date-style" />
			<xs:attribute name="datePattern" use="optional" type="xs:string" />
			<xs:attribute name="suffix" use="optional" type="xs:string" />
			<xs:attribute name="useBackgroundColor" use="optional" type="xs:boolean" />
		</xs:complexType>
	</xs:element>

	<xs:element name="Where">
		<xs:complexType>
			<xs:attribute name="measureId" use="optional" type="measure-id" />
			<xs:attribute name="infoId" use="optional" type="info-id" />
			<xs:attribute name="value" use="optional" type="xs:string" />
			<xs:attribute name="bounds" use="optional" type="bounds-type" />
		</xs:complexType>
	</xs:element>

	<xs:element name="where">
		<xs:complexType>
			<xs:sequence maxOccurs="unbounded">
				<xs:choice>
					<xs:element ref="measure" />
					<xs:element ref="indicator" />
					<xs:element ref="info" />
				</xs:choice>
			</xs:sequence>
		</xs:complexType>
	</xs:element>

	<xs:element name="measure">
		<xs:complexType>
			<xs:attribute name="id" type="measure-id" />
			<xs:attribute name="values" use="optional" type="xs:string" />
			<xs:attribute name="bounds" use="optional" type="xs:string" />
			<xs:attribute name="invert" use="optional" type="xs:boolean" />
		</xs:complexType>
	</xs:element>

	<xs:element name="indicator">
		<xs:complexType>
			<xs:attribute name="id" type="indicator-id" />
			<xs:attribute name="levels" type="xs:string" />
			<xs:attribute name="invert" use="optional" type="xs:boolean" />
		</xs:complexType>
	</xs:element>

	<xs:element name="info">
		<xs:complexType>
			<xs:attribute name="id" type="info-id" />
			<xs:attribute name="values" use="optional" type="xs:string" />
			<xs:attribute name="patterns" use="optional" type="xs:string" />
			<xs:attribute name="invert" use="optional" type="xs:boolean" />
		</xs:complexType>
	</xs:element>

	<xs:element name="OrderBy">
		<xs:complexType>
			<xs:attribute name="measureId" use="required" type="measure-id" />
			<xs:attribute name="order" use="optional" default="ASC" type="top-order" />
		</xs:complexType>
	</xs:element>

</xs:schema>
properties.xsd
<?xml version="1.0" encoding="UTF-8"?>
<xs:schema xmlns:xs="http://www.w3.org/2001/XMLSchema" elementFormDefault="qualified">

	<xs:simpleType name="id">
		<xs:restriction base="xs:string">
			<xs:pattern value='[A-Z_][A-Z0-9_]+' />
		</xs:restriction>
	</xs:simpleType>

	<xs:simpleType name="list-id">
		<xs:restriction base="xs:string">
			<xs:pattern value='[A-Z_][A-Z0-9_]+(;[A-Z_][A-Z0-9_]+)*' />
		</xs:restriction>
	</xs:simpleType>

	<xs:simpleType name="aggregation-type">
		<xs:restriction base="id">
			<xs:enumeration value="MIN"/>
			<xs:enumeration value="MAX"/>
			<xs:enumeration value="OCC"/>
			<xs:enumeration value="AVG"/>
			<xs:enumeration value="DEV"/>
			<xs:enumeration value="SUM"/>
			<xs:enumeration value="MED"/>
			<xs:enumeration value="MOD"/>
		</xs:restriction>
	</xs:simpleType>

	<xs:complexType name="elements">
		<xs:sequence>
			<xs:choice minOccurs="0" maxOccurs="unbounded">
				<xs:element ref="package"/>
				<xs:element ref="hideMeasure"/>
				<xs:element ref="findingsTab"/>
				<xs:element ref="actionItemsTab"/>
				<xs:element ref="rulesEdition"/>
				<xs:element ref="scoreGroups"/>
			</xs:choice>
		</xs:sequence>
	</xs:complexType>

	<xs:element name="bundle" type="elements"/>
	<xs:element name="package" type="elements"/>

	<xs:element name="hideMeasure">
		<xs:complexType>
			<xs:attribute name="path" use="required"/>
			<xs:attribute name="targetArtefactTypes" type="list-id"/>
		</xs:complexType>
	</xs:element>

	<xs:element name="findingsTab">
		<xs:complexType>
			<xs:attribute name="orderBy" type="list-id"/>
			<xs:attribute name="hideColumns" type="list-id"/>
			<xs:attribute name="hideCharacteristicsFilter" type="xs:boolean"/>
		</xs:complexType>
	</xs:element>

	<xs:element name="actionItemsTab">
		<xs:complexType>
			<xs:attribute name="orderBy" type="list-id"/>
			<xs:attribute name="hideColumns" type="list-id"/>
		</xs:complexType>
	</xs:element>

	<xs:element name="rulesEdition">
		<xs:complexType>
			<xs:attribute name="scales" use="required" type="list-id"/>
		</xs:complexType>
	</xs:element>

	<xs:element name="scoreGroups">
		<xs:complexType>
			<xs:attribute name="indicatorId" type="id"/>
			<xs:attribute name="aggregationType" type="aggregation-type"/>
		</xs:complexType>
	</xs:element>
</xs:schema>
tutorials.xsd
<?xml version="1.0" encoding="UTF-8"?>
<xs:schema xmlns:xs="http://www.w3.org/2001/XMLSchema">

	<xs:simpleType name="external-id">
		<xs:restriction base="xs:string">
			<xs:pattern value="[A-Z]{1}[A-Z0-9_]*" />
		</xs:restriction>
	</xs:simpleType>

	<xs:simpleType name="positive-integer">
		<xs:restriction base="xs:string">
			<xs:pattern value="[0-9]+" />
		</xs:restriction>
	</xs:simpleType>

	<xs:simpleType name="opacity">
		<xs:restriction base="xs:string">
			<xs:pattern value='(0|1){1}\.?[0-9]\{0,2}' />
		</xs:restriction>
	</xs:simpleType>

	<xs:simpleType name="actions">
		<xs:restriction base="xs:string">
			<xs:enumeration value="EXPAND_PORTFOLIO_TREE" />
			<xs:enumeration value="EXPAND_ARTEFACT_TREE" />
			<xs:enumeration value="EXPAND_MEASURE_TREE" />
			<xs:enumeration value="COLLAPSE_PORTFOLIO_TREE" />
			<xs:enumeration value="COLLAPSE_ARTEFACT_TREE" />
			<xs:enumeration value="COLLAPSE_MEASURE_TREE" />
			<xs:enumeration value="SELECT_MODEL" />
			<xs:enumeration value="SELECT_PROJECT" />
			<xs:enumeration value="SELECT_ARTEFACT" />
			<xs:enumeration value="SELECT_ARTEFACT_LEAF" />
			<xs:enumeration value="CLOSE_MEASURE_POPUP" />
			<xs:enumeration value="SELECT_MEASURE" />
			<xs:enumeration value="SHOW_REVIEW_SET" />
			<xs:enumeration value="SHOW_PORTFOLIO_TREE" />
			<xs:enumeration value="SHOW_DASHBOARD_TAB" />
			<xs:enumeration value="SHOW_ACTION_ITEMS_TAB" />
			<xs:enumeration value="SHOW_HIGHLIGHTS_TAB" />
			<xs:enumeration value="SHOW_FINDINGS_TAB" />
			<xs:enumeration value="SHOW_REPORTS_TAB" />
			<xs:enumeration value="SHOW_FORMS_TAB" />
			<xs:enumeration value="SHOW_INDICATORS_TAB" />
			<xs:enumeration value="SHOW_MEASURES_TAB" />
			<xs:enumeration value="SHOW_COMMENTS_TAB" />
			<xs:enumeration value="SHOW_ACTION_ITEMS_ADVANCED_SEARCH" />
			<xs:enumeration value="EXPAND_ACTION_ITEM" />
			<xs:enumeration value="SHOW_FINDINGS_ADVANCED_SEARCH" />
			<xs:enumeration value="SELECT_FINDING" />
			<xs:enumeration value="SELECT_FINDING_ARTEFACT" />
			<xs:enumeration value="EXPAND_FINDING" />
			<xs:enumeration value="EXPAND_ATTRIBUTE" />
			<xs:enumeration value="SWITCH_INDICATORS_PAGE" />
			<xs:enumeration value="SWITCH_MEASURES_PAGE" />
			<xs:enumeration value="SWITCH_COMMENTS_PAGE" />
			<xs:enumeration value="CLOSE_CHART_POPUP" />
			<xs:enumeration value="OPEN_CHART_POPUP" />
			<xs:enumeration value="OPEN_MODEL_CHART_POPUP" />
			<xs:enumeration value="SELECT_DESCR_TAB" />
			<xs:enumeration value="SELECT_COMMENTS_TAB" />
			<xs:enumeration value="SELECT_FAVORITES_TAB" />
			<xs:enumeration value="COMPARE_CHART" />
			<xs:enumeration value="QUIT_COMPARATIVE_MODE" />
			<xs:enumeration value="QUIT_FULLDISPLAY_MODE" />
			<xs:enumeration value="CLOSE_ARTEFACT_TREE_FILTER" />
			<xs:enumeration value="SHOW_ARTEFACT_TREE_FILTER" />
			<xs:enumeration value="OPEN_TABLE" />
			<xs:enumeration value="CHANGE_PAGE" />
			<xs:enumeration value="CREATE_NEW_PROJECT" />
			<xs:enumeration value="SELECT_WIZARD" />
			<xs:enumeration value="VALIDATE_WIZARD" />
			<xs:enumeration value="VALIDATE_INFORMATION" />
			<xs:enumeration value="VALIDATE_DP_OPTIONS" />
			<xs:enumeration value="RUN_PROJECT_CREATION" />
			<xs:enumeration value="OPEN_SUB_MENU_HELP" />
			<xs:enumeration value="CLOSE_TUTORIAL_POPUP" />
			<xs:enumeration value="OPEN_TUTORIAL_POPUP" />
			<xs:enumeration value="NONE" />
		</xs:restriction>
	</xs:simpleType>

	<xs:simpleType name="alias">
		<xs:restriction base="xs:string">
			<xs:enumeration value="CUSTOM" />
			<xs:enumeration value="BODY" />
			<xs:enumeration value="BREADCRUMBS" />
			<xs:enumeration value="MENU_HELP" />
			<xs:enumeration value="SUB_MENU_HELP" />
			<xs:enumeration value="SUB_MENU_HELP_ROW" />
			<xs:enumeration value="SUB_MENU_HELP_ROW_FIRST" />
			<xs:enumeration value="TUTORIAL_POPUP" />
			<xs:enumeration value="TUTORIAL_POPUP_MODEL" />
			<xs:enumeration value="TUTORIAL_POPUP_MODEL_FIRST" />
			<xs:enumeration value="TUTORIAL_POPUP_TUTORIAL_NAME" />
			<xs:enumeration value="TUTORIAL_POPUP_TUTORIAL_NAME_FIRST" />
			<xs:enumeration value="TUTORIAL_POPUP_TUTORIAL_DESCR" />
			<xs:enumeration value="TUTORIAL_POPUP_TUTORIAL_DESCR_FIRST" />
			<xs:enumeration value="EXPLORER" />
			<xs:enumeration value="DRILLDOWN" />
			<xs:enumeration value="EXPLORER_TAB" />
			<xs:enumeration value="ARTEFACT_TREE" />
			<xs:enumeration value="MEASURE_TREE" />
			<xs:enumeration value="EXPLORER_HEADER" />
			<xs:enumeration value="PORTFOLIO_HEADER" />
			<xs:enumeration value="ARTEFACT_TREE_SEARCH" />
			<xs:enumeration value="ARTEFACT_TREE_FILTER" />
			<xs:enumeration value="REVIEW_SET" />
			<xs:enumeration value="PORTFOLIO_TREE" />
			<xs:enumeration value="PORTFOLIO_TREE_PROJECT" />
			<xs:enumeration value="PORTFOLIO_TREE_PROJECT_FIRST" />
			<xs:enumeration value="MODEL_DASHBOARD" />
			<xs:enumeration value="MODEL_CHARTS" />
			<xs:enumeration value="MODEL_CHART_FIRST" />
			<xs:enumeration value="MODEL_TABLE" />
			<xs:enumeration value="MODEL_TABLE_ROW_FIRST" />
			<xs:enumeration value="MODEL_CHART" />
			<xs:enumeration value="MODEL_TABLE_ROW" />
			<xs:enumeration value="MODEL_CHART_POPUP" />
			<xs:enumeration value="MODEL_CHART_POPUP_GRAPH" />
			<xs:enumeration value="MODEL_CHART_POPUP_PREVIOUS_ARROW" />
			<xs:enumeration value="MODEL_CHART_POPUP_NEXT_ARROW" />
			<xs:enumeration value="MODEL_CHART_POPUP_NAV_BAR" />
			<xs:enumeration value="MODEL_CHART_POPUP_ASIDE" />
			<xs:enumeration value="MODEL_CHART_POPUP_ASIDE_HEAD" />
			<xs:enumeration value="MODEL_CHART_POPUP_DESCR" />
			<xs:enumeration value="FILTER_POPUP" />
			<xs:enumeration value="FILTER_LEVEL" />
			<xs:enumeration value="FILTER_TYPE" />
			<xs:enumeration value="FILTER_EVOLUTION" />
			<xs:enumeration value="FILTER_STATUS" />
			<xs:enumeration value="ARTEFACT_TREE_LEAF" />
			<xs:enumeration value="MEASURE_TREE_LEAF" />
			<xs:enumeration value="MENU_INDICATOR_ARTEFACT" />
			<xs:enumeration value="DASHBOARD " />
			<xs:enumeration value="SCORECARD" />
			<xs:enumeration value="KPI" />
			<xs:enumeration value="CHARTS" />
			<xs:enumeration value="TABLES" />
			<xs:enumeration value="CHART_FIRST" />
			<xs:enumeration value="LINE" />
			<xs:enumeration value="CHART" />
			<xs:enumeration value="CHART_FIRST" />
			<xs:enumeration value="TABLE" />
			<xs:enumeration value="TABLE_FIRST" />
			<xs:enumeration value="MEASURE_POPUP" />
			<xs:enumeration value="MEASURE_POPUP_CONTENT" />
			<xs:enumeration value="MEASURE_POPUP_LEVELS" />
			<xs:enumeration value="MEASURE_POPUP_ROW_FIRST" />
			<xs:enumeration value="MEASURE_POPUP_ROW" />
			<xs:enumeration value="CHART_POPUP" />
			<xs:enumeration value="CHART_POPUP_GRAPH" />
			<xs:enumeration value="CHART_POPUP_COMPARE_OPTION" />
			<xs:enumeration value="CHART_POPUP_PREVIOUS_ARROW" />
			<xs:enumeration value="CHART_POPUP_NEXT_ARROW" />
			<xs:enumeration value="CHART_POPUP_NAV_BAR" />
			<xs:enumeration value="CHART_POPUP_ASIDE" />
			<xs:enumeration value="CHART_POPUP_ASIDE_HEAD" />
			<xs:enumeration value="CHART_POPUP_DESCR" />
			<xs:enumeration value="CHART_POPUP_COMMENTS" />
			<xs:enumeration value="CHART_POPUP_FAVORITES" />
			<xs:enumeration value="CHART_POPUP_COMPARATIVE_CHART" />
			<xs:enumeration value="ACTION_ITEMS" />
			<xs:enumeration value="ACTION_ITEMS_TABLE" />
			<xs:enumeration value="ACTION_ITEMS_TABLE_HEAD" />
			<xs:enumeration value="ACTION_ITEMS_TABLE_HEAD_CHECK" />
			<xs:enumeration value="ACTION_ITEMS_ADD_REVIEW_SET" />
			<xs:enumeration value="ACTION_ITEMS_EXPORT_LIST" />
			<xs:enumeration value="ACTION_ITEMS_EXPORT_BUTTON" />
			<xs:enumeration value="ACTION_ITEMS_SEARCH" />
			<xs:enumeration value="ACTION_ITEMS_ROW" />
			<xs:enumeration value="ACTION_ITEMS_REASON" />
			<xs:enumeration value="ACTION_ITEMS_ADVANCED_SEARCH" />
			<xs:enumeration value="ACTION_ITEMS_ADVANCED_SEARCH_SELECT_FIRST" />
			<xs:enumeration value="ACTION_ITEMS_ADVANCED_SEARCH_SELECT" />
			<xs:enumeration value="HIGHLIGHTS" />
			<xs:enumeration value="HIGHLIGHTS_TABLE" />
			<xs:enumeration value="HIGHLIGHTS_TABLE_HEAD" />
			<xs:enumeration value="HIGHLIGHTS_TABLE_HEAD_CHECK" />
			<xs:enumeration value="HIGHLIGHTS_SEARCH" />
			<xs:enumeration value="HIGHLIGHTS_SEARCH_FILTER" />
			<xs:enumeration value="HIGHLIGHTS_SEARCH_TYPE" />
			<xs:enumeration value="HIGHLIGHTS_EXPORT_BUTTON" />
			<xs:enumeration value="HIGHLIGHTS_ADD_REVIEW_SET" />
			<xs:enumeration value="HIGHLIGHTS_ROW_FIRST" />
			<xs:enumeration value="FINDINGS" />
			<xs:enumeration value="FINDINGS_TABLE" />
			<xs:enumeration value="FINDINGS_TABLE_HEAD" />
			<xs:enumeration value="FINDINGS_SEARCH" />
			<xs:enumeration value="FINDINGS_INFO" />
			<xs:enumeration value="FINDINGS_RULE" />
			<xs:enumeration value="FINDINGS_ARTEFACT" />
			<xs:enumeration value="FINDINGS_ROW_FIRST" />
			<xs:enumeration value="FINDINGS_ADVANCED_SEARCH" />
			<xs:enumeration value="FINDINGS_ADVANCED_SEARCH_SELECT_FIRST" />
			<xs:enumeration value="FINDINGS_ADVANCED_SEARCH_SELECT" />
			<xs:enumeration value="REPORTS" />
			<xs:enumeration value="REPORTS_REGION" />
			<xs:enumeration value="REPORTS_OPTIONS" />
			<xs:enumeration value="REPORTS_OPTION_TEMPLATE" />
			<xs:enumeration value="REPORTS_OPTION_FORMAT" />
			<xs:enumeration value="REPORTS_OPTION_SYNTHETIC_VIEW" />
			<xs:enumeration value="REPORTS_CREATE" />
			<xs:enumeration value="EXPORT_REGION" />
			<xs:enumeration value="EXPORT_OPTIONS" />
			<xs:enumeration value="EXPORT_CREATE" />
			<xs:enumeration value="FORMS" />
			<xs:enumeration value="FORMS_ATTRIBUTE" />
			<xs:enumeration value="FORMS_ATTRIBUTE_FIELD" />
			<xs:enumeration value="FORMS_ATTRIBUTE_COMMENT" />
			<xs:enumeration value="FORMS_HISTORY" />
			<xs:enumeration value="FORMS_BLOCK" />
			<xs:enumeration value="INDICATORS" />
			<xs:enumeration value="INDICATORS_TABLE" />
			<xs:enumeration value="INDICATORS_TABLE_HEAD" />
			<xs:enumeration value="INDICATORS_ROW" />
			<xs:enumeration value="MEASURES" />
			<xs:enumeration value="MEASURES_TABLE" />
			<xs:enumeration value="MEASURES_TABLE_HEAD" />
			<xs:enumeration value="MEASURES_ROW" />
			<xs:enumeration value="COMMENTS" />
			<xs:enumeration value="COMMENTS_TABLE" />
			<xs:enumeration value="COMMENTS_TABLE_HEAD" />
			<xs:enumeration value="COMMENTS_ROW" />
			<xs:enumeration value="CREATE_PROJECT_BUTTON" />
			<xs:enumeration value="WIZARD_PANEL" />
			<xs:enumeration value="WIZARD_ROW" />
			<xs:enumeration value="WIZARD_ROW_FIRST" />
			<xs:enumeration value="WIZARD_NEXT_BUTTON" />
			<xs:enumeration value="GENERAL_INFORMATION" />
			<xs:enumeration value="PROJECT_IDENTIFICATION_BLOCK	" />
			<xs:enumeration value="GENERAL_INFO_BLOCK" />
			<xs:enumeration value="GENERAL_INFO_ROW" />
			<xs:enumeration value="PROJECT_NEXT_BUTTON" />
			<xs:enumeration value="DP_PANEL" />
			<xs:enumeration value="DP_PANEL_BLOCK" />
			<xs:enumeration value="DP_PANEL_ROW" />
			<xs:enumeration value="DP_PANEL_NEXT_BUTTON" />
			<xs:enumeration value="CONFIRMATION_PANEL" />
			<xs:enumeration value="SUMMARY" />
			<xs:enumeration value="CONFIRMATION_PANEL_PARAMETERS" />
			<xs:enumeration value="RUN_NEW_PROJECT_BUTTON" />
		</xs:restriction>
	</xs:simpleType>

	<xs:simpleType name="colors">
		<xs:union>
			<xs:simpleType>
				<xs:restriction base="xs:string">
					<xs:pattern value="#[A-Fa-f0-9]{6}" />
				</xs:restriction>
			</xs:simpleType>
			<xs:simpleType>
				<xs:restriction base="xs:string">
					<xs:pattern value="(rgb|RGB)\([0-9]{3},[0-9]{3},[0-9]{3}\)" />
				</xs:restriction>
			</xs:simpleType>
			<xs:simpleType>
				<xs:restriction base="xs:string">
					<xs:enumeration value="aqua" />
					<xs:enumeration value="black" />
					<xs:enumeration value="blue" />
					<xs:enumeration value="gray" />
					<xs:enumeration value="lime" />
					<xs:enumeration value="green" />
					<xs:enumeration value="maroon" />
					<xs:enumeration value="navy" />
					<xs:enumeration value="olive" />
					<xs:enumeration value="orange" />
					<xs:enumeration value="purple" />
					<xs:enumeration value="red" />
					<xs:enumeration value="silver" />
					<xs:enumeration value="teal" />
					<xs:enumeration value="white" />
					<xs:enumeration value="yellow" />
					<xs:enumeration value="transparent" />
				</xs:restriction>
			</xs:simpleType>
		</xs:union>
	</xs:simpleType>

	<xs:simpleType name="text-positions">
		<xs:restriction base="xs:string">
			<xs:enumeration value="INTERNAL" />
			<xs:enumeration value="EXTERNAL" />
			<xs:enumeration value="LEFT" />
			<xs:enumeration value="RIGHT" />
			<xs:enumeration value="TOP" />
			<xs:enumeration value="BOTTOM" />
			<xs:enumeration value="CENTER" />
		</xs:restriction>
	</xs:simpleType>

	<xs:simpleType name="phase-type">
		<xs:restriction base="xs:string">
			<xs:enumeration value="PARALLEL" />
			<xs:enumeration value="PROGRESSIVE" />
			<xs:enumeration value="SEQUENTIAL" />
			<xs:enumeration value="FREE" />
		</xs:restriction>
	</xs:simpleType>

	<xs:complexType name="elements">
		<xs:sequence minOccurs="0" maxOccurs="unbounded">
			<xs:element ref="help"/>
		</xs:sequence>
	</xs:complexType>

	<xs:element name="Bundle" type="elements" />
	<xs:element name="Package" type="elements"/>

	<xs:element name="item">
		<xs:complexType>
			<xs:attribute name="element" use="required" type="external-id" />
			<xs:attribute name="param" use="optional" type="xs:string" />
			<xs:attribute name="descrId" use="required" type="xs:string" />
			<xs:attribute name="textPosition" use="optional" default="EXTERNAL" type="text-positions" />
			<xs:attribute name="maskColor" use="optional" default="#2aa0d5" type="colors" />
			<xs:attribute name="maskOpacity" use="optional" default="0.8" type="opacity" />
			<xs:attribute name="textSize" use="optional" default="25" type="positive-integer" />
			<xs:attribute name="textColor" use="optional" default="white" type="colors" />
		</xs:complexType>
	</xs:element>

	<xs:element name="preAction">
		<xs:complexType>
			<xs:attribute name="action" use="required" type="actions" />
			<xs:attribute name="param" use="optional" default="" type="xs:string" />
			<xs:attribute name="clickIndicator" use="optional" default="false" type="xs:boolean" />
		</xs:complexType>
	</xs:element>

	<xs:element name="phase">
		<xs:complexType>
			<xs:sequence maxOccurs="unbounded">
				<xs:choice>
					<xs:element minOccurs="0" maxOccurs="unbounded" ref="item" />
					<xs:element minOccurs="0" maxOccurs="unbounded" ref="preAction" />
				</xs:choice>
			</xs:sequence>
			<xs:attribute name="element" use="required" type="external-id" />
			<xs:attribute name="param" use="optional" type="xs:string" />
			<xs:attribute name="type" use="optional" default="PARALLEL" type="phase-type" />
			<xs:attribute name="textPosition" use="optional" default="EXTERNAL" type="text-positions" />
			<xs:attribute name="textSize" use="optional" default="25" type="positive-integer" />
			<xs:attribute name="textColor" use="optional" default="white" type="colors" />
			<xs:attribute name="maskColor" use="optional" default="#2aa0d5" type="colors" />
			<xs:attribute name="maskOpacity" use="optional" default="0.6" type="opacity" />
		</xs:complexType>
	</xs:element>

	<xs:element name="help">
		<xs:complexType>
			<xs:sequence minOccurs="1" maxOccurs="unbounded">
				<xs:choice>
					<xs:element ref="phase" />
					<xs:element ref="item" />
				</xs:choice>
			</xs:sequence>
			<xs:attribute name="id" use="required" type="external-id" />
			<xs:attribute name="opacity" use="optional" default="0.4" type="opacity" />
			<xs:attribute name="textPosition" use="optional" default="EXTERNAL" type="text-positions" />
			<xs:attribute name="textSize" use="optional" default="25" type="positive-integer" />
			<xs:attribute name="textColor" use="optional" default="white" type="colors" />
			<xs:attribute name="maskColor" use="optional" default="#2aa0d5" type="colors" />
			<xs:attribute name="maskOpacity" use="optional" default="0.6" type="opacity" />
			<xs:attribute name="firstConnexionGroup" use="optional" type="xs:string" />
			<xs:attribute name="icon" use="optional" type="xs:string" />
		</xs:complexType>
	</xs:element>
</xs:schema>
wizards.xsd
<?xml version="1.0" encoding="UTF-8"?>
<xs:schema xmlns:xs="http://www.w3.org/2001/XMLSchema" elementFormDefault="qualified">

	<xs:simpleType name="id">
		<xs:restriction base="xs:string">
			<xs:pattern value='[A-Z_][A-Z0-9_]+' />
		</xs:restriction>
	</xs:simpleType>

	<xs:simpleType name="list-id">
		<xs:restriction base="xs:string">
			<xs:pattern value='[A-Z_][A-Z0-9_]+(;[A-Z_][A-Z0-9_]+)*' />
		</xs:restriction>
	</xs:simpleType>

	<xs:simpleType name="alignment">
		<xs:restriction base="id">
			<xs:enumeration value="LEFT"/>
			<xs:enumeration value="RIGHT"/>
		</xs:restriction>
	</xs:simpleType>

	<xs:simpleType name="project-status">
		<xs:restriction base="id">
			<xs:enumeration value="IGNORE"/>
			<xs:enumeration value="WARNING"/>
			<xs:enumeration value="ERROR"/>
		</xs:restriction>
	</xs:simpleType>

	<xs:element name="Bundle">
		<xs:complexType>
			<xs:sequence>
				<xs:choice minOccurs="0" maxOccurs="unbounded">
					<xs:element ref="tags"/>
					<xs:element ref="wizard"/>
				</xs:choice>
			</xs:sequence>
		</xs:complexType>
	</xs:element>

	<xs:element name="tags">
		<xs:complexType>
			<xs:sequence>
				<xs:element minOccurs="0" maxOccurs="unbounded" ref="tag"/>
			</xs:sequence>
			<xs:attribute name="textAlign" type="alignment"/>
			<xs:attribute name="valueAlign" type="alignment"/>
		</xs:complexType>
	</xs:element>

	<xs:element name="tag">
		<xs:complexType>
			<xs:sequence>
				<xs:element minOccurs="0" maxOccurs="unbounded" ref="value"/>
			</xs:sequence>
			<xs:attribute name="defaultValue"/>
			<xs:attribute name="displayType"/> <!-- Not display-type because it is case insensitive -->
			<xs:attribute name="group"/>
			<xs:attribute name="groupId" type="id"/>
			<xs:attribute name="measureId" use="required" type="id"/>
			<xs:attribute name="name"/>
			<xs:attribute name="placeholder"/>
			<xs:attribute name="required" type="xs:boolean"/>
			<xs:attribute name="review" type="xs:boolean"/>
			<xs:attribute name="suffix"/>
			<xs:attribute name="targetArtefactTypes" type="list-id"/>
			<xs:attribute name="textAlign" type="alignment"/>
			<xs:attribute name="type" use="required"/> <!-- Not tag-type because it is case insensitive -->
			<xs:attribute name="valueAlign" type="alignment"/>
		</xs:complexType>
	</xs:element>

	<xs:element name="value">
		<xs:complexType>
			<xs:attribute name="key" use="required"/>
			<xs:attribute name="value" use="required" type="xs:decimal"/>
		</xs:complexType>
	</xs:element>

	<xs:element name="wizard">
		<xs:complexType>
			<xs:sequence>
				<xs:choice minOccurs="0" maxOccurs="unbounded">
					<xs:element ref="tags"/>
					<xs:element ref="milestones"/>
					<xs:element ref="repositories"/>
					<xs:element ref="tools"/>
				</xs:choice>
			</xs:sequence>
			<xs:attribute name="autoBaseline" type="xs:boolean"/>
			<xs:attribute name="group"/>
			<xs:attribute name="groups"/>
			<xs:attribute name="hideRulesEdition" type="xs:boolean"/>
			<xs:attribute name="img"/>
			<xs:attribute name="users"/>
			<xs:attribute name="versionPattern"/>
			<xs:attribute name="wizardId" use="required" type="id"/>
			<xs:attribute name="projectsSelection" type="xs:boolean"/>
			<xs:attribute name="name"/>
		</xs:complexType>
	</xs:element>

	<xs:element name="milestones">
		<xs:complexType>
			<xs:sequence minOccurs="0">
				<xs:element minOccurs="0" maxOccurs="unbounded" ref="goals"/>
				<xs:element minOccurs="0" maxOccurs="unbounded" ref="milestone"/>
			</xs:sequence>
			<xs:attribute name="canCreateMilestone" type="xs:boolean"/>
			<xs:attribute name="canCreateGoal" type="xs:boolean"/>
			<xs:attribute name="hide" type="xs:boolean"/>
			<xs:attribute name="skipUiValues" type="xs:boolean"/>
			<xs:attribute name="changeableMode" type="xs:boolean"/>
		</xs:complexType>
	</xs:element>

	<xs:element name="goals">
		<xs:complexType>
			<xs:sequence minOccurs="0">
				<xs:element ref="goal"/>
			</xs:sequence>
			<xs:attribute name="displayableFamilies" use="required" type="list-id"/>
		</xs:complexType>
	</xs:element>

	<xs:element name="goal">
		<xs:complexType>
			<xs:attribute name="mandatory" use="required" type="xs:boolean"/>
			<xs:attribute name="measureId" use="required" type="id"/>
		</xs:complexType>
	</xs:element>

	<xs:element name="milestone">
		<xs:complexType>
			<xs:sequence>
				<xs:element ref="defaultGoal"/>
			</xs:sequence>
			<xs:attribute name="id" use="required" type="id"/>
			<xs:attribute name="mandatory" type="xs:boolean"/>
		</xs:complexType>
	</xs:element>

	<xs:element name="defaultGoal">
		<xs:complexType>
			<xs:attribute name="measureId" use="required" type="id"/>
			<xs:attribute name="value" use="required" type="xs:integer"/>
		</xs:complexType>
	</xs:element>

	<xs:element name="repositories">
		<xs:complexType>
			<xs:sequence>
				<xs:element minOccurs="0" maxOccurs="unbounded" ref="repository"/>
			</xs:sequence>
			<xs:attribute name="all" use="required" type="xs:boolean"/>
			<xs:attribute name="hide" use="required" type="xs:boolean"/>
		</xs:complexType>
	</xs:element>

	<xs:element name="repository">
		<xs:complexType>
			<xs:sequence>
				<xs:element minOccurs="0" ref="param"/>
			</xs:sequence>
			<xs:attribute name="checkedInUI" type="xs:boolean"/>
			<xs:attribute name="name" use="required"/>
		</xs:complexType>
	</xs:element>

	<xs:element name="tools">
		<xs:complexType>
			<xs:sequence>
				<xs:element minOccurs="0" maxOccurs="unbounded" ref="tool"/>
			</xs:sequence>
			<xs:attribute name="all" type="xs:boolean"/>
			<xs:attribute name="expandedInUI" type="xs:boolean"/>
		</xs:complexType>
	</xs:element>

	<xs:element name="tool">
		<xs:complexType>
			<xs:sequence>
				<xs:element minOccurs="0" maxOccurs="unbounded" ref="param"/>
			</xs:sequence>
			<xs:attribute name="checkedInUI" type="xs:boolean"/>
			<xs:attribute name="expandedInUI" type="xs:boolean"/>
			<xs:attribute name="name" use="required"/>
			<xs:attribute name="optional" type="xs:boolean"/>
			<xs:attribute name="projectStatusOnFailure" type="project-status"/>
			<xs:attribute name="projectStatusOnWarning" type="project-status"/>
		</xs:complexType>
	</xs:element>

	<xs:element name="param">
		<xs:complexType>
			<xs:attribute name="availableChoices"/>
			<xs:attribute name="name" use="required"/>
			<xs:attribute name="value"/>
			<xs:attribute name="hide" type="xs:boolean"/>
		</xs:complexType>
	</xs:element>
</xs:schema>
Appendix C: Licences
Software Licence Agreement
Squoring Software

End-User License and Support Agreement

Please read this document carefully. This is a legal agreement by which Squoring Technologies SAS ("Squoring") permits use of its Software products ("Squoring Software").  The user ("Customer") accepts the terms of this Agreement by taking any or all of the following actions: (a) by signing an order form or purchase order referencing either this Agreement or a Technical and Financial proposal issued by Squoring (an "Order Form"), (b) by opening the package containing the Software, and/or (c) by installing the Software on a computer ("Target Hardware").

CUSTOMER CONSENTS TO BE LEGALLY BOUND BY THESE TERMS. IF CUSTOMER DOES NOT AGREE TO ALL OF THE TERMS OF THIS AGREEMENT, CUSTOMER MUST NOT USE THE SOFTWARE AND MUST RETURN IT, INCLUDING ANY PRINTED ASSOCIATED DOCUMENTATION, TO SQUORING WITHIN FOURTEEN (14) DAYS TO RECEIVE A FULL REFUND OF THE PURCHASE PRICE.


1)	DEFINITION
(a) "Squoring Software" includes (i) the Software identified in an Order Form or delivered with this Agreement; (ii) any authorized copies thereof; (iii) all related documentation ("Documentation") delivered with or included in that software; and (iv) any update to that software that Customer may receive from Squoring.
(b) Squoring Software is based on a traditional 3-tier architecture consisting of:
. a database and a data folder for storing project and user management data
. an application server running the "Squore Server Software" and the "License Server Software"
. a client front-end accessible through a Web Browser and a Command Line Interface to interact with the application server from a client machine
(c) Target hardware ("Target Hardware") is uniquely identified by the hardware specification and the operating system running on it.


2)	LICENSE
Squoring grants to Customer, and Customer accepts from Squoring, a non-exclusive and non-transferable right and license to use the Squoring Software that is specified in the Order Form and/or that accompanies this Agreement, but only (i) in accordance with the related Documentation, (ii) subject to Customer's payment of applicable license fees and (iii) subject to the terms and conditions specified below.
Customer agrees that Customer does not have, and does not hereby acquire, any title or rights of ownership in any Squoring Software or, except for the license rights hereby granted, any right to use, copy, transfer or disclose all or any portion of any Squoring Software. The Squoring Software is protected by copyright laws and international treaties.


3)	FEES
The fees for the license under this Agreement are set forth in the applicable Order Form or, if no Order Form exists, in the applicable Technical and Financial proposal  issued by Squoring, or, if no proposal exists, then in accordance with Squoring current list prices.


4)	USE
(a)	Unless otherwise stated in a special agreement, all dissemination or commercial exploitation of Squoring Software results is strictly forbidden.
(b)	The license granted by this Agreement is a license under which a maximum number of active users and projects specified in the Order Form may use the Squoring Software.  An "Active User" is a physical user registered in the Squoring Software database.  Active Users are not shared among several Squoring software databases. A user is active if any activity has been recorded by the Squore Server Software in the past 6 months.  Activities include remote project creation, viewing of analysis results, and e-mail notification.
(c)	The management and regulation of Active Users is managed by the License Server Software hosted on the Target hardware designated by the Customer.
(d)	Except for continuous integration purpose, it is strictly forbidden to share the same Squoring Software login between different physical users.
(e)	Customer will ensure that at least one of its employees has completed the two days on-site training course "Administrating Squoring software" given by a Squoring Software certified trainer, and that such trained employee(s) are the people within Customer's organization who are responsible for interactions with Squoring on maintenance and support matters.
(f)	Customer may make a reasonable number of back-up or archival copies of the Software. Customer will reproduce all confidentiality and proprietary notices on each of these copies and maintain an accurate record of the location of each of these copies.
(g)	Customer will not:
. Reverse compile, disassemble, or otherwise reverse engineer any Squoring Software, or allow anyone else to do so (except only to the extent such prohibition is contrary to applicable law).
. Remove or destroy any proprietary markings or legends or any encrypted license keys or similar security devices placed upon or contained in any Squoring Software.
. Modify or adapt the Squoring Software or create a derivative work based on or incorporate the Squoring Software into or with other software.
. Unless otherwise stated in a special agreement, distribute, sublicense, share, display, or in any manner make the Squoring Software available to any third party, with or without compensation.
. Use all or any part of the Squoring Software to create other software a principal purpose of which is to perform the same or similar functions as, or to replace any component of, the Squoring Software.


5.  MAINTENANCE AND SUPPORT
(a) Depending on the type of licenses bought by the Customer, Squoring will provide support and maintenance services according to the following schedule:
i.	In case of perpetual licenses bought by Customer
. Maintenance fees will be charged in addition to the price of the purchase of the Squoring Software licenses. The annual initial amount of maintenance fees will be calculated on the basis of a 20% percentage of the net list price of the software licenses purchased by the Customer.
. After one year, Maintenance and Support services will be renewed by tacit agreement of the parties, for annual periods. Before the anniversary date of each license for which Support Services are in effect, Squoring shall advise the Customer of the applicable Maintenance and Support Service fees for the coming year.
. The termination of maintenance contract will be effective only by sending a registered letter with acknowledgement of receipt denouncing the contract at least 60 days before the end of the period of validity.
ii.	In case of software licenses subscription
If the license to use the software is subject to a periodic subscription, the maintenance cost for these licenses is included in the subscription price. The maintenance is so provided during all the duration of the subscription, and stops automatically at the end of the subscription validity.
(b) Conditions.  Maintenance and support services as defined hereafter in paragraph 5-(c) are applicable subject to the following conditions:
. Squoring Software is covered by a valid maintenance contract for all acquired Squoring software licenses.
. Squoring Software was not modified by the Customer.
. The version of the installed Squoring Software corresponds to one of the two latest annual major updates distributed by Squoring Technologies.
. Customer engages to comply with the normal use of the software, strictly comply with the instructions given by the Squoring Technologies and to respect all provisions in the present agreement.
. Customer shall nominate from among its staff a technical coordinator and an alternate coordinator at the Customer Site(s), with up to date knowledge of Squoring licensed products usage and sufficient technical knowledge to interact with Squoring support staff. In case of change of the coordinators, the Customer will provide written notification to Squoring Technologies.
(c) Maintenance and support services include:
. Assistance from support: the online support (hot line) is available during Squoring normal business hours from 9 am to 6 pm (Central European Time) to answer the questions of the technical coordinator when technical facts encountered in the use of the Squoring Software. Support will help to identify problems and provide, where appropriate, temporary fixing patches. Contact information for support is:
- support site: https://support.squoring.com
- email: support@squoring.com
. Corrective maintenance: the corrective maintenance includes the development, to the extent commercially reasonable, of workarounds or program fixes for malfunctions submitted by Customer. Are considered as malfunctions recognized or reproducible defects resulting in distorted results compared to those defined in the software Manual and not coming from non-observance of the instructions of the said Manual.
. Updates: updates include the delivery of successive versions of the software, being either due to bug fixes or to enhancements of performances or features (this delivery does not necessarily provide new additional features). Customer will destroy any prior version before installing a new update.
. Rehost: any change of "Target hardware" implies a change of license keys and shall be subject to the prior written authorization of Squoring and to the signature by the Customer of a letter of destruction of all the license files already installed.
d) Maintenance and support services do not include:
. Time spent, after request of the Customer by Squoring Technologies staff not directly attributable to maintenance services: search for non-reproducible anomalies, malfunction due to non-compliance with the Manual without the Software itself being an issue, unavailability of the system, operating activities prior to the intervention (such as preliminary backup ...).
. Installation of the Software by Squoring Technologies.
. Additional services which do not fall within the scope of maintenance services as defined above in paragraph 5-(c).
. On-site support: Squoring may offer on-site support to Customer at additional charges
e) Procedure for the submission of requests:
. To be taken into account, Customer requests shall be sent using the support site at https://support.squoring.com
. Customer agrees to give, in support of a request for correction due to an anomaly, any information likely to facilitate the search for the causes of this anomaly, and to give for free to Squoring Technologies an open access to its premises and development stations in the day and hours necessary to perform the contract, and to ensure the conservation, under the conditions of appropriate security and condition of the latest version, of the sources of programs in case of this is necessary to enable Squoring Technologies to perform its maintenance services.
. Regarding correction of anomalies, Squoring is committed to act as soon as possible to correct the anomalies detected. Squoring will transfer to the Customer either a technique to bypass the anomaly or a patch of necessary corrections or a new version of the software.
. Any issues not resolved with the initial response will be investigated using the data provided. Below are the targeted response times for continued investigations.
-	Blocker: 1 day, daily update. A request is "blocking" when the incident has a significative impact with a risk of operating loss or when datas are corrupted. The significative impact is appreciated by Squoring Technologies.
-	Serious: 2 days, weekly update
-	Major: 3 days, monthly update
-	Minor: 1 week, monthly update
 (f) Limitations
. Squoring is expressly subject to an obligation of means.
. Squoring is not required to (i) develop and release any, or any particular type of enhancements or (ii) customize the enhancements to satisfy Customer's particular requirements.
. The Updates will not include any upgrade or new version of the Products that Squoring decides, in its sole discretion, to make generally available as a separately priced item.
. Squoring will be released from any responsibility in case of breach by the Customer of any provision of this maintenance terms and conditions.


6. WARRANTIES AND REMEDIES
(a) Limited Warranty. Squoring warrants that it has the right to (i) enter into this Agreement and (ii) grant the licenses hereunder. Squoring also warrants that the Squoring Software will perform substantially as described in the Documentation during a 90 days Warranty Period. Customer acknowledges that (i) the Products may not satisfy all of Customer's requirements and (ii) the use of the Products may not be uninterrupted or error-free.
(b) Remedies. Squoring or its representative will correct or replace any defective Software. Customer acknowledges that this paragraph sets forth Customer's exclusive remedy, and Squoring exclusive liability, for any breach of warranty or other duty related to the quality of the Products.
(c) Disclaimer. EXCEPT AS EXPRESSLY PROVIDED IN THIS AGREEMENT OR REQUIRED BY APPLICABLE LAW, ALL WARRANTIES, CONDITIONS, REPRESENTATIONS, INDEMNITIES AND GUARANTEES WITH RESPECT TO THE PRODUCTS, WHETHER EXPRESS OR IMPLIED, ARISING BY LAW, CUSTOM, PRIOR ORAL OR WRITTEN STATEMENTS BY SQUORING, ITS SQUORINGS OR REPRESENTATIVES OR OTHERWISE (INCLUDING, BUT NOT LIMITED TO ANY WARRANTY OF MERCHANTABILITY, SATISFACTION AND FITNESS FOR A PARTICULAR PURPOSE) ARE HEREBY OVERRIDDEN, EXCLUDED AND DISCLAIMED.
IN NO EVENT SHALL THE AGGREGATE LIABILITY OF SQUORING TO CUSTOMER ON ACCOUNT OF ANY MATTER ARISING WITH RESPECT TO THE SQUORING SOFTWARE EXCEED THE LICENSE FEES PAID BY CUSTOMER UNDER THIS AGREEMENT.
(d)  Infringement Indemnity. If an action is brought against Customer claiming that the Product infringes a patent, trade secret or copyright, Squoring will defend Customer at Squoring expense and, subject to this Section, pay the damages and costs finally awarded against Customer in the infringement action, but only if (i) Customer notifies Squoring promptly upon learning that the claim might be asserted, (ii) Squoring has sole control over the defense of the claim and any negotiation for its settlement or compromise, and (iii) Customer takes no action that is contrary to Squoring interest. If a claim described above may be or has been asserted, Customer will permit Squoring, at Squoring option and expense, to (A) procure the right to continue using the Product, (B) replace or modify the Product to eliminate the infringement while providing functionally equivalent performance, or (C) accept the return of the Product and refund to Customer the License Fee actually paid to Squoring for such Product, less depreciation based on a 5-year straight-line-depreciation schedule.
Squoring shall have no indemnity obligation to Customer under this Section if the patent or copyright infringement claim results from (i) a correction or modification of the Product not provided by Squoring, (ii) the failure to promptly install an Update or Enhancement at Squoring direction with knowledge that installation thereof would have avoided the infringement or (iii) the combination of the Product with other non-Squoring software or (iv) any unauthorized use of the Squoring Software, or (v) any version of the Software other than the latest update offered by Squoring to Customer at no additional charge.


7. LIMITATION OF LIABILITY
UNDER NO CIRCUMSTANCES WILL SQUORING OR ITS SQUORINGS BE LIABLE FOR ANY CONSEQUENTIAL, INDIRECT, SPECIAL, PUNITIVE OR INCIDENTAL DAMAGES OR LOST PROFITS, WHETHER FORESEEABLE OR UNFORSEEABLE, BASED ON CUSTOMER'S CLAIMS OR THOSE OF ITS CUSTOMERS (INCLUDING, BUT NOT LIMITED TO, CLAIMS FOR LOSS OF DATA, GOODWILL, USE OF MONEY OR USE OF THE PRODUCTS, INTERRUPTION IN USE OR AVAILABILITY OF DATA, STOPPAGE OF OTHER WORK OR IMPAIRMENT OF OTHER ASSETS), ARISING OUT OF BREACH OR FAILURE OF EXPRESS OR IMPLIED WARRANTY, BREACH OF CONTRACT, MISREPRESENTATION, NEGLIGENCE, STRICT LIABILITY IN TORT OR OTHERWISE. IN NO EVENT WILL THE AGGREGATE LIABILITY WHICH SQUORING OR ITS SQUORINGS MAY INCUR IN ANY ACTION OR PROCEEDING EXCEED THE LICENSE FEES ACTUALLY PAID BY CUSTOMER FOR THE SPECIFIC PRODUCT THAT DIRECTLY CAUSED THE DAMAGE. THIS SECTION WILL NOT APPLY ONLY WHEN AND TO THE EXTENT THAT APPLICABLE LAW SPECIFICALLY REQUIRES LIABILITY, DESPITE THE FOREGOING EXCLUSION AND LIMITATION.


8. OWNERSHIP
All trademarks, service marks, patents, copyrights, trade secrets and other proprietary rights in or related to the Products are and will remain the exclusive property of Squoring, whether or not specifically recognized or perfected under local applicable law. Customer will not take any action that jeopardizes Squoring proprietary rights or acquire any right in the Products, except the limited use rights specified in Section 4. Squoring will own all rights in any copy, translation, modification, adaptation or derivation of the Products, including any improvement or development thereof.


9. CONFIDENTIALITY
(a) Confidentiality. Customer acknowledges that the Products constitute and incorporate confidential and proprietary information developed or acquired by or licensed to Squoring. Customer will take all reasonable precautions necessary to safeguard the confidentiality of the Products, including at a minimum those taken by Customer to protect Customer's own confidential information. Customer will not allow the removal or defacement of any confidentiality or proprietary notice placed on the Products. The placement of copyright notices on these items will not constitute publication or otherwise impair their confidential nature.
(b) Disclosure. Customer will not disclose, in whole or in part, the Products or any portion thereof or other information that has been designated as confidential to any individual, entity or other person, except to those of Customer's employees or consultants who require access for Customer's authorized use of the Products, provided such consultants agree in writing to comply with the use and non-disclosure restrictions applicable to the Products under this Agreement. Customer acknowledges that any unauthorized use or disclosure of the Products may cause irreparable damage to Squoring. If an unauthorized use or disclosure occurs, Customer will immediately notify Squoring and take, at Customer's expense, all steps which may be available to recover the Products and to prevent their subsequent unauthorized use or dissemination. Squoring agrees to take the same action regarding any information designated in writing as proprietary which it receives from Customer ("Customer Information").
(c) Limitation. Neither Squoring nor Customer will have any confidentiality obligation with respect to any portion of the Products or Customer Information that (i) the receiving party knew or independently developed before receiving such Products or Customer Information under this Agreement, (ii) the receiving party lawfully obtained from a third party under no confidentiality obligation, or (iii) became available to the public other than as a result of any act or omission by the receiving party or any of receiving party's employees or consultants.


10. TERMINATION
Customer may terminate this Agreement or any Order Form, without right to refund, by notifying Squoring of such termination and returning the Product and copies thereof to Squoring. Squoring may terminate this Agreement, upon reasonable notice and without judicial or administrative resolution, if Customer or any of Customer's employees or consultants breach any material term or condition hereof. This Agreement will terminate automatically if Customer becomes insolvent or enters into bankruptcy, suspension of payments, moratorium, or any other proceeding that relates to insolvency or protection or creditors' rights.
Upon the termination of this Agreement for any reason, all rights granted to Customer hereunder will cease, and Customer will stop using Squoring Software, return or destroy all copies and so certify to Squoring in writing. The provisions of Sections 6-8 will survive the termination of this Agreement.


11. INSPECTION
During the term of this Agreement, Squoring or its representative, if in receipt of credible evidence of non-compliance, may, upon prior notice to Customer, inspect the files, computer processors, equipment and facilities of Customer during normal working hours to verify Customer's compliance with this Agreement. While conducting such inspection, Squoring or its representative will be entitled to copy any item that Customer may possess in violation of this Agreement, without disruption of Squoring business and violation of Laws and Regulations.


12. ASSIGNMENT
Customer shall not assign, delegate or otherwise transfer this Agreement or any of its rights or obligations hereunder without Squoring prior approval which shall not he unreasonably withheld.


13. MISCELLANEOUS
. Any terms and conditions of any unilateral letter, memorandum, purchase order or other writing issued by Customer shall not be binding on Squoring. Any waiver or modification of this Agreement will not be effective unless executed in writing and signed by an authorized representative of Squoring and Customer. This Agreement will bind Customer's successors-in-interest.
. This Agreement will be governed by and interpreted in accordance with the laws of France. If any provision of this Agreement is held to be unenforceable, in whole or in part, such holding will not affect the validity of the other provisions of this Agreement, unless the Parties in good faith deem the unenforceable provision to be essential, in which case either Party may terminate this Agreement effective immediately upon notice to the other Party. This Agreement constitutes the complete and entire statement of all conditions and representations of the agreement between Squoring and Customer with respect to its subject matter and supersedes all prior writings or understandings.
Redistributed Software
Redistributed Software						Version			License File
----------------------
Wildfly										10.1.0.Final	lgpl-2.1
PostgreSQL									8.4				postgresql-bsd
Perl										5.12.3			al
TCL											8.5				tcltkl,tcllib
PhantomJS									2.1.1			bsd3

Components				Sub component		Version			License File
----------
Richfaces									4.5.17			lgpl-2.1
PostgreSQL JDBC Driver						42.0.0			bsd2
Oracle JDBC driver							12.1.02			otn
Omnifaces									2.6				apache-2.0
ANTLR										3.1				antlr3
JasperReports Library						4.8				lgpl-2.1
Checkstyle									5.6				lgpl-2.1
JTcl										2.8				jtcl, amd, itcl, janino, tcllib, tcltk, ucb
log4j										1.2.17			apache-2.0
Apache Commons			commons-lang3		3.1				apache-2.0
Apache HttpComponents	httpclient			4.1.2			apache-2.0
Apache HttpComponents	httpmime			4.1.2			apache-2.0
Apache XML Graphics		batik-transcoder	1.7				apache-2.0
Bouncy Castle			bcmail-jdk16		1.46			bouncy-castle
com.beust				jcommander			1.48			apache-2.0
com.google.collections	google-collections	1.0				apache-2.0
com.googlecode.juniversalchardet	juniversalchardet	1.0.3	mpl1.1
com.sun.mail			javax.mail			1.5.3			gf
commons-cli				commons-cli			1.2				apache-2.0
commons-collections		commons-collections	3.2.2			apache-2.0
javax.enterprise		cdi-api				1.2				apache-2.0
javax.validation		validation-api		1.1.0.Final		apache-2.0
net.java.dev.jna		jna					4.1.0			lgpl-2.1
net.sf.jsci				jsci				1.2				lgpl-2.1
net.sf.saxon			saxon-xom			8.7				mpl1.0
nux						nux					1.6				nux
org.glassfish			javax.json			1.0.4			gf
org.jdom				jdom2				2.0.5			jdom

Resources									Version			License File
---------
CodeMirror									4.4.0			mit
font-awesome								4.7.0			mit, ofl-1.1
JavaScript InfoVis Toolkit					2.0.1			mit
jquery										1.12.3			jquery
jquery-mobile								1.4.2			jquery-mobile
jquery-ui-resizable							1.11.4			mit, jquery
lodash.js									4.17.11			mit
notify.js									0.4.2			mit
gridstack.js								1.0.0			mit
spectrum.js									1.8.0			mit
Index
A
- Architecture
B
- Backup
- Browser Compatibility
C
- Certificates
- Collaboration
-
- Allow users to contact project owners to gain access to a project
- Command Line Interface
- Concurrent Deletions
- Concurrent Tasks
- Confluence
- Continuous Integration
D
- Database
-
- Restore
- Default User
- Disk Space
E
- E-Mail Notifications
- E-mail Notification
- Embedding Squore charts into other applications
I
- Installation Folder
- Installer
J
- Java
K
L
- LDAP
-
- Default group
- Licence
-
- Licence File
- Remote Licence
- Licence File
- Licences
M
- Maintenance
- Memory
- Mobile Devices
N
- Nagios
O
P
- Permalinks
- PhantomJS
-
- Alternate Squore URL
- PingFederate
- PostgreSQL
- Prerequisites
R
- Redistributed Software
S
- SMTP Server
- Server
-
- Application Server
- Database Server
- Licence Server
- Running multiple Servers
- Single Sign-On
- Software Licence Agreement
- Squore Mobile
- Squore Monitoring
- Statistics
- sqctl
T
- TeamForge
- Themes
- Timeout
X
- XML Schema
-
- analysis.xsd
- config-1.3.xsd
- decision.xsd
- description.xsd
- exports.xsd
- form.xsd
- highlights.xsd
- input-data-2.xsd
- properties-1.2.xsd
- properties.xsd
- tutorials.xsd
- wizards.xsd