| Installation and Administration | Getting Started | Command Line | Configuration | Eclipse Plugin | Reference Manual |
| Show on single page Show on multiple pages |
|
|
|
|
Copyright © 2017 Squoring Technologies
Licence
No part of this publication may be reproduced, transmitted, stored in a retrieval system, nor translated into any human or computer language, in any form or by any means, electronic, mechanical, magnetic, optical, chemical, manual or otherwise, without the prior written permission of the copyright owner, Squoring Technologies.
Squoring Technologies reserves the right to revise this publication and to make changes from time to time without obligation to notify authorised users of such changes. Consult Squoring Technologies to determine whether any such changes have been made.
The terms and conditions governing the licensing of Squoring Technologies software consist solely of those set forth in the written contracts between Squoring Technologies and its customers.
All third-party products are trademarks or registered trademarks of their respective companies.
Warranty
Squoring Technologies makes no warranty of any kind with regard to this material, including, but not limited to, the implied warranties of merchantability and fitness for a particular purpose. Squoring Technologies shall not be liable for errors contained herein nor for incidental or consequential damages in connection with the furnishing, performance or use of this material.
Abstract
This edition of the Installation and Administration Guide applies to Squore 17.0.10 and to all subsequent releases and modifications until otherwise indicated in new editions.
Table of Contents
config.xml
List of Tables
The following conventions are used in this manual.
| Typeface or Symbol | Meaning |
| Bold | Book titles, important items, or items that can be selected including buttons and menu choices. For example: Click the Next button to continue |
| Italic | A name of a user defined textual element. For example:
Username
: admin
|
Courier New
| Files and directories; file extensions, computer output. For example:
Edit the config.xml file |
Courier Bold
| Commands, screen messages requiring user action. For example:
Username
: admin
|
| > | Menu choices. For example: Select
File > Open
. This means select the File menu, then select the Open
command from it. |
| <...> | Generic terms. For example:
<SQUORE_HOME> refers to the Squore
installation directory. |
Notes
Screenshots displayed in this manual may differ slightly from the ones in the actual product.
The following acronyms and abbreviations are used in this manual.
| CI | Continuous Integration |
| CLI | Command Line Interface |
| DP | Data Provider, a Squore module capable of handling input from various other systems and import information into Squore |
| RC | Repository Connector, a Squore module capable of extracting source code from source code management systems. |
Table of Contents
This document was released by Squoring Technologies.
It is part of the user documentation of the Squore software product edited and distributed by Squoring Technologies.
This document is the Installation Guide for the Squore software product.
While we recommend that you read it in its entirety, we divided it up into chapters for an easier introduction to Squore:
Jump to Chapter 2, The Squore Architecture to learn about the available Squore components.
Jump to Chapter 3, Installing Squore Server to learn how to deploy Squore in your environment.
Jump to Chapter 4, Starting Squore to learn how to to start Squore Server.
Jump to Chapter 5, Squore Administration to discover how to maintain a Squore installation.
Jump to Chapter 6, Integrating Squore on Your Network to understand how to integrate Squore Server within your network.
Jump to Chapter 7, Sizing Squore Server and Database to evaluate the resources that Squore will require in your environment.
If you want to install Squore Command Line Interface, refer to the Command Line Interface manual.
If you are already familiar with Squore, you can navigate this manual by looking for what has changed since the previous version. New functionality is tagged with (new in 17.0) throughout this manual. A summary of the new features described in this manual is available in the entry * What's New in Squore 17.0? of this manual's Index.
If the information provided in this manual is erroneous or inaccurate, or if you encounter problems during your installation, contact Squoring Technologies Product Support: http://support.squoring.com/
You will need a valid Squore customer account to submit a support request. You can create an account on the support website if you do not have one already.
For any communication:
support@squoring.com
Squoring Technologies Product Support
76, allées Jean Jaurès / 31000 Toulouse - FRANCE
Approval of this version of the document and any further updates are the responsibility of Squoring Technologies.
The version of this manual included in your Squore installation may have been updated. If you would like to check for updated user guides, consult the Squoring Technologies documentation site to consult or download the latest Squore manuals at http://support.squoring.com/documentation/17.0.10. Manuals are constantly updated and published as soon as they are available.
Table of Contents
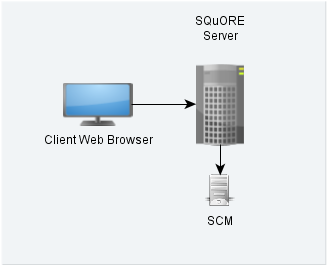
Squore is based on a traditional 3-tier architecture consisting of:
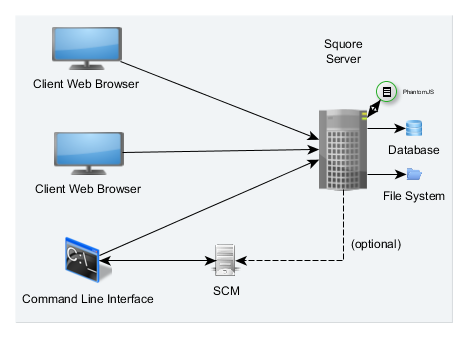
The Squore Architecture
As shown in the schema above, Squore Server can provide analysis results to clients without having access to any source code, in scenarios where the analysis is carried out on a client machine with access to the SCM repository, as is the case in most Continuous Integration environments.
If you are planning to access source code hosted in a Subversion, Git, ClearCase, CVS or Synergy repository, a command line client for this repository must be available on the machine where the Squore analysis carried out. For complete information about all installation pre-requisites, consult the section called “Installation Prerequisites”.
Squore allows analysing source code in the following programming languages: ABAP, Ada, C, COBOL, C++, C#, Fortran 77, Fortran 90, Java, JavaScript, Lustre, Mind-C, Objective-C, PHP, PL/SQL, Python, T-SQL, Visual Basic .NET, XAML.
The Squore database is a PostgreSQL or Oracle database used for storing:
A hierarchy of artefacts defined in a software projects (e.g. files, classes, functions)
Incremental sets of base measures (e.g. complexity measures provided by the Squore data providers)
Incremental sets of derived measures (i.e. all measures computed by the specified analysis model)
Along with the database, a set of data files is maintained on disk to compute information about project history and stability. A backup of a Squore installation must always include the database and the file system. For more information about backing up your installation, refer to the section called “Backing-Up the Squore Data”.
Note: No source code is stored in the database or the file system.
The Squore application server is based on the WildFly framework. Its main functionalities are:
Aggregating data coming from the various Squore Data Providers
Applying an analysis model, producing high-level key performance indicators
Exploring and analysing the results using efficient graphical representations and statistical features
Squore end-users access the server services through a Web interface that enables them to:
Create projects from source code or other data types via the Squore Data Providers system.
Explore the results of analyses, view the levels of performance of the project artefacts via a user-specific, dynamic dashboard making use of filtering and sorting features
Review action plans, highlights and findings of the analysis
Export information for reporting purposes
Perform administration tasks like managing users and groups or troubleshooting the system
Refer to the section called “Browser Compatibility” to make sure that your the Squore Wib Interface is compatible with your browser
For more details on performance-related requirements when using Squore, please refer to Chapter 7, Sizing Squore Server and Database.
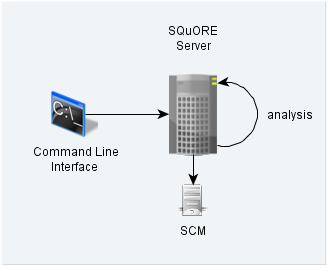
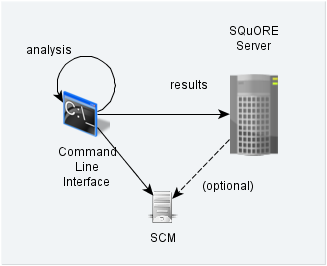
In order to provide compatibility with Continuous Integration systems or run analyses on machines other than Squore Server, Squoring Technologies also delivers Squore CLI (Command Line Interface): a set of APIs used to remotely create and manage software projects.
Squore CLI is a Squore package that allows a Squore client to locally analyse project source code files visible to the client machine and send the results to a remote Squore server.
Squore CLI comes as a separate installable package that can be downloaded from Squoring Technologies's support site: http://support.squoring.com/download_area.php.
For more information about installing Squore CLI, refer to the Command Line Interface manual.
Squore Server requires a valid licence file in order to run. The licence file information is served by the
Squore Licence Server,
which reads a licence file squore-license.p7s
located in <SQUORE_HOME>/server/standalone/configuration.
The licence file is delivered by Squoring Technologies and can be copied on the machine hosting Squore Licence Server at installation time or post-installation. In all cases, Squore Server must be restarted to take into account new licence information.
If you run multiple instances of Squore Server, each one can have its own Squore Licence Server and licence file, or you can point them to a common Squore Licence Server.
Sharing an instance of Squore Licence Server between multiple Squore Server instances means that each Squore Server instance queries the Squore Licence Server to find out which licence features are available. The Squore Licence Server keeps track of the total number of active users, volume of code analysed and number of projects created on all instances of Squore Server. User-Management is specific to each Squore Server: if a user called "admin" exists on two instances of Squore Server linked to the same Squore Licence Server and both accounts are active, as far as the Squore Licence Server is concerned, two licences are used by two individual users.
The licence file restricts Squore usage according to the following parameters:
A licence file has a start date: it becomes active at a date decided by Squoring Technologies when the licence is issued.
A licence file has an end date: it becomes invalid at a date decided by Squoring Technologies when the licence is issued.
A licence file is tied to a particular server host-id, a fingerprint of some of the hardware components of a server machine. It can therefore not be used on another machine. If you need to move your licence file to another machine, contact Squoring Technologies to request a new licence. If you need to know your host-id, refer to the section called “Obtaining a Licence File”.
A licence file defines a maximum number of active users. A user is active if any activity has been recorded for their Squore Server account in the past 6 months. Activities include remote project creation, viewing of analysis results, and e-mail notification.
A Squore login is meant to be used by an individual user: each Squore user should log into Squore using their own personal account.
A licence file defines a maximum number of projects that can be created. After this number is reached, no new projects can be created.
A licence file defines a maximum number of lines of source code that can be analysed. After this number is reached, no new analysis can be carried out.
A licence file defines the ability to generate XML report of analyses, export data and generate reports from the web user interface.
Table of Contents
Squore Server can only be installed in a folder whose path contains no space, accented and non-Latin letters or special characters. This is a PostgreSQL limitation that must be followed to ensure maximum compatibility, efficiency, and to avoid unexpected behaviour when analysing projects.
The application files (product binaries and standard configuration) and the data files (database cluster, analysis data, custom configuration, custom scripts...) must be located in separate folders.
By default, application files are deployed in a folder we will refer to in this manual as <SQUORE_HOME> and data files are deployed under a folder we will refer to as <SQUORE_DATA>.
Refer to the specific options of the setup package for your platform below to know how to specify the desired paths when installing Squore Server.
The following is a list of the officially supported and tested operating systems:
CentOS 6
CentOS 7
Fedora 19
Ubuntu Server 14.04
Windows 7
Windows 8
Windows 10
On Linux, a 64-bit version of the OS is required
On Windows, a 64-bit version of the OS is required if you want Squore to run as a Windows service, but the installation is also supported on a 32-bit system (and is started and stopped using .bat files instead of a Windows Service)
The following is a list of the operating systems that are not regularly tested but are known to be working:
RedHat EL 6
RedHat EL 7
SuSe Linux 11.1
Ubuntu Server 10.04
Ubuntu Server 16.04
Windows Server 2008 R2
Windows Server 2012 R2
Squore Server can use the following database management systems to store its data:
PostgreSQL 8.4 and up
Oracle Database 12c Release 1
In both cases, it is possible to have database on the same machine as Squore Server or on a remote machine.
When using a database backend on a remote machine, the database administrator is responsible for backing up the database. The backup scripts included in the Squore Server installation will only handle the backup of the data stored on the Squore Server file system in that case. You can find more information about backup strategies for Squore Server in the section called Backup Tools in the Installation and Administration Guide.
Squore is compatible with many browsers. The following is the list of officially supported browsers:
Google Chrome stable branch
Mozilla Firefox latest esr version
Microsoft Internet Explorer 11.0.15063.0 and up
Microsoft Edge 40.15063.0.0 and up
For a successful installation of Squore, you will need:
The latest version of the Squore Server installer, which can be downloaded from http://support.squoring.com/download_area.php
A supported Operating System, as stated in the section called “Supported Operating Systems”
A user account with system administrator privileges
The Oracle Java Runtime Environment version 8 (other versions are not supported)
It is technically possible to run Squore on a server using a 32-bit JRE, however this will limit the memory available to 1GB of RAM to run the application, which will result in poor performance. If you still want to attempt such an installation, consult the troubleshooting page at http://openwiki.squoring.com/index.php/Running_Squore_On_A_32-bit_Java_Installation
At least 2 GB of space available on the disk for a full installation
A valid Squore Server licence file (optional, since the licence file can be added after installation)
Keep in mind that the requirements above are the strict minimum. In production, Squore Server generally runs on a dedicated machine with a multi-core processor and 8 to 12GB of RAM. Squore reserves 25% of the available RAM of the machine to the database and another 25% to the server. External processes (like Checkstyle or FindBugs) running on the same machine as Squore may add to the amount of RAM required for analysing source code. Linux is known to offer better performances than Windows when running Squore.
When using Oracle as a database backend, a database administrator must create an Oracle user before you can install Squore.
The user requires the following privileges:
CREATE PROCEDURE
CREATE SEQUENCE
CREATE SESSION
CREATE TABLE
CREATE TYPE
CREATE VIEW
A valid quota for the tablespace used by the user (for example UNLIMITED)
A Squore licence file is linked to the hardware that Squore Server is installed on. When you complete your installation of Squore Server, and access http://localhost:8180/SQuORE_Server in your browser, you are presented with a screen that allows you to request an activation key and download an evaluation licence.
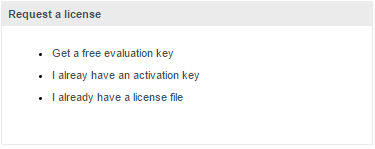
The licence request dialog
Request an activation key or enter an existing one to download a temporary licence for your machine. Requesting an activation key ensures that Squoring gets all the information necessary to generate your final licence file when the evaluation period ends.
The licence request dialog only displays when accessing http://localhost:8180/SQuORE_Server (it redirects to http://localhost:8180/SQuORE_Server/License/License.xhtml) from the machine where Squore Server is installed. If you cannot open a browser window on the server, you will have to request your evaluation licence by manually generating and e-mailing your host-id to Squoring:
Open a terminal on the machine where you installed or plan to install Squore.
Change to the <SQUORE_HOME> folder
Run the command java -jar ./lib/hostid.jar.
Send the output to support@squoring.com.
A JRE is required for Squore Server. The Windows installer contains the tcl and perl runtimes as well as a portable PostgreSQL installation and a distribution of PhantomJS.
On Linux platforms, the following must be installed before installing Squore:
Perl version 5.10.1 or greater including the following extra-modules:
Mandatory packages:
Algorithm::Diff [module details]
Archive::Zip [module details]
Date::Calc [module details]
DBD::Pg (unless you use a Oracle as your database backend) [module details]
DBI (unless you use a Oracle as your database backend) [module details]
Digest::SHA [module details]
HTTP::Request [module details]
JSON [module details]
LWP [module details]
LWP::UserAgent [module details]
Time::HiRes [module details]
XML::Parser [module details]
Optional packages for working with Microsoft Excel:
HTML::Entities [module details]
Spreadsheet::BasicRead [module details]
Optional packages for working with OSLC systems:
Date::Parse [module details]
WWW::Mechanize [module details]
XML::LibXML [module details]
Optional packages for working with GitHub systems:
Date::Parse [module details]
Mail::Box::Manager [module details]
Mail::Message::Body::Lines [module details]
Mail::Message::Construct [module details]
Mail::Mbox::MessageParser [module details]
Net::GitHub [module details]
Optional packages for working with Semios/Prometil systems:
File::Slurp [module details]
Optional packages for Advanced CSV Export Management:
Text::CSV [module details]
If some of these modules are not available as packages on your operating system, use your perl installation's cpan to install the modules. Using the OS packages is recommended, as it avoids having to reinstall via cpan after upgrading your version of perl.
Tcl version 8.5 or greater,
PostgreSQL version 8.4
(unless you use a RDBMS running on another system) including at least the server component, and optionally, the
pgAdmin utility. Note that your system must use a UTF-8 locale for the database creation to be carried out successfully. You can force this by running export LANG=en_US.UTF-8
or export LANG=fr_FR.UTF-8 according to what is available on your system before installing Squore.
The rsync utility
If you are running on a headless Squore Server, java-1.6.0-openjdk may not be sufficient, as it lacks some fonts to render graphics. This is why using Oracle's JRE is recommended.
On Red Hat Enterprise Linux and CentOS (6.5 and 7.1), the dependencies are satisfied by the following packages:
Mandatory packages:
java-1.8.0-openjdk
perl
perl-Algorithm-Diff
perl-Archive-Zip
perl-Date-Calc
perl-Digest-SHA
perl-JSON
perl-libwww-perl
perl-Time-HiRes
perl-XML-Parser
postgresql-server (unless you use a RDBMS running on another system)
rsync
tcl
Optional packages for working with Microsoft Excel:
perl-HTML-Parser
perl-CPAN (CPAN utility requirement)
perl-Spreadsheet-ParseExcel (available in the EPEL repository)
perl-Spreadsheet-XLSX (available in the EPEL repository)
The module Spreadsheet::BasicRead is not available as a package and must therefore be installed using cpan (make sure cpan is properly configured, by running cpan without arguments first):
sudo cpan -i Spreadsheet::BasicRead
Optional packages for working with OSLC systems:
perl-TimeDate
perl-WWW-Mechanize (available in the EPEL repository)
perl-XML-LibXML
Optional packages for working with GitHub systems:
perl-TimeDate
perl-Mail-Box (available in the EPEL repository)
perl-Mail-Mbox-MessageParser (available in the EPEL repository)
perl-Net-GitHub (available in the EPEL repository)
Optional packages for working with Semios/Prometil systems:
perl-File-Slurp
Optional packages for Advanced CSV Export Management:
perl-Text-CSV (available in the EPEL repository)
For more information about how to install the Extra Packages for Enterprise Linux (EPEL) repository, consult https://fedoraproject.org/wiki/EPEL.
On Ubuntu 14.04.3 LTS, the dependencies are satisfied by the following packages:
Mandatory packages:
libalgorithm-diff-perl
libarchive-zip-perl
libdate-calc-perl
libdbd-pg-perl (unless you use a Oracle as your database backend)
libdbi-perl (unless you use a Oracle as your database backend)
libhttp-message-perl
libjson-perl
libwww-perl
libxml-parser-perl
openjdk-8-jre
perl
postgresql (unless you use a RDBMS running on another system)
rsync
tcl
Optional packages for working with Microsoft Excel:
make (CPAN utility requirement)
libhtml-parser-perl
libspreadsheet-parseexcel-perl
libspreadsheet-xlsx-perl
The module Spreadsheet::BasicRead is not available as a package and must therefore be installed using cpan (make sure cpan is properly configured, by running cpan without arguments first):
sudo cpan -i Spreadsheet::BasicRead
Optional packages for working with OSLC systems:
libtimedate-perl
libwww-mechanize-perl
libxml-libxml-perl
Optional packages for working with GitHub systems:
libtimedate-perl
libmail-box-perl
libmail-mbox-messageparser-perl
libnet-github-perl
Optional packages for working with Semios/Prometil systems:
libfile-slurp-perl
Optional packages for Advanced CSV Export Management:
libtext-csv-perl
Squore in a configuration where projects are created via the web interface
In this simple deployment, you only use the web UI to create projects. Squore Server is installed on a machine and you connect to it using a web browser. Analyses are carried out on the server, which must have access to the source files you are telling it to analyse.
Squore in a configuration where projects creations are requested by a client and delegated to a server
In this deployment, Squore Server is installed on one machine (the server), and Squore CLI is installed on another machine (the client). The client remote-controls the server and instructs it to analyse source files. The client provides the path to the sources as the server sees it. The sources need to be visible or accessible from the server only, and the code is fully analysed on the server. This is known as the Delegate method and is quite similar to what you achieve by creating projects from the web interface directly.
Squore in a configuration where projects creations are run locally on a client and results are sent to a server
In this type of deployment the setup is the same as in the previous method, but the client runs the full analysis and only send the results of the analysis to the server when it is done. This is useful when the server does not have access to the source code, or when parts of the data analysed is only available on the client machine.
It is possible to install Squore Server and use a database running on another machine. In this mode, Squore Server does not manage the database startup and shutdown, and database backups should be performed manually.
If you plan on performing such an installation, ensure that you have access to the information:
The IP address or hostname of the server where the database is running
The port that the database is listening on
The name of the PostgreSQL database or the Oracle schema that will store your data
The credentials required to connect to the database backend
The installer requires that the specified user and database already exist so it can connect and initialise the database using the details provided. However, the Linux installation script also include an extra option to specify SYSDBA credentials to automatically create a new Oracle schema for Squore.
When performing backups, ensure that you backup the database and the project folder at the same time so that you can restore a coherent snapshot of your data. For more information about backups in Squore, consult the section called “Backup Tools”.
In a Continuous Integration scenario, you are free to choose either client/server deployment method described in the section called “Creating Projects From a Client Machine”. This will depend on which machine carried out the source code extraction or computes the data you feed to the Data Providers. You can learn more about how to configure Squore in a Continuous Integration environment by referring to the Command Line Interface Manual.
Squore provides a mobile-friendly web interface that can be used by users to view their favourite charts in their dashboards. This requires no extra configuration on your part, as it uses the same http port as the main web interface. For more information about how users may use Squore Mobile, refer to the Getting Started Guide.
This section describes the possible scenarios for installing Squore on windows.
If you use all the default settings, the installer will deploy the following components in the specified locations:
<SQUORE_HOME> is %SYSTEMDRIVE%\Squoring\squore-server and contains Squore Server and its dependencies, including
dedicated distributions of:
Strawberry Perl 5.12.3.0 Portable
PostgreSQL 8.4.22 Portable
Tcl 8.5 for Windows 8.5.12
PhantomJS 2.1.1
WildFly 10.1.0
<SQUORE_DATA> is %SYSTEMDRIVE%\Squoring\squore-data and consists of the following subfolders:
The Squore database in <SQUORE_DATA>\cluster
The Squore database backup directory in <SQUORE_DATA>\backup
The Squore project data directory in <SQUORE_DATA>\projects
The Squore temporary data directory in <SQUORE_DATA>\temp
The Squore temporary source code directory in <SQUORE_DATA>\temp\sources
The installer provides options to:
use a different installation folder
use a specific path for temporary data and project data
use a specific path for the local PostgreSQL cluster and backup folder
use an existing local PostgreSQL instance
use a remote PostgreSQL or Oracle database
use your own perl distribution
The data and temporary folders must be excluded from the scope of virus scanners, malware protectors and search indexers to avoid any errors during an analysis.
When an error occurs during the installation, the installer wizard remains open and display the log file of the installation, as shown on the screenshot below. When this happens, review the contents of the installer window, and if necessary, copy and send the contents to support@squoring.com.
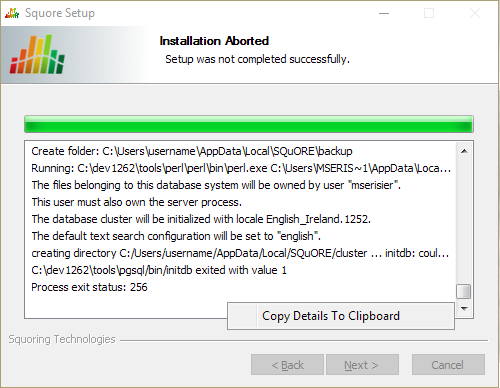
The Installation Aborted screen
In order to start installing Squore, log on with an account that has administrator privileges and launch the Squore installer (squore-17.0.10-windows-x86_64.exe). Each of the wizard screens is documented below in the order that you will see them.
The Squore installer Welcome screen
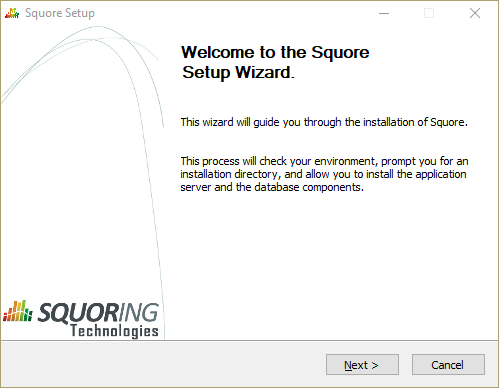
The Squore installer Welcome screen
On the Welcome screen, click the Next button to start the installation.
The Squore Licence Agreement screen
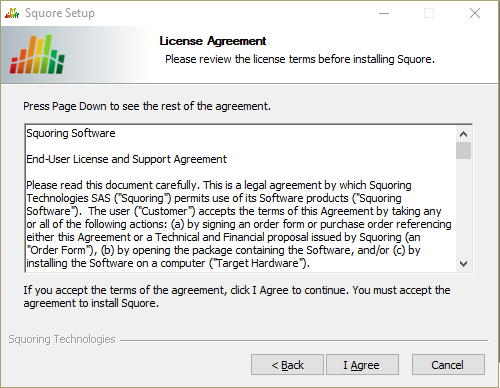
The Squore Licence Agreement screen
Review the Licence Agreement and click I Agree to accept the terms of the agreement and continue with the installation.
Squore Server Destination Folder screen
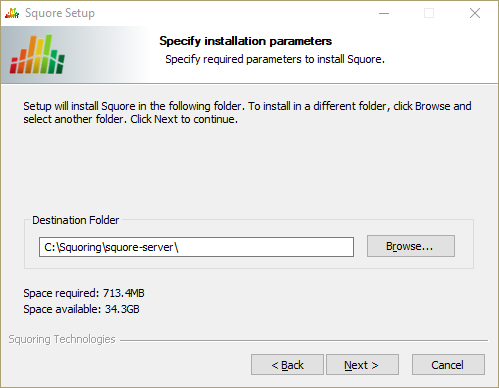
Squore Server Destination Folder screen
The Destination Folder screen allows you to select the Squore installation folder, where the application server will be installed. If you choose the path of an existing Squore installation, the installer will offer to upgrade this existing installation. Note that you should back up your data before you attempt to upgrade a Squore installation.
The steps to follow in order to upgrade an existing installation are described in the section called “Upgrading from a Previous Version”. The rest of the current chapter describes the procedure for a new installation.
Check that the location suggested by the Squore installer is appropriate. If not, use the Browse... button to select another location.
After specifying the Destination Folder, click on the Next button.
The Squore Components screen
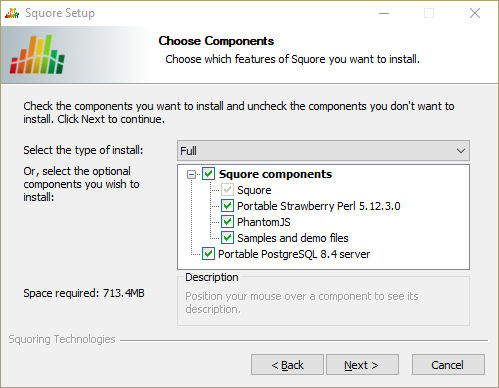
The Squore Components screen
The Components screen allows you to choose between the three available types of installations:
Full: all components will be installed
Minimal: only Squore Server will be installed. Use this mode if you already have your own database server, perl and PhantomJS installations
Custom: you define which components will be installed using the checkboxes on the Choose Components screen
If you are unsure which option is the best for you, you can safely use the Full installation, so that all Squore components are installed locally.
Select the appropriate installation mode. Then, click the Next button.
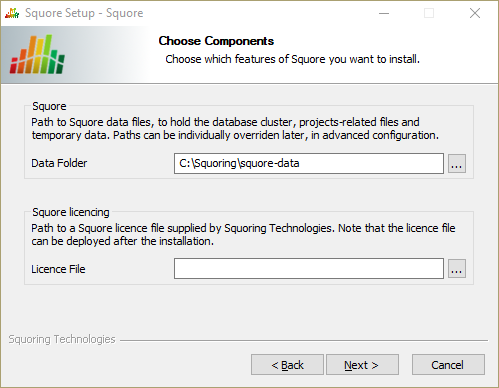
The General Options screen
The General Options screen
The Squore General Options screen allows specifying where Squore stores its data and which licence file is used for the installation.
Data Folder: The data folder is the main folder where the data generated by Squore will be stored. Define a path on your system to hold the data. By default, the database cluster, the temporary folder, the project data and the default backup folder will live in this location. Note that you can refine each individual location later by going through the advanced option screens of the installation wizard.
Licence File: The location of the Squore licence file you wish to use for your installation. Note that you can leave this field empty at this time and provide the licence information only after the installation procedure has finished. This is explained in further details in the section called “Updating the Squore Licence File”.
After specifying the data location and optionally pointing to a licence file, click the Next button.
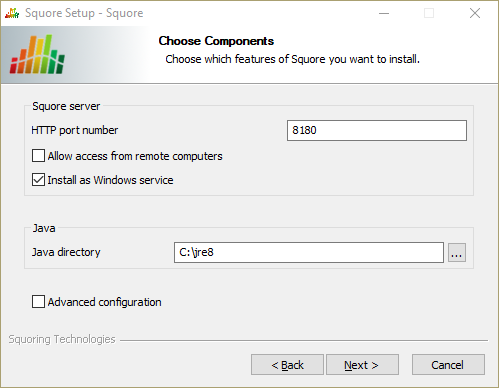
The Squore Additional Options screen
The Squore Additional Options screen
The Squore Additional Options screen allows specifying the rest of the necessary, basic options for your installation.
HTTP port number: Define the port used to access Squore from your browser.
Allow access from remote computers: Check this box to allow other computers on your network to connect to the Squore installation from a web browser. This setting is off by default to provide a safe installation that is only accessible from the server machine itself. The value can be changed after the installation process finishes by following the steps detailed on http://openwiki.squoring.com/openwiki/index.php/Connect_remotely_to_the_server.
Install as Windows service: Check this box if you want to be able to start and stop Squore Server using a Windows service. You can optionally customise the service name when clicking the Next button.
If you plan to have multiple Squore Server installations on the same machine, using Windows Services is not recommended, as it can cause issues when upgrading. For more details, consult https://wiki.squoring.com/display/HOW/Recommendations+for+Squore+Installations+on+Windows%3A+Services+and+Registry.
Java directory: the directory where the Oracle JRE is installed. The wizard should have found the appropriate Java installation on your server, but you can modify the value if the JRE you want to use is in a different location using the ... button. Note that Java 8 (other versions are not supported) is required (see the section called “Installation Prerequisites”).
Advanced configuration: Check this box to see more installation options for advanced users. Advanced options include finer control over data folder locations, memory settings, and advanced database configuration (like using a remote PostgreSQL installation or an Oracle database).
After setting your preferences, click the Next button to view a summary of your installation settings (step 14) or proceed with the advanced configuration options (step 7).
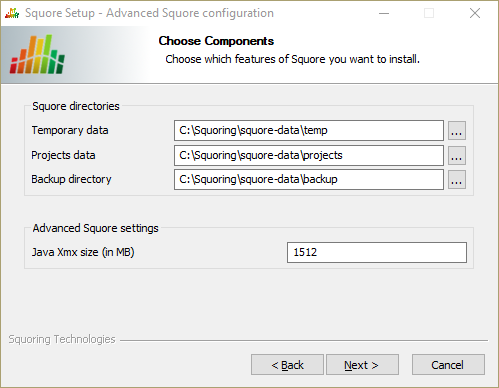
The Advanced Squore configuration screen
The Advanced Squore configuration screen
This screen is only displayed if you checked the Advanced configuration box in step 6.
On the Advanced Squore configuration screen, you can modify the default work directory and memory and performance settings for the server.
Temporary data: The location of the temporary data generated by Squore.
Projects data: The location of the data generated by Squore when running analyses on the server.
Backup directory: The location used to store backups when the backup script is launched. For more details about backing up your Squore data, see the section called “Backing-Up the Squore Data”
Java Xmx size (in MB): The maximum amount of RAM available to Squore Server, set to 25% of the physical RAM available on your server by default. It is recommended to keep the memory allocated to Squore under 25% of the total physical RAM so that other Squore modules (especially the database) or external processes (the OS and some Data Providers like Checkstyle or FindBugs) still have enough resources available. This setting can be changed after installation by following the procedure described in the section called “Changing the Java Heap Size”.
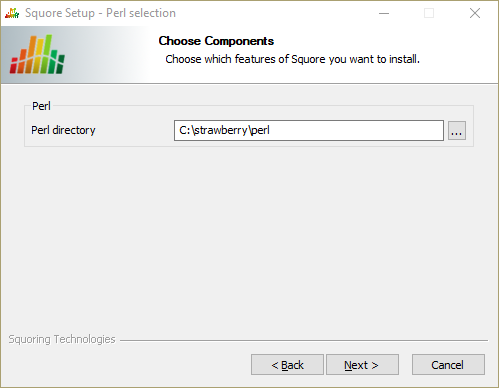
The Perl selection screen
The Perl selection screen
This screen is only displayed if you disabled the installation of Strawberry Perl 5.12.3.0 Portable box in step 3.
On the Perl selection screen, you can modify the path to the Perl distribution that will be used by Squore Server. Use the ... button to specify the Perl installation folder and click the Next button to continue.
The Squore database screen
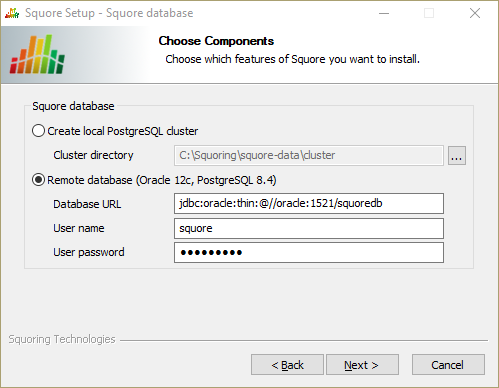
The Squore database screen
On the Squore databse screen, you can specify if your Squore Server installation should use a local PostgreSQL cluster or a database on a remote DBMS.
In order to use a local PostgreSQL cluster, modify the path to the PostgreSQL installation that will be used by the installer to create the Squore database. Use the ... button to specify the installation folder and click the Next button to continue.
In order to use a remote database backend, specify its URL and provide the username and password of a dedicated user for the Squore installation.
The syntax for the database URL is:
jdbc:oracle:thin:@//[host][:port]/sid for Oracle
jdbc:postgresql:[//host[:port]/]dbname for PostgreSQL
When you click the Next button to continue, a connection to the databse is attempted. If the database cannot be reached with the details supplied, you will be asked to review them before you can continue with the installation.
The PostgreSQL server configuration screen
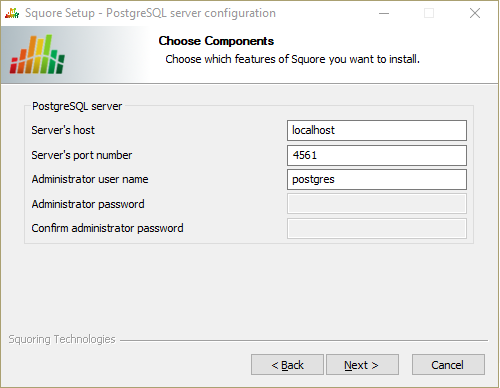
The PostgreSQL server configuration screen
This screen is only displayed if you checked the Advanced configuration box in step 6 and are using a local PostgreSQL database.
On the PostgreSQL server configuration screen, you can provide details about the PostgreSQL server to be used with Squore Server
Server's host: the hostname of the machine running the PostgreSQL server
Server's port number: the running port of the PostgreSQL server
Administrator user name: the user name of the PostgreSQL server admin user
Note that the Administrator password cannot be set. After adjusting your settings, click the Next button to continue.
The Squore database configuration screen
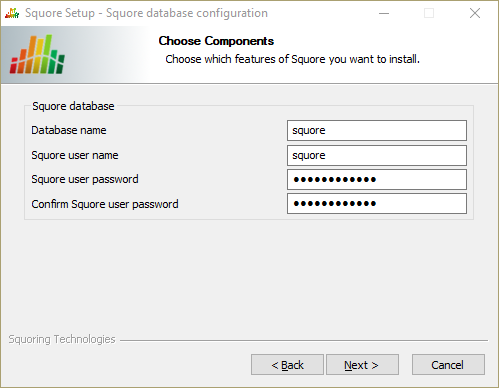
The Squore database configuration screen
This screen is only displayed if you checked the Advanced configuration box in step 6 and are using a local PostgreSQL database.
On the Squore database configuration screen, you can specify the desired name and user for the Squore database:
Database name: the name of the database that will be created for this installation of Squore
Squore user name: the name of the user that will be created as the owner of the database
Squore user password: the password for the specified database user
After adjusting your settings, click the Next button to continue.
The Networking screen
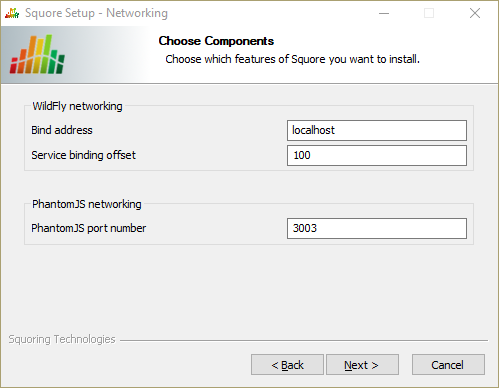
The Networking screen
This screen is only displayed if you checked the Advanced configuration box in step 6.
On the Networking screen, you can specify the desired bind address and ports for Squore Server, as well as the port to use for the PhantomJS server:
Bind address: the bind-address configuration for the WildFly Server
If you want to restrict access to Squore Server from the server itself, leave localhost. If you want your server
to be accessible from anywhere on your network, set the bind address to 0.0.0.0.
Service binding offset: the offset added to the value of the default WildFly ports (as described on https://docs.jboss.org/author/display/WFLY10/Interfaces+and+ports#Interfacesandports-SocketBindingGroups) for this installation of Squore, resulting in the following ports being assigned for the following offset values:
100 (default): http: 8180, https: 8543, management: 10090
200: http: 8280, https: 8643, management: 10190
300: http: 8380, https: 8743, management: 10290
The offset is mainly used to install several instances of Squore using different ports on the same machine.
The remoting port is used to share a licence server between multiple installations, as described in the section called “Connecting to a Remote Licence Server”.
PhantomJS port number: Choose the port used for the PhantomJS server. Not that all communication between Squore Server and PhantomJS happens on the same machine. This port therefore does not need to be open on your firewall, except in very specific scenarios described in the section called “Advanced PhantomJS Settings”.
After adjusting your settings, click the Next button to continue.
The Windows Service screen
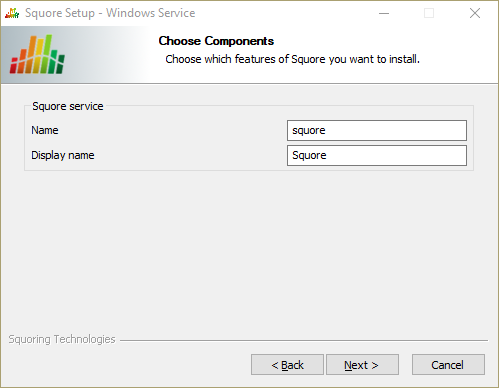
The Windows Service screen
This screen is only displayed if you checked the Install as Windows service box in step 6.
On the Windows Service screen, you can specify the desired name and display name for service that controls Squore Server.
For a Windows Service, the name is the alias used in the command line (for example: net start squore),
and the display name (Squore) is the name displayed in the graphical Windows Services Console.
Set the name and display name for the service according to you needs and click the Next button to continue.
The Confirmation screen
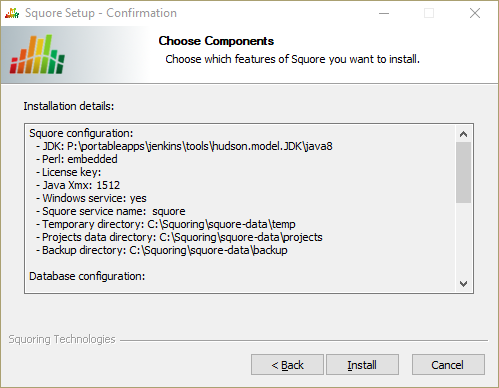
The Confirmation screen
The Confirmation screen shows a summary of the parameters you specified in previous steps of the wizard. Verify that the information matches your selections and click Install to start installing Squore. The installation process lasts a few minutes.
The Installation progress screen
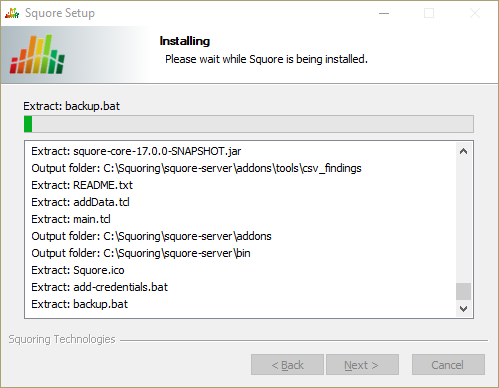
The Installation progress screen
During the installation, a progress bar is displayed while files are copied to your hard drive.
The installation cannot be cancelled after it has started.
The Squore installation completed screen
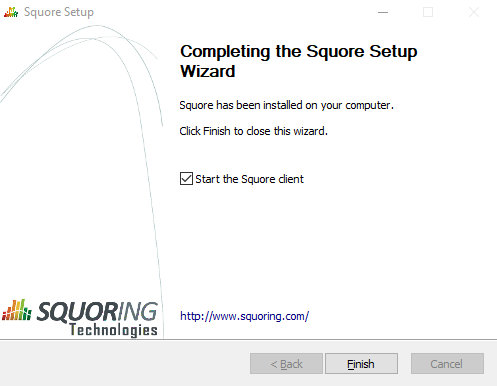
The Squore installation completed screen
When the installation completes, the installation completed screen is displayed. Click the Finish button to close the Squore Installation Wizard. If you checked the Start the Squore client box, the Squore Login page should open in your browser.
Squore is now ready for use and can be accessed via
http://localhost:8180/SQuORE_Server
. Refer to the next section if you need more information about how to start and stop Squore and, if applicable, change the default configuration.
Before installing Squore on a Linux platform, verify that all prerequisites are met, as described in the section called “Installation Prerequisites”
If you use all the default settings, the installer will deploy the following components in the specified locations:
<SQUORE_HOME><SQUORE_DATA>/backup/tmp/squore/tmp/squore/sourcesEnsure that the user that installs and runs Squore has read and write access to these locations.
The installation script will try to guess the amount of memory to allocate for the database on your system. If it cannot do it, you will get an error message about setting kernel.shmall. In this case, you need to set the value of kernel.shmall to a value that suits your need, based on which other applications are running on your system. The script will only suggest a minimum value.
Follow these instructions to install Squore Server:
Copy the installation package (squore-17.0.10-linux-x86_64.tar.bz2) into the location where you want to install Squore Server (For example: /opt/squore/).
Extract the contents of the archive into the selected installation directory.
The folder now contains a new folder called squore-server, which we will refer to as
<SQUORE_HOME>
.
Run the Squore installation script in a command shell. The full list of options accepted by the install script can be found in install(1), but the command below is usually enough for most installations:
<SQUORE_HOME>/bin/install
			  -b 0.0.0.0
			  -k /path/to/squore-license.p7s


/path/to/project/data
It is mandatory to accept the end-user licence agreement as the first step of the installation.
Do not run the installation script as root, as this causes the installation of PostgreSQL to fail.
The file squore-license.p7s should have been previously provided by
Squoring Technologies according to the applicable Squore licensing agreement in order to run Squore Server, but you can perform
the installation even if you do not have a licence file yet.
If you want Squore Server to use a remote database backend, consult install(1) to find out more about the parameters available to set the remote database type, name and location.
End users can run third-party static code analysers or rule checkers that are not shipped with the Squore installer for licencing reasons. In this case, it is necessary to download the extra binaries from http://support.squoring.com/download_area.php and deploy them on the server.
The list of third party plugins to be downloaded separately is as follows:
Checkstyle 5.6
FindBugs 3.0
Cppcheck 1.61
PMD 5.0.5
Polyspace Export
Stylecop 4.7
Here is a full example of how to deploy Checkstyle into Squore
Download the Checkstyle binary from http://support.squoring.com/download_area.php.
Extract the contents of the zip file onto Squore Server.
Copy the extracted checkstyle-5.6 folder into <SQUORE_HOME>/addons/tools/CheckStyle_auto.
Instruct all client installations to synchronise with the server so that they get the newly deployed third-party binaries.
If you have deployed some third-party tools on Squore Server, they will automatically be downloaded to your client when you launch the client synchronisation script.
AntiC and Cppcheck on Linux also require special attention: Cppcheck must be installed and available in the path, and antiC must be compiled with the command:
# cd <SQUORE_HOME>/addons/Antic_auto/bin/ && gcc antic.c -o antic
For more information, refer to the Command Line Interface Manual, which contains the full details about special installation procedures for Data Providers and Repository Connectors.
The Squore installation package can be used to upgrade an existing Squore installation from Squore 2013-B-SP3.
When an installation is upgraded, the following happens:
The new version of Squore Server overwrites the previous one in the same installation directory.
The database is upgraded.
The data files are migrated.
The old basic configuration is kept: location of data, cluster and tmp folders as well as ports.
LDAP settings, licence server sharing, SSL configuration are discarded and will need to be configured again. The old <SQUORE_HOME>/config.xml and <SQUORE_HOME>/server/standalone/configuration/standalone.xml are backed up for your convenience next to the new ones (i.e. <SQUORE_HOME>/config.xml.bkp and <SQUORE_HOME>/server/standalone/configuration/standalone.xml.bkp).
The java version required by the new version of Squore may be different from the one you were using in your previous installation. On Windows, an installer screen will prompt you for the path to the new Java installation to use after upgrading. On Linux, you can use the -J option to specify the new path to Java in your upgrade command line.
Before upgrading from a pre-16.0 version, ensure that you have as much free space on your disk as the size of your current database, as reported on Administration > Projects.
Folders inside the installation directory are deleted during an upgrade, including the default tmp, data, cluster and backup folders. Before you attempt to upgrade Squore, run a full backup of your data (and move it outside <SQUORE_HOME>) using the provided backup scripts described in the section called “Backing-Up the Squore Data”
On Linux, if you used the -x and/or -s parameters in your initial installation or if you manually edited the value of PostgreSQL's shared_buffer or java Xmx parameters after installing, you must pass -x and/or -s on the command line for the upgrade as well, as they are not read from the previous installation. For more details on install options, refer to install(1).
The file postgresql.conf in your database cluster is patched during the upgrade process. If you have modified it manually, create a backup copy before upgrading and verify that the migrated file still contains your modifications.
If you are a local PostgreSQL cluster as your database, ensure that the server and the database are shut down before continuing. In all other scenarios (an Oracle database or a remote PostgreSQL cluster not managed by Squore) ensure that Squore Server is stopped and that the database is accessible and accepting connections.
No progress information is displayed on screen during the database upgrade phase, which may take a while to complete.
Follow these steps to upgrade your Windows installation.
Run the Windows installer.
Click the Next button to get to the Licence Agreement screen.
Click the Next button to get to the Destination Folder screen.
Browse for the folder containing the old installation and click the Next button.
On the Upgrade Choice screen, select Override to delete the existing installation and start from scratch (all your data is lost) or Upgrade to upgrade your existing installation to the new version, then click the Next button.
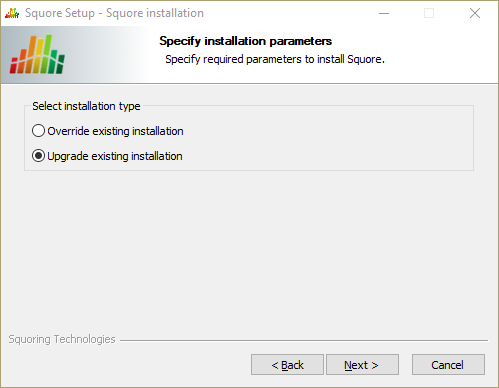
The Upgrade Choice screen
Clicking the the Next button button to continue with the upgrade.
If you are running an unsupported Java version, you will see the following screen, where you can specify the path to the new Java version:
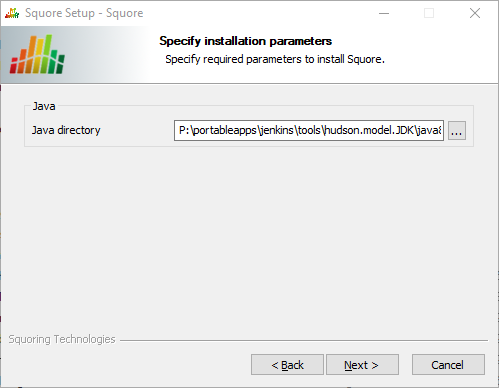
The Squore Setup screen for the new Java directory
Specify the path to the new Java installation and click the Next button to continue with the upgrade.
Wait while the installer retrieves the settings to apply to the upgrade and displays them on the Confirmation screen, and click Install.
The Confirmation screen
Wait for the upgrade process to complete and close the wizard by clicking on Finish.
The Installation Complete screen
The java version required by the new version of Squore may be different from the one you were using in your previous installation. On Windows, an installer screen will prompt you for the path to the new Java installation to use after upgrading. On Linux, you can use the -J option to specify the new path to Java in your upgrade command line.
Before upgrading from a pre-16.0 version, ensure that you have as much free space on your disk as the size of your current database, as reported on Administration > Projects.
Folders inside the installation directory are deleted during an upgrade, including the default tmp, data, cluster and backup folders. Before you attempt to upgrade Squore, run a full backup of your data (and move it outside <SQUORE_HOME>) using the provided backup scripts described in the section called “Backing-Up the Squore Data”
On Linux, if you used the -x and/or -s parameters in your initial installation or if you manually edited the value of PostgreSQL's shared_buffer or java Xmx parameters after installing, you must pass -x and/or -s on the command line for the upgrade as well, as they are not read from the previous installation. For more details on install options, refer to install(1).
The file postgresql.conf in your database cluster is patched during the upgrade process. If you have modified it manually, create a backup copy before upgrading and verify that the migrated file still contains your modifications.
If you are a local PostgreSQL cluster as your database, ensure that the server and the database are shut down before continuing. In all other scenarios (an Oracle database or a remote PostgreSQL cluster not managed by Squore) ensure that Squore Server is stopped and that the database is accessible and accepting connections.
No progress information is displayed on screen during the database upgrade phase, which may take a while to complete.
Follow these steps to upgrade your Linux installation.
Download the Linux installation package.
Extract the archive by running the command:
cd
/tmp
/usr/bin/tar
xjf
squore-17.0.10-linux-x86_64.tar.bz2
<SQUORE_HOME>/server/bin/standalone.confRun the upgrade by executing:
cd
/tmp/squore-server/bin
./install
-U
/path/to/old/installation
[options...]
<SQUORE_HOME>/server/bin/standalone.conf if necessary to reapply your custom configurations.You can remove Squore Server from your machine by going through the uninstaller wizard, as described below:
Stop Squore Server by running <SQUORE_HOME>/stop.bat.
Launch the uninstaller wizard from the Add/Remove Programs dialog in
the control panel or directly by double-clicking <SQUORE_HOME>/Squore_Uninst.exe. The wizard opens:
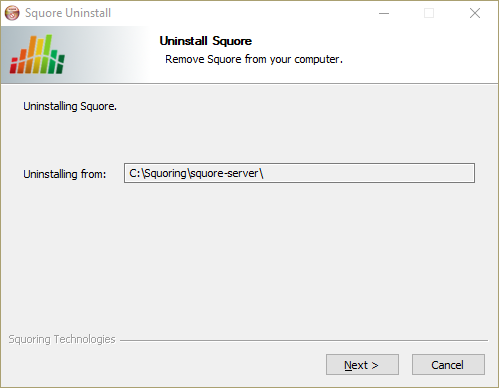
The Squore Server uninstallation wizard
Click the Next button to go to the next screen.
The wizard will prompt you which of the data folders created by Squore Server to remove from your machine:
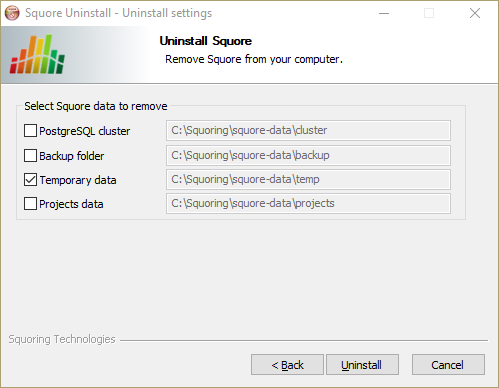
The Folder Selection screen
The data generated by Squore Server is left on the machine by default. If you do not need it, check all the boxes to delete all the folders.
Click Uninstall to procede with the removal of the software and the selected data.
This operation cannot be interrupted or rolled-back.
The wizard will notify you when the uninstallation finishes, as shown below:
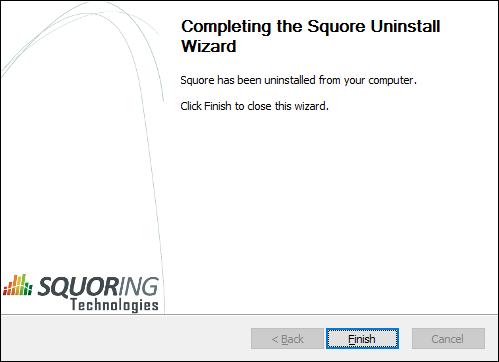
The Uninstallation Complete screen
Click Finish to exit the wizard.
There is no uninstallation script for Squore Server on linux. In order to completely remove Squore Server from your system:
Ensure that Squore Server is completely stopped by running:
<SQUORE_HOME>/bin/sqctl
						  stop
Delete the folders where Squore Server generated data:
The database cluster
The projects folder
The temp folder
The sources folder
You can identify these locations by looking at <SQUORE_HOME>/config.xml,
as described in the section called “Understanding config.xml
”.
Delete <SQUORE_HOME>, the folder containing config.xml and the Squore binaries.
Table of Contents
The Squoring program group created during the installation process contains all commands to start Squore on Windows.
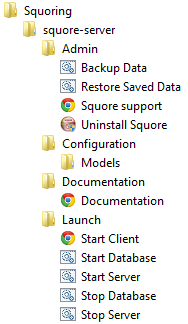
Start the Squore Database Server:
Start >
                            Squoring > Squore > Launch > start-db.bat
Start the Squore Application Server:
Start >
                            Squoring > Squore > Launch > start-server.bat
Launch Squore Client:
Start > Squoring >
                            Squore > Launch > StartClient
Alternatively, you can type the following
address in a web browser:
http://localhost:8180/SQuORE_Server
Log into Squore using the default admin user account:
Username: admin
Password : admin
Squore is now started. Please refer to the Squore Getting Started Guide for more details on how to use Squore.
The admin user is the default user with administrative rights. If you want to provide non-administrative access to a user after installation, they need to use the demo login instead (password: demo)
Instead of using the Windows Start menu for launch and shutdown operations, you can use the scripts available in <SQUORE_HOME>/bin:
start-db.bat Starts the Squore database
start-server.bat Starts Squore Server
start.bat Performs the two previous operations in succession
stop-server.bat terminates Squore Server
stop-db.bat stops the Squore database
stop.bat performs the two previous operations in succession
During the installation of Squore Server on Windows, the installer provides the option to register a service to control Squore's startup and shutdown. This section covers the functionality of the prunmgr utility that allows you to further configure some aspects of the Squore Windows service. Note that when you install the Windows service, you should no longer use the start and stop scripts described in the section called “Starting Squore on Windows”
After installing Squore Server as a Windows service, you can use the service manager to change some of the settings.
The Windows service uses Apache Commons Daemon. Consult https://commons.apache.org/proper/commons-daemon/index.html for more information about the framework and the available installation options.
Start the utility by typing the following in a command window as administrator:
<SQUORE_HOME>\bin\prunmgr.exe //ES/squore
squore is the service name you chose during the installation.
The service manager opens in a new window and allows you to change the following settings:
General Settings
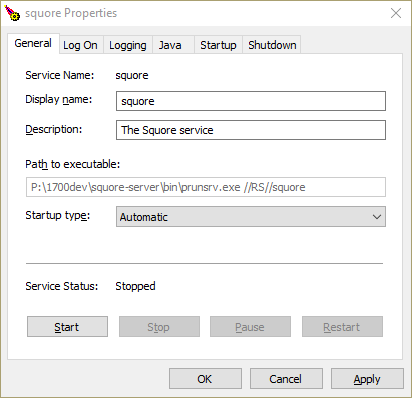
The General Tab
From the General tab, you can adjust the Service display name, description and startup type (Automatic to start at boot, Manual to start interactively, Disabled to stop using the service). You can also see and change the current state of the service.
Log On

The Log On Tab
From the Log On tab, you can control which Windows account runs the service. Note that any change takes affect after the service is restarted.
The service is set to run under the local system account by default. Depending on your security requirements you may need to manually set the account to a real Windows user to run the services. For more information, consult the Microsoft Windows documentation at https://technet.microsoft.com/en-us/library/cc755249.aspx.
Logging
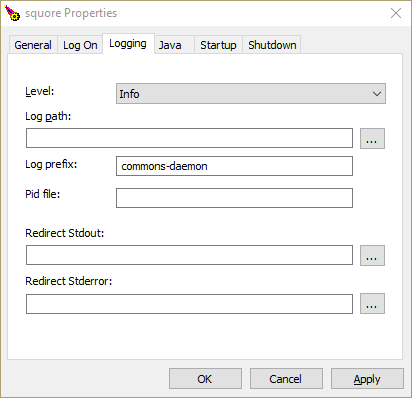
The Logging Tab
On the Logging tab, you can define paths to log files where the startup and shutdown activities of the service will be saved.
The default location for the log file is %SystemRoot%\System32\LogFiles\Apache and generally does not need
to be changed, unless you are noticing issues starting and stopping the service.
Java
The Java Tab
The Java tab is useful if you need to change the path to your JRE. You can use jvm.dll from the
system's %PATH%, or you can point to a specific %JAVA_HOME%\bin\server\jvm.dll if needed.
The settings on this tab have no effect over the Java settings for Squore Server. If you want to change the path to the Java installation or the amount of memory used by Squore, refer to the section called “Changing the path to the Java Installation” and the section called “Changing the Java Heap Size” instead.
Startup and Shutdown
There are no useful settings to be modified on these tabs.
Go to the Squore bin directory
cd
                            <SQUORE_HOME>/bin
Start Squore Server:
./sqctl start
Launch Squore by typing the following address in a Web browser: http://localhost:8180/SQuORE_Server
Log into Squore using the default user account:
Username: admin
Password : admin
Squore is now started. Please refer to the Squore Getting Started Guide for more details on how to use Squore.
The admin user is the default user with administrative rights. If you want to provide non-administrative access to a user after installation, they need to use the demo login instead (password: demo)
Table of Contents
config.xml
During the installation process, the Squore Installation Wizard creates several folders
and files in the Squore installation directory
<SQUORE_HOME>
:
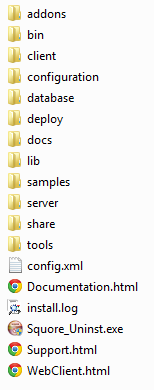
<SQUORE_HOME>/addons contains the Data Providers and Repository Connectors available in Squore
<SQUORE_HOME>/bin contains the main commands available to administer
Squore. Most of these commands are also available from the
Start
menu in the
Squoring/Squore program group on Windows.
<SQUORE_HOME>/client contains the libraries used by Squore CLI.
<SQUORE_HOME>/configuration contains folders and files that provide the default analysis and decision models, as well as the default dashboards for these models. For more details on how to understand and use these configuration files, refer to the Squore Configuration Guide.
<SQUORE_HOME>/database contains PostgreSQL tools to administer the database.
<SQUORE_HOME>/docs contains licences for third party libraries included in Squore.
<SQUORE_HOME>/lib contains libraries used by Squore Server for installation and maintenance tasks.
<SQUORE_HOME>/samples contains some sample source code in various programming languages that can be used as examples when getting to know Squore. This folder can safely be deleted if you do not need it.
<SQUORE_HOME>/server contains the Squore application server. See the section called “The Squore Application Server” for more information.
<SQUORE_HOME>/share contains some custom perl modules.
<SQUORE_HOME>/tools contains the deployed instances of perl, tclsh and PostgreSQL on Windows.
<SQUORE_HOME>/config.xml is used to specify the location of some
configuration folders. See the section called “Understanding config.xml
” for more information.
Note: This section deals with editing the configuration of the installed instance of Squore. For more information about how to edit analysis models and wizards, refer to the Squore Configuration Guide.
The initial contents of <SQUORE_HOME>/config.xml are as follows:
<?xml version="1.0" encoding="utf-8" standalone="yes"?>
<squore type="server">
	<paths>
		<path name="perl.dir" path="C:\Squoring\Squore\tools\perl\perl"/>
		<path name="tclsh.dir" path="C:\Squoring\Squore\tools\tclsh"/>
	</paths>
	<database>
		<postgresql directory="C:\Squoring\Squore\tools\pgsql"/>
		<cluster directory="C:\Squoring\Squore\cluster"/>
		<backup directory="C:\Squoring\Squore\backup"/>
		<security>
			<user-name>postgres</user-name>
		</security>
	</database>
	<phantomjs>
		<socket-binding port="3003"/>
	</phantomjs>
	<configuration>
		<path directory="C:\Squoring\Squore\configuration"/>
	</configuration>
	<addons>
		<path directory="C:\Squoring\Squore\addons"/>
	</addons>
	<tmp directory="C:\Users\username\AppData\Local\Temp\Squore"/>
	<projects directory="C:\Squoring\Squore\projects"/>
	<sources directory="C:\Users\username\AppData\Local\Temp\Squore\sources"/>
</squore>
Here is a description of each element:
paths/path name="perl.dir" (mandatory) is the path to the perl installation used by Squore. It is detected automatically on Linux and set to <SQUORE_HOME>/tools/perl/perl on Windows.
paths/path name="tclsh.dir" (mandatory) is the path to the tcl installation used by Squore. It is detected automatically on Linux and set to <SQUORE_HOME>/tools/tclsh on Windows.
database/postgresql directory="..." (mandatory) is the path to the PostgreSQL installation used by Squore It is detected automatically on Linux (or passed as a parameter to ./install) and set to <SQUORE_HOME>/tools/pgsql on Windows.
database/cluster directory="..." (mandatory) is the path to the PostgreSQL cluster defined at installation to hold the Squore Database.
database/backup directory="..." (mandatory) is the path to the folder used by Squore by default to store backups. It can be overridden by passing a path to the backup script.
phantomjs (optional) allows you to specify the port used by Squore Server to communicate with the local instance of PhantomJS.
configurations/path directory="..." (mandatory): Paths to one or more configuration folders. The first path listed in the list takes precedence over the next one.
addons/path directory="..." (mandatory): Paths to one or more addons folders. The first path listed in the list takes precedence over the next one.
tmp directory="..." (mandatory) is the path to the temporary folder used to hold temporary analysis and user session data created while the server is running (this folder is emptied at startup).
projects directory="..." (mandatory) is the path to the project folder that holds analysis results. Files in this folder are included in a backup, along with the contents of the database.
sources directory="..." (optional, default: inside tmp folder) is the path to the folder used to store source files checked out from source code management systems. It is located by default inside the temporary folder, as the source code is not normally necessary after it has been analysed. If you need the source code to be saved permanently, move the sources folder outside of the temporary folder. This is normally only needed when working with zip files to send data files to the server.
In order to add a custom addons or configuration folder, simply add a path element in the configuration file:
<?xml version="1.0" encoding="utf-8" standalone="yes"?>
<squore type="server">
	<paths>
		(...)
	</paths>
	<database>
		(...)
	</database>
	<configuration>
		<path directory="C:\MyModels\configuration"/>
		<path directory="C:\Squoring\Squore\configuration"/>
	</configuration>
	<addons>
		<path directory="C:\MyModels\addons"/>
		<path directory="C:\Squoring\Squore\addons"/>
	</addons>
	<tmp directory="C:\Users\username\AppData\Local\Temp\Squore"/>
	<projects directory="C:\Squoring\Squore\projects"/>
	<sources directory="C:\Users\username\AppData\Local\Temp\Squore\sources"/>
</squore>
By adding your own custom configuration and addons folder before the standard configuration, you ensure that the modifications you made override the definitions from the standard configuration.
When several users run analyses using the command line on the server machine,
it is good practice for each user to work with their own tmp, sources and
data folders. This can be done by adding a client
node in the server
configuration file.
<?xml version="1.0" encoding="utf-8" standalone="yes"?>
<squore type="server">
	<paths>
        (...)
	</paths>
	<database>
        (...)
	</database>
	<configuration>
        (...)
	</configuration>
	<addons>
        (...)
	</addons>
	<client>
		<!-- java system properties are supported under the client node only -->
		<tmp directory="${java.io.tmpdir}/squore-${user.name}"/>
		<projects directory="${user.home}/.squore/projects"/>
		<sources directory="${java.io.tmpdir}/sources"/>
	</client>
	<tmp directory="..."/>
	<projects directory="..."/>
	<sources directory="..."/>
</squore>
As stated in the example, java system properties are supported in this section of <SQUORE_HOME>/config.xml.
All three elements are optional, and their default value if missing are the ones described in the XML snippet above.
Your installation of Squore includes some scripts designed to help save and restore snapshots of your analysis data. These scripts will allow you to:
Backup the current Squore data (See the section called “Backing-Up the Squore Data”)
Restore a previously saved snapshot (See the section called “Restoring Squore Data”)
The scripts are located in the <SQUORE_HOME>/bin folder of the Squore
installation directory.
The Windows and Linux backup scripts accept a parameter that is used as the path to store the backup file. This makes it possible to use a scheduled task on Windows or a cron job on Linux to automate your backups. If you do not specify this parameter, the default backup folder will be used and each new backup will replace the previous one.
Before launching a backup or restore operation, stop Squore Server completely and ensure that the Squore Database is started.
Backups can be launched while the server is running, but it is recommended to regularly perform a backup while the server is stopped. This guarantees that the database and the data files are in sync, which may not be the case if your server is started and analyses are running.
If your database is not running on the same machine as Squore Server, the backup will only include the Squore Server data files. When running in this configuration, you need to perform database backup and restore operations manually.
The contents of the Squore Database and file system can be saved using the
backup script
from the <SQUORE_HOME>/bin folder.
There are several ways to create a backup:
By running
<SQUORE_HOME>/bin\backup.bat [%BACKUP_FOLDER%]
on Windows
By launching Start > Squoring > Squore > Admin > Backup Data on Windows
By running
<SQUORE_HOME>/bin/backup [$BACKUP_FOLDER]
on Linux
Executing this script creates a folder with a compressed database dump and a backup of the projects folder in the location configured in
<SQUORE_HOME>/config.xml, or the backup folder specified on the command line. This backup can later be used by a script that restores database and file system snapshots, which we will cover in the next section.
A previously backed-up Squore snapshot can be restored using the
restore script from the <SQUORE_HOME>/bin folder.
There are several ways to restore data:
By running
<SQUORE_HOME>/bin\restore.bat [%BACKUP_FOLDER%]
on Windows
By launching Start > Squoring > Squore > Admin > Restore Saved Data on Windows
By running
<SQUORE_HOME>/bin/restore [$BACKUP_FOLDER]
on Linux
The script uses the data dump in the
backup folder specified in your <SQUORE_HOME>/config.xml or the backup folder specified on the command line to restore the database and file data for
this snapshot.
You can reset the Squore installation to its initial state
using the sqadm utility from the command line. The tool is located in the
<SQUORE_HOME>/bin folder of the Squore installation directory.
This operation cannot be undone. All the projects, roles, users, groups and profiles you created will be lost.
Stop Squore Server
Ensure that the Squore Database is started
From a terminal, launch the following command:
sqadm reset
Confirm, and allow the command to finish
Start Squore Server
In order to handle cases where the URL configured in Administration > System is not accessible
to PhantomJS, you can configure a different URL for the communication between Squore and PhantomJS. This is useful when you need to bypass a proxy
on your network, or when the Squore Server URL just cannot be resolved from the machin it runs on itself. In those cases, you can force PhantomJS
to make requests to Squore Server by adding the squore-url
attribute to your <SQUORE_HOME>/config.xml, as shown below:
<phantomjs>
	<socket-binding port="3003" squore-url="http://127.0.0.1:8180/SQuORE_Server/" />
</phantomjs>
When using Microsoft Edge, extra configuration is needed in order to use the
Save as ... menu items in the chart viewer. In this specific case, PhantomJS must be
reachable on your network so that the end user's browser calls it directly to generate a downloadable chart on the fly.
The PhantomJS URL needs to be specified in the distant-url
attribute:
<phantomjs>
	<socket-binding port="3003" distant-url="http://servername:3003" />
</phantomjs>
Squore users can only have access to a project when they are added to the project's team by the project manager or an administrator. Until this happens, users are unaware of the projects that others have created. In situations where you wish users to be able to see the list of projects that exist on the server, you can configure Squore Server to provide users with a list of projects they do not currently have access to, so that they contact the project owner and ask to be added to the project's team.
As an administrator, your role is to define which projects should appear on this public list. The list includes all
project whose group matches the value set up in the administration settings. The procedure below shows how you can automatically list all
projects that were created within the public group to the public list.
Log into Squore as an administrator and click on Administration > System
Locate the option called Allow Visibility and check the box to make projects visible
Locate the option called Pattern to filter list by project group and set it to public
Click on Apply at the bottom of the page to save your changes
The Project Owners List options required to list projects from the public group
The Pattern to filter list by project group option accepts a regular expression. As a result, you can display projects
from any group by setting its value to .*, or projects from the
public and demo groups by setting it to
public|demo. By leaving the field empty, all the existing projects on the server will be visible.
After saving your changes, the Projects page will display a new button labelled Ask access to Project Owners, as shown below:

The Projects page with the Ask access to Project Owners button
When clicking the button, you will see the list of projects in the specified groups, together with their owner. Users can click on a user's e-mail address to ask the project owner if they can add them to the project team.
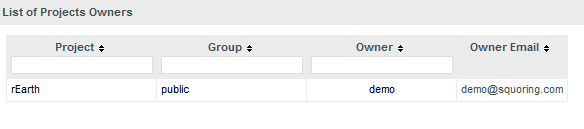
The Projects page with the Ask access to Project Owners button
Squore versions use the following naming convention:
major.minor.patch - buildId - scmInfo. Major and minor releases usually introduce new functionality, while patch releases normally only contain bugfixes.
There are two ways to find out which version of Squore you are running:
From the web interface via ? > About
From the command line (new in 17.0) by running
sqadm version
You can change Squore Server port number after installation. The procedure involves modifying some configuration files in a text editor and restarting the server.
Shutdown Squore Server
Edit <SQUORE_HOME>/server/standalone/configuration/standalone.xml and search for the element
socket-binding-group. The attribute port-offset="${jboss.socket.binding.port-offset:100}" defines the offset chosen at installation. Modify the value as needed.
You can change the port used by the Squore Database
by editing PostgreSQL's configuration file and modifying Squore Server's <SQUORE_HOME>/server/standalone/configuration/standalone.xml to point to the new port. The procedure involves modifying some configuration files in a text editor and restarting the server.
Shutdown Squore Server and stop the database
Open <CLUSTER_DIR>/postgresql.conf in a text editor and search for the line where the port option is defined:
port = 4561 # (change requires restart)
Change the port value to the desired one for your system
Open <SQUORE_HOME>/server/standalone/configuration/standalone.xml in a text editor and search for the database connection URL:
<connection-url>jdbc:postgresql://localhost:4561/<SQUORE_HOME>/Squore_CLI_Uninst.exe</connection-url>
Change the port value to match the change you made in <CLUSTER_DIR>/postgresql.conf.
Start Squore Server.
If you do not know where <CLUSTER_DIR> is located on your server, you can find its location by
reading the value of the cluster setting in <SQUORE_HOME>/config.xml.
The port used by PhantomJS can be changed by editing <SQUORE_HOME>/config.xml to change the port value in the following line:
<phantomjs>
	<socket-binding port="3003"/>
</phantomjs>
After changing the port, restart Squore Server for the changes to take effect.
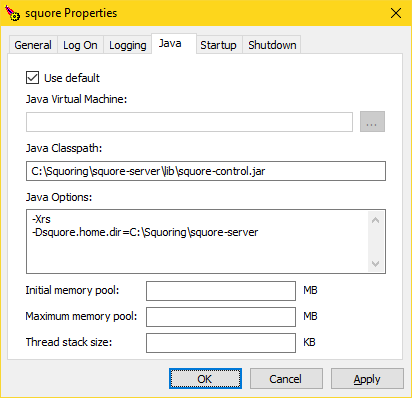
The maximum amount of memory used by Squore Server's Java process at runtime is defined at installation time. If you have not specified any value, the maximum amount of memory used will be 25% of the RAM available on the machine. It is recommended to keep the memory allocated to Squore under 25% of the total physical RAM so that other Squore modules (especially the database) or external processes (the OS and some Data Providers like Checkstyle or FindBugs) still have enough resources available.
This setting can be changed by following this procedure:
Stop Squore Server
Edit <SQUORE_HOME>/server/bin/standalone.conf on Linux or <SQUORE_HOME>/server/bin/standalone.conf.bat on Windows
Change the value of the Xmx parameter, as shown below:
JAVA_OPTS="$JAVA_OPTS -Xms64m -Xmx1512m
or
set "JAVA_OPTS=%JAVA_OPTS% -Xms64M -Xmx1512M -XX:MaxPermSize=256M"
In the example above, 1512M is the default value for a machine with 6Gb RAM, i.e. 25% of 6048Mb.
Start Squore Server
The path to the Java installation on your server can be updated by following the procedure below:
Stop Squore Server
Edit <SQUORE_HOME>/server/bin/standalone.conf on Linux or <SQUORE_HOME>/server/bin/standalone.conf.bat on Windows
Change the value of the JAVA_HOME, as shown below:
JAVA_HOME="/opt/java/jre8"
or
set "JAVA_HOME=C:\jre8"
Start Squore Server
You can change the main timeout value for tasks on a Squore Server installation. . The default value is six hours and is generally fine: if an analysis runs for six hours, it is assumed that something went wrong or will go wrong for reasons regarding memory consumption.
If you decide that the timeout does not suit your workflow, you can change the default timeout value from the Administration pages:
Log into Squore Server as a user with administrative privileges.
Click Administration > System to view the advanced configuration options.
Set the value of the timeout in seconds in the Timeout of queue tasks, in seconds field.
The timeout period defines how long a project can stay in the project queue on the server. This means the timeout period
for projects created using the web interface or from the command line using the DELEGATE_CREATION command is as defined
by the parameter above. For projects created from the command line using the PROCESS_CREATION command, the part
of the analysis carried out on the client machine is not taken into account in the timeout time. These projects only enter the server queue when
the analysis is finished on the client and the results are sent to the server for processing, and there is no built-in timeout
for the client part of the analysis.
You can change the size of the project queue on a Squore Server installation. The default value is 8, which means that 8 projects can be analysed in parallel.
If your hardware can handle a higher number of concurrent analyses, you can increase the queue size
by editing the file <SQUORE_HOME>/Server/server/default/deploy/squore-server.ear/squore-server.jar/META-INF/ejb-jar.xml, and set the maxSession key to the desired size. This involves repackaging and redeploying the
application, as explained below:
Extract the settings file:
cd <SQUORE_HOME>/deploy
jar xf squore-server.ear
jar xf squore-ejb.jar
Make the necessary modifications:
Open <SQUORE_HOME>/deploy/squore-ejb.jar/META-INF/ejb-jar.xml in a text editor
Modify the parameter maxSession (default: 8) to set it to the number of projects that can be created in parallel
Repackage the application:
cd <SQUORE_HOME>/deploy
jar cf squore-ejb.jar
jar cf squore-server.ear
Deploy the patched application following the instructions on https://openwiki.squoring.com/index.php/Deploying_A_Patch#Since_Squore_16.1.2.
Instead of using the command line, you can use 7zip on Windows to open the .ear and .jar files and directly patch their contents.
Squore's web interface allows users to choose between several UI themes: chocolate (brown), classico (green) , neroverdi (light green), rossoneri (red). When a user selects a theme, their preference is saved and this theme is applied each time they log into Squore. As an administrator, you can manage theme functionality in two ways:
Define what the default theme for all users is
Prevent users from using a theme other than the default one
You can access these options from Administration > System in the Theme Control section.
You can also configure these settings by specifying values for the options ui.theme.default and ui.theme.changeable in <SQUORE_HOME>/server/standalone/configuration/squore-server.properties. The default values are shown below:
ui.theme.default = classico
ui.theme.changeable = true
A Squore licence key file named squore-license.p7s should have been
provided to you by Squoring Technologies under the applicable Squore licencing agreement.
Follow these steps to deploy the Squore licence file:
Log into Squore Server as an administrator
Click on ? > License
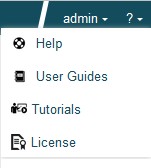
On the License Management page, click Deploy a license file
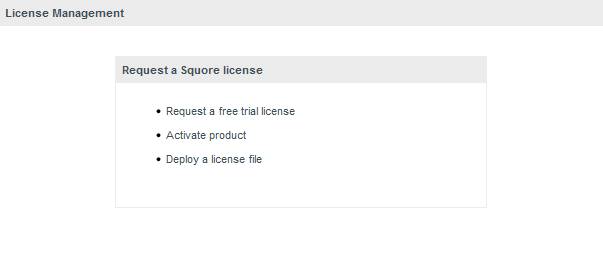
Upload your new licence file and click Deploy. If the new licence file is valid, you are automatically redirected to the home page.
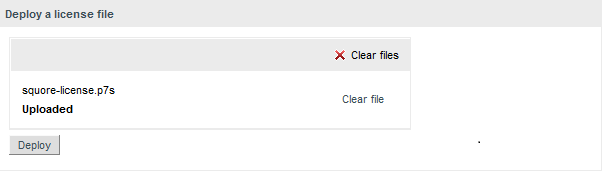
You can access the License Management without logging in if you are accessing http://localhost:8180/SQuORE_Server from the machine running Squore Server itself.
In this section, you will learn to configure Squore to rely on a remote licence server instead of using the licence server embedded into your local installation. This is useful when you run a production server and a development server, and you want the licence to be shared between both installations.
Before you follow these steps, ensure that the two Squore servers are installed and start up correctly as described in Chapter 3, Installing Squore Server and Chapter 4, Starting Squore and that the remote licence server listens to requests from remote machines:
<interface name="public">
	<inet-address value="${jboss.bind.address:0.0.0.0}"/>
</interface>If both servers are running on the same machine, then each server must be identified as a specific instance for this configuration to work.
You can achieve this by editing the server
element at the root of <SQUORE_HOME>/server/standalone/configuration/standalone.xml
and adding a name
attribute as shown below:
<?xml version='1.0' encoding='UTF-8'?>
<server name="production" xmlns="urn:jboss:domain:4.2">
...
</server>
Assign a different name for each server installation before you start following the procedure below.
This procedure involves modifying <SQUORE_HOME>/server/standalone/configuration/standalone.xml and removing one of the default
applications deployed automatically by the installation or upgrade script. These changes therefore have to be applied again after upgrading Squore.
In order to point a local Squore server to a licence served by a remote Squore installation, carry out the following steps:
On the remote license server (optional):
By default, the password of the ejb user is changeme.
If you want to change the password, then:
Generate a new password with this command:
# echo -n "ejb:ApplicationRealm:new_password" | md5sum
where new_password is the password to assign to the user.
Edit <SQUORE_HOME>/server/standalone/configuration/application-users.properties to specify the new password as shown below:
#
# Properties declaration of users for the realm 'ApplicationRealm' which is the default realm
# for application services on a new AS 7.1 installation.
# (...)
ejb=bc0deae7c29cd133a2de015f36ab6132
Restart Squore Server.
On the local server:
Stop Squore Server.
Edit <SQUORE_HOME>/server/standalone/configuration/squore-server.properties. Add the property:
license.remote = true
Edit <SQUORE_HOME>/server/standalone/configuration/standalone.xml
Find the outbound-socket-binding
element with the remote-ejb
attribute and edit its
remote-destination
definition accordingly so that the host
and
port
match the hostname and http port of the remote server
(8080 plus the offset you defined during installation, so 8180 by default). Here is an example of the
complete configuration block:
<outbound-socket-binding name="remote-ejb">
	<remote-destination host="remoteLicenceServer" port="8180"/>
</outbound-socket-binding>
Optionally, if you have changed the default password for the ejb user on the remote server,
look for the ejb-security-realm
security-realm element
, and
modify the secret value with the output of the command
# echo -n "new_password" | openssl base64
. Here is an example of the complete block:
<security-realm name="ejb-security-realm">
	<server-identities>
		<secret value="bmV3X3Bhc3N3b3Jk"/>
	</server-identities>
</security-realm>
Restart Squore Server
Run the following command, with port
matching the controller port of the
installation (9990 plus the offset defined at install time, so 10090 by default):
# <SQUORE_HOME>/server/bin/jboss-cli.sh -c \
 --controller=localhost:10090 \
 --command="undeploy squore-license.ear"
The local Squore Server is now using a remote licence server.
User deletion in Squore permanently blocks an account and a login from being reused, and is therefore not recommended unless you know that the associated user will never need to access Squore again. Instead of deleting a user account, you can make it inactive. This section covers the difference between both operations.
When you delete an account:
The user cannot access Squore anymore to view or create projects
The comments made by the user are kept and are still displayed in the web UI.
You will not be able to reuse the account's login for another user.
A licence token is freed up for another user immediately.
When you deactivate an account:
The user cannot access Squore anymore to view or create projects
The comments made by the user are kept and are still displayed in the web UI.
You can set the account to active again at any time to allow the user to log in again.
A licence token is freed up when the account becomes inactive (usually 6 months after the last recorded activity of the user).
Deactivating an account is usually a safer operation, especially if you are integrating Squore with an LDAP directory.
Squore lets you export your list of user accounts to a CSV file in order to manage it and, if necessary, import it back into another Squore database.
This feature makes use of a perl script that can be run from the command line, as long as you make sure that you have a valid Perl environment for Squore. Refer to the section called “Setting Perl Environment” for more information about verifying that your environment is correct before running the script.
In order to export user accounts, follow these steps:
Move to <SQUORE_HOME>/addons/scripts/export-scripts, which the location of the sqexport.pl script.
Run the perl script with the appropriate options to export users, groups and their members respectively:
perl sqexport.pl
-f
users.csv
users
perl sqexport.pl
-f
groups.csv
groups
perl sqexport.pl
-f
members.csv
groups
-m
In order to import CSV files into the Squore database, use the same options with the sqimport.pl
Note: It is possible to import users or groups only, but in this case both the user and the group need to exist. The CSV files above can be manually edited, or generated by third-party tools (for example an LDAP utility). Ensure that the encoding used for the CSV files is UTF-8 before importing.
For more details on sqimport.pl options, and the format of CSV files, refer to sqimport.pl(1).
The format of the csv files supported is described below.
users.csv
login;fullname;email;password;department;
demo;demo;demo@domain.com;[encrypted-password];demo;
Note: When importing users, you can replace the encrypted password with a password in clear text and instruct sqimport.pl to treat it as clear text by using the -P option, as described in sqimport.pl(1)
members.csv
group;login
Demo Mode;tobias
This section is useful if you want to manually execute Perl scripts that are usually internally used by Squore.
If you have installed the Portable Strawberry Perl with Squore, locate and execute this file (skip this step otherwise):
<SQUORE_HOME>\Tools\perl\portableshell.bat
Then type all commands in the new command prompt window.
SET SQUORE_HOME=<SQUORE_HOME>
SET PERL5LIB=%SQUORE_HOME%\share\perl
As a Squore administrator, you may need to keep track of the usage of the platform and report on its overall performance. This information is now available directly within Squore via Administration > Statistics. If you are also a model developer or a project manager and wish to fine-tune the layout of your dashboards, you will find more statistical data about how users consult analysis results via Models > Statistics and the Manage Project page. This section describes the information you can access from these pages. Note that statistics are collected locally, saved in the Squore database, and never sent anywhere. Statistics collection cannot be turned off. Viewing the statistics collected on the server is subject to licence.
Before you can view statistics on these pages, a date range must be selected in order to display information about the activity on the server during this period. You can also select whether the information is aggregated by day, week, month or year by adjusting the granularity setting.

The application usage statistics are broken down into five sections where you can view information about users, projects, hardware resources, pages response time and dashboard usage.
The Users tab displays the following information:
Global statistics about user accounts for this Squore Server installation
Information about current Web Users Web Users during the selected period
A series of charts containing information about the number of users, new users and overall connections to the server during the selected period
A table detailing session information per user
A table displaying session duration statistics
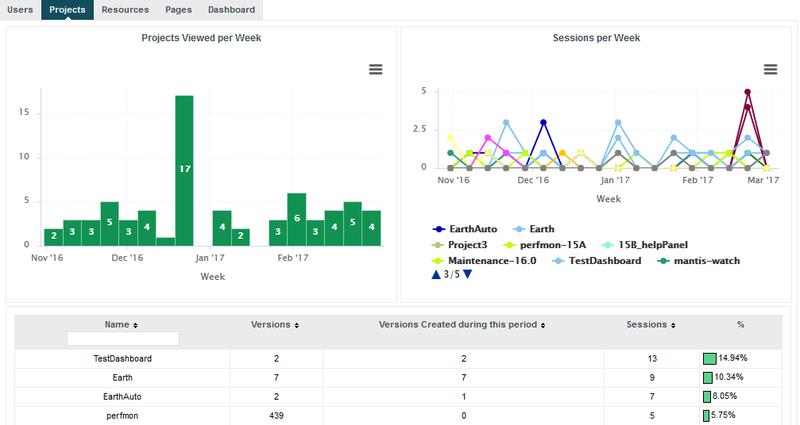
The Projects tab displays information about the number of projects viewed. You can get overall numbers of visits for all the projects on the server, or select specific projects to compare their number of views. The data is rendered as:
A chart showing a trend of the total number of projects viewed for the selected reporting period
A chart where you can consult detailed view statistics about the projects of your choice. You can click on a project name to show or hide it from the chart.
Information about the number of sessions per project during the selected period
The Resources tab helps administrators in monitoring the memory and disk consumption and the performance of the application.

Memory Consumption vs. Users: displays a history of the amount of memory used by the java process running the application and a line indicating the number of users who logged in during the selected period.
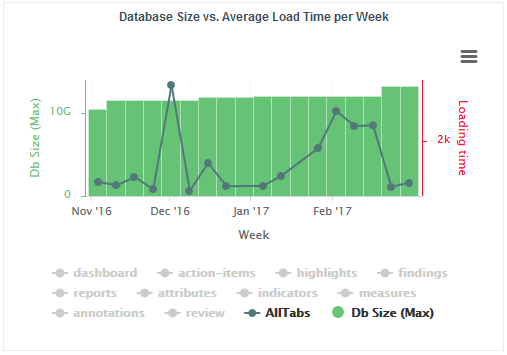
Database Size vs Average Load Time: displays a history of the size of the database on disk. Trend lines displaying the average page or tab load times can be displayed on the chart.
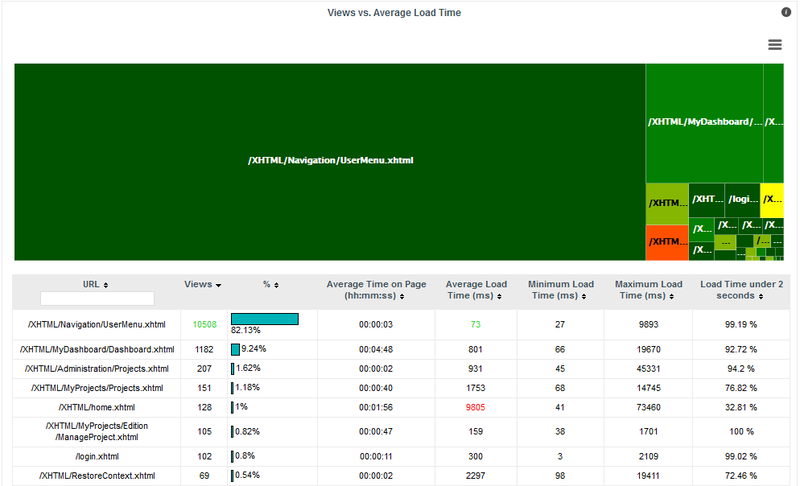
The Pages tab, shows statistics about page views and load times in tabular form and graphical form. The table automatically highlights the best result in green and the worst result in red.
You can learn more about the usage of particular features of a model by clicking Models > Statistics. For each analysis model, find out how many users consult results, which projects are the most popular and which regions and charts of the dashboard are the most useful for users.
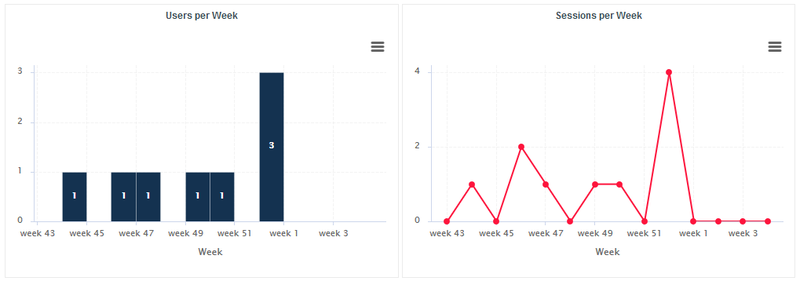
The Users tab displays the information about the number of users and overall connections to the server for projects in this analysis model.
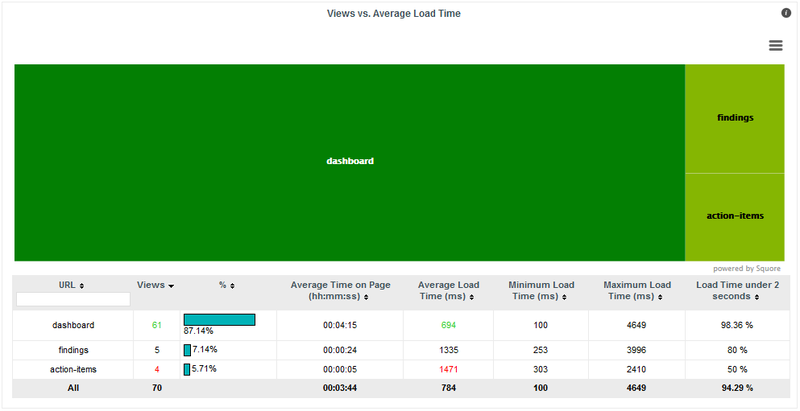
The Dashboard tab allows analysing the usage of each tab on the dashboard. Each tab is represented in a treemap according to how many views it receives. This information can be used to adjust the default display status of each tab or their availability to end users.
As a project manager, you can use project statistics to investigate the popularity of your project by going to Manage > Statistics.
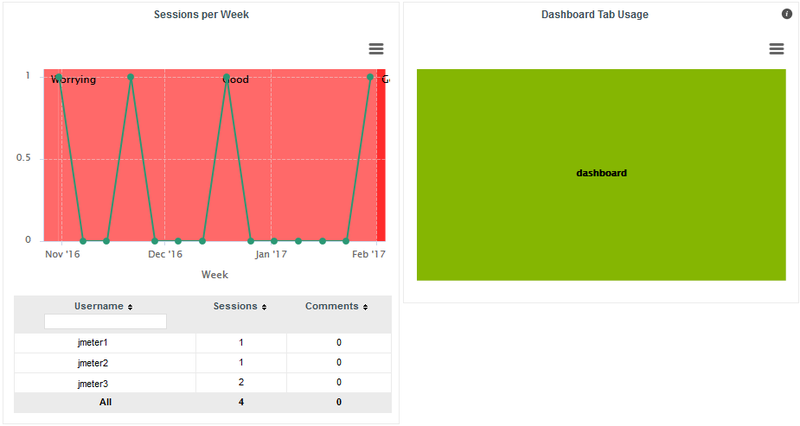
When you select a reporting period, the following information is displayed:
The trend of the number of views for this project uses the colours from the scale of the root indicator as background to help you correlate the project rating with the number of visits.
The treemap helps you understand which of the dashboard tabs is the most visited for this project.
A table summarises the breakdown of views per user, as well as the number of comments left by each user.
Table of Contents
You can configure WildFly to allow https access to Squore Server instead of http by following the instructions below.
These instructions are based on the standard WildFly instructions from https://docs.jboss.org/author/display/WFLY10/Security+Realms#SecurityRealms-DetailedConfiguration for securing the web server and use a self-signed certificate managed in the Java keystore, which may show a warning in users' browsers.
If your company supply their own certificate and you want to import it instead of generating one, refer to the instructions in the section called “Key and Certificate Management”.
It is also possible to use Apache as a reverse proxy on top of Squore Server to achieve the same result. For more information, consult the section called “Proxying Squore Server with Apache”.
Generate a secret key/certificate and store it in a file called a "key store" (foo.keystore in the current directory). The certificate is valid for 30 years (10950 days). The password use for encryption is "secret". One important issue is the common name (CN) of the certificate. For some reason this is referred to as "first and last name". It should however match the name of the web server, or some browsers like IE will claim the certificate to be invalid although you may have accepted it already.
$ keytool -genkey -alias foo -keyalg RSA -keystore foo.keystore -validity 10950
Enter keystore password: secret
Re-enter new password: secret
What is your first and last name?
  [Unknown]:  foo.acme.com
What is the name of your organizational unit?
  [Unknown]:  Foo
What is the name of your organization?
  [Unknown]:  acme corp
What is the name of your City or Locality?
  [Unknown]:  Duckburg
What is the name of your State or Province?
  [Unknown]:  Duckburg
What is the two-letter country code for this unit?
  [Unknown]:  WD
Is CN=foo.acme.com, OU=Foo, O=acme corp, L=Duckburg, ST=Duckburg, C=WD correct?
  [no]:  yes

Enter key password for <deva> secret
    (RETURN if same as keystore password):
Re-enter new password: secret
Create a new security realm in WildFly's <SQUORE_HOME>/server/standalone/configuration/standalone.xml to configure an SSL Server identity:
<management>
	<security-realms>
		<security-realm name="SslRealm">
			<server-identities>
				<ssl>
					<keystore path="/path/to/foo.keystore" keystore-password="keystore_password" alias="foo" key-password="key_password" />
				</ssl>
			</server-identities>
		</security-realm>
		<security-realm name="ManagementRealm">
		...
		</security-realm>
	</security-realms>
</management>
Add a HTTPS listener next to the default HTTP listener in <SQUORE_HOME>/server/standalone/configuration/standalone.xml:
<http-listener [...] name="default" socket-binding="http" [...] />
<https-listener name="default-ssl" socket-binding="https" security-realm="SslRealm"/>
Start Squore Server. The SSL port is 8443 + the offset selected at installation. By default you should therefore be able to access the web interface via https://localhost:8543 in your browser.
After you enable HTTPS access to Squore Server following the steps described in the section called “Accessing Squore via HTTPS”, you can redirect insecure traffic to HTTPS by modifying the web server's configuration and the Squore Server application:
Stop Squore Server
Extract the settings file:
cd <SQUORE_HOME>/deploy
jar xf squore-server.ear
jar xf squore-web.war
Modify Squore Server's web.xml:
Open <SQUORE_HOME>/deploy/squore-web.war/WEB-INF/web.xml in a text editor
Add the following security-constraint
element before
the closing web-app
element, as shown below:
<?xml version="1.0" encoding="UTF-8"?>
<web-app>
(...)
	<security-constraint>
		<web-resource-collection>
			<web-resource-name>SECURE</web-resource-name>
			<url-pattern>/*</url-pattern>
		</web-resource-collection>
		<user-data-constraint>
			<transport-guarantee>CONFIDENTIAL</transport-guarantee>
		</user-data-constraint>
	</security-constraint>
</web-app>
Repackage the application:
cd <SQUORE_HOME>/deploy
jar cf squore-web.war
jar cf squore-server.ear
Edit the http
connector
in <SQUORE_HOME>/server/standalone/configuration/standalone.xml to add a redirection to the https port:
<connector name="http" protocol="HTTP/1.1" scheme="http" socket-binding="http" redirect-port="8543" />
Deploy the patched application following the instructions on https://openwiki.squoring.com/index.php/Deploying_A_Patch#Since_Squore_16.1.2.
Instead of using the command line, you can use 7zip on Windows to open the .ear and .war files and directly patch their contents.
It is possible to use Apache in a proxy/reverse proxy role on top of Squore Server.
This approach makes use of the proxy and proxy_wstunnel
modules to handle web and websocket traffic between client browsers and Squore Server.
For more information about the Apache modules, consult http://httpd.apache.org/docs/2.4/mod/mod_proxy.html and http://httpd.apache.org/docs/2.4/mod/mod_proxy_wstunnel.html.
The following configuration can be used to proxy Squore Server traffic in your Apache configuration file:
<VirtualHost *:80>
  ServerName   squore.example.com
  ProxyPass / http://localhost:8180/
  ProxyPassReverse / http://localhost:8180/
  <Location />
    RewriteEngine on
    RewriteCond %{HTTP:UPGRADE} ^WebSocket$ [NC]
    RewriteCond %{HTTP:CONNECTION} Upgrade$ [NC]
    RewriteRule .* ws://localhost:8180%{REQUEST_URI} [P]
  </Location>
</VirtualHost>
These lines of configuration are the minimum required to guarantee that the necessary traffic to and from Squore. For more complex scenarios, including SSL and certificate configuration, refer to official Apache documentation on http://httpd.apache.org/docs/2.4/.
By default, Squore Server uses its own authentication mechanism, storing user information in the Squore database. An existing directory can be used in addition, so that all existing users your the directory can log into Squore without having to create accounts manually, and the user's full name, e-mail address and department can be imported automatically. The process described in this section explains how to configure a Squore administrator, set up the server to authenticate all new users as standard users when they log in via with their LDAP credentials and finally lists the configuration files that need to be modified to turn on LDAP authentication. After you integrate with LDAP, you will still be able to create and use users that are only known to Squore and do not exist in your directory.
Before you start, ensure that you know:
The address of the LDAP server you want to connect to Squore.
The section(s) of the directory that contain the users that should be allowed to log into Squore.
The login and password of a user account allowed to browse the section(s) of the directory mentioned above.
Basic knowledge of your directory structure. Note that Squore was tested with Microsoft Active Directory on Windows Server 2008 and OpenLDAP on Ubuntu 12.04.
In order to enable LDAP authentication, follow these steps:
Decide which role will be associated to a user the first time they log into Squore. The default choices are:
STANDARD_USER: Standard users can view projects.
ADVANCED_USER: Advanced users can projects and create new ones.
ADMINISTRATOR: Administrators can view projects and administer the server. They cannot create projects.
If none of these choices fit your needs, you can create a specific profile later by logging into Squore and going to Administration > Profiles. If no profile is specified, then the user will be assigned the STANDARD_USER profile by default.
Decide which group new users will be part of the first time they log into Squore. The default choices are:
users: Users from this group can view and create projects.
admin: Users from this group can administer Squore and view projects but they cannot create projects.
If none of these choices fit your needs, you can create a specific group later by logging into Squore and going to Administration > Groups. If no group is specified, then the user will not be added to any group.
Configure WildFly: Edit <SQUORE_HOME>/server/standalone/configuration/standalone.xml, and
locate the section providing the squore-policy security domain, which by default looks like this:
<security-domain name="squore-policy" cache-type="default">
	<authentication>
		<login-module code="Database" flag="sufficient">
		(...)
		</login-module>
	</authentication>
</security-domain>
Paste in the configuration LDAP and Active Directory before the default login module and uncomment the XML as needed.
The security-domain
should now look like this :
<security-domain name="squore-policy" cache-type="default">
	<authentication>
	<!-- LDAP login module -->
	<!--
	<login-module code="com.squoring.squore.server.security.LdapLoginModule" flag="sufficient">
		<module-option name="java.naming.factory.initial" value="com.sun.jndi.ldap.LdapCtxFactory"/>
		<module-option name="java.naming.provider.url" value="ldaps://domain-controller:636/"/>
		<module-option name="java.naming.security.authentication" value="simple"/>
		<module-option name="baseCtxDN" value="ou=people,dc=example,dc=com"/>
		<module-option name="bindDN" value="cn=admin,dc=domain,dc=com"/>
		<module-option name="bindCredential" value="password"/>
		<module-option name="baseFilter" value="(uid={0})"/>

		<module-option name="rolesCtxDN" value="ou=groups,dc=example,dc=com"/>
		<module-option name="roleFilter" value="(member={1})"/>
		<module-option name="roleAttributeIsDN" value="false"/>
		<module-option name="roleAttributeID" value="cn"/>

		<module-option name="userCompositeName" value="cn"/>
		<module-option name="userMail" value="mail"/>
		<module-option name="userOrganizationUnit" value="ou"/>
		<module-option name="userId" value="uid"/>
	</login-module>
	-->
	<!-- Active Directory login module -->
	<!--
	<login-module code="com.squoring.squore.server.security.LdapLoginModule" flag="sufficient">
		<module-option name="java.naming.factory.initial" value="com.sun.jndi.ldap.LdapCtxFactory"/>
		<module-option name="java.naming.provider.url" value="ldap://domain-controller:389/"/>
		<module-option name="java.naming.security.authentication" value="simple"/>
		<module-option name="baseCtxDN" value="OU=Users,DC=EXAMPLE,DC=COM"/>
		<module-option name="bindDN" value="CN=Administrator,OU=Administrators,DC=EXAMPLE,DC=COM"/>
		<module-option name="bindCredential" value="password"/>
		<module-option name="baseFilter" value="(sAMAccountName={0})"/>

		<module-option name="rolesCtxDN" value="OU=Users,DC=EXAMPLE,DC=COM"/>
		<module-option name="roleFilter" value="(sAMAccountName={0})"/>
		<module-option name="roleAttributeIsDN" value="true"/>
		<module-option name="roleAttributeID" value="memberOf"/>
		<module-option name="roleNameAttributeID" value="CN" />
		<module-option name="searchScope" value="ONELEVEL_SCOPE"/>

		<module-option name="userCompositeName" value="sAMAccountName"/>
		<module-option name="userMail" value="mail"/>
		<module-option name="userOrganizationUnit" value="department"/>
		<module-option name="userId" value="sAMAccountName"/>
	</login-module>
	-->
	<login-module code="Database" flag="sufficient">
		(...)
	</login-module>
	</authentication>
</security-domain>
Edit the security domain properties to reflect your setup (LDAP or Active Directory). The LDAP administrator shall provide the following information:
java.naming.provider.url: The URL of the directory server.
baseCtxDN: The fixed DN of the context to start the user search from.
bindDN: The DN used to bind against the ldap server for the user and roles queries. This is some DN with read/search permissions on the baseCtxDN and rolesCtxDN values.
bindCredential: The password for the bindDN
baseFilter: The search query sent by Squore to the LDAP server when authentificating. If the password is correct and the search returns true, the user is allowed to log into Squore. The default query checks that the login exists, but you can change it to check that the login is valid and that the user is part of a specific group for example, using the syntax &((condition1) (condition2)). For more information about LDAP query syntax, refer to https://technet.microsoft.com/en-us/library/aa996205(v=exchg.65).aspx. Note that the & characters must be written as an entity (&) in the settings file.
rolesCtxDN: The fixed DN of the context to search for user roles. This is required to exist, even though it is not used by Squore at the moment.
userCompositeName (optional): the field in the LDAP account that Squore will import and user as the user's full name.
userMail (optional): the field in the LDAP account that Squore will import and user as the user's e-mail address.
userOrganizationUnit (optional): the field in the LDAP account that Squore will import and user as the user's department.
userId (optional): the field in the LDAP account that Squore will use as a the final user login to create the account or log into the application. When no value is specified for this field, Squore uses the login as typed by the user on the login page.
Using this field helps avoiding confusion with mixed-case logins. Squore Server considers demo and Demo as two separate users by default. By specifying that the login is taken from a specific field from your directory, you ensure that the same account is used no matter what case was used in the login form.
Note that for Active Directory, OU, DC and other keywords are all uppercase.
For more details on the WildFly configuration of the LDAP module and the more details about the available options, please refer to http://community.jboss.org/wiki/LdapExtLoginModule.
Start Squore Server.
Log in as administrator and configure the default group and profile information for users who log in for the first time in the LDAP configuration section of Administration > System.
Note: It is highly recommended to use LDAPS instead of LDAP. In the <SQUORE_HOME>/server/standalone/configuration/standalone.xml
configuration file, configure the java.naming.provider.url property to use an
LDAPS server. The URL of an LDAPS Server will look like the following: ldaps://host:port/.
The java instance used by WildFly shall be able to check the certificate of the LDAP server. If the LDAP certificate has not been signed by an "official" CA (self-signed certificate, or the company issued its own root CA), please refer to the section called “Import a certificate”.
User accounts created before you configured the connection to the directory still exist and can still log in.
If you need to authenticate users on more than one branch in your directory, duplicate the login-module
block and change the baseCtxDN
and rolesCtxDN
accordingly.
The login module used has changed in Squore 2014-A-SP1 to support the import of extra user information, but you can
still revert to the legacy authentication module if you are experiencing compatibility issues. To do so, change
the login module code
attribute in <SQUORE_HOME>/server/standalone/configuration/standalone.xml from
<login-module code="com.squoring.squore.server.security.LdapLoginModule" flag="sufficient">
to
<login-module code="org.jboss.security.auth.spi.LdapExtLoginModule" flag="sufficient">
When using the legacy login module, you should set the following module option if you are using Active Directory:
<module-option name="allowEmptyPasswords" value="false"/>
This option prevents users from authenticating successfully when sending a blank password, as is the case when using some versions of Active Directory.
For more details on keys and certificates management with the keytool utility, please refer to the keytool(1) man page, or online documentation.
The system-wide keystore with CA certificates is a cacert file, which is located
in the java.home/lib/security directory, where java.home is
the runtime environment's directory.
Note: the default password of the system-wide keystore is changeit.
The Java keytool utility does not support importing a private key directly from a file. First convert the private key into PKCS12 format, then merge that file with the Java keystore:
openssl
pkcs12
-export
-in
server.crt
-inkey
server.key
-name
company
-out
file.p12
keytool
-importkeystore
-srckeystore
file.p12
-destkeystore
file.keystore
-srcstoretype PKCS12
-destalias
company
Squore allows users to configure automatic sending of e-mail notifications at the end of an analysis. In order to use this feature, Squore Server must be configured to communicate with an SMTP server.
Before you start, ensure that the following details are available:
The URL and port of your SMTP server
The username and password used to authenticate against the SMTP server
The e-mail address that you want to see used in the from field of the e-mails.
In order to configure the SMTP server integration:
Edit <SQUORE_HOME>/server/standalone/configuration/standalone.xml, find the mail-session
configuration, which by default looks like this:
<smtp-server outbound-socket-binding-ref="mail-smtp"/>
Complete the element to add in the username and password for the smtp server, and optionally turn on ssl:
<mail-session name="default" jndi-name="java:jboss/mail/Default">
  <smtp-server outbound-socket-binding-ref="mail-smtp" ssl="false" username="login" password="password"/>
</mail-session>
Find the outbound-socket-binding
element with the
name
attribute mail-smtp and edit the remote-destination
sub-element as needed:
<outbound-socket-binding name="mail-smtp">
    <remote-destination host="localhost" port="25"/>
</outbound-socket-binding>
Start Squore Server.
Log in as administrator and go to Administration > System.
Set the value of the FROM e-mail address for notifications, as well as the
Squore Server URL to be used in body of the e-mails, for example squore@domain.com and http://localhost:8180/SQuORE_Server/.
Squore allows notifying all users by e-mail when planned maintenance is necessary. If you have already configured e-mail notification as explained in the section called “Configuring E-Mail Notifications”, follow these steps to send a maintenance e-mail:
Log in as administrator.
Click Administration > System
Click on Notify users by e-mail.
Type a message subject and content and click Send to e-mail users.
The e-mail will be sent to all enabled users that have an e-mail address.
All the charts displayed on the Squore Dashboard have a unique URL, so they can be embedded into other sites.
In order to find out what the URL of a chart is, follow these steps:
Log into Squore and view the dashboard of the project you want to get information from.
Click a chart to view it.
Click the ![]() icon in the chart viewer to open the chart in a new browser window or tab.
icon in the chart viewer to open the chart in a new browser window or tab.
Copy the URL of the chart, as displayed by your browser location bar.
The URL http://localhost:8180/SQuORE_Server/squore/resource/chart/<CHART_UID>.png.xhtml (the ?s= parameter is a way to work around the browser cache) is a permalink to this chart for this project version.
It is possible to extract some elements from the Squore dashboard and integrate them into a Confluence page. This section details how to configure Squore Server and Confluence to trust each other and how to extract the URLs to display charts.
In order to allow Confluence to connect to Squore Server:
Edit <SQUORE_HOME>/server/standalone/configuration/standalone.xml
Add a new login-module
element, as shown below:
<security-domain name="squore-policy" cache-type="default">
  <authentication>
  <login-module code="com.squoring.squore.server.security.TrustedLoginModule" flag="sufficient"/>
  (...)
  </authentication>
</security-domain>
Restart Squore Server to take the new configuration into account.
Because Confluence does not offer a single sign-on mechanism or authentication delegation, Confluence has to connect to Squore without using a password. This does not, however constitute a security risk, as the Squore user still has to exist and be allowed to view the target project in order for any information to be retrieved.
In order to allow Confluence users to add Squore elements, a Confluence administrator can create a macro to make it easier to include Squore elements into a page. You can find an example macro below.
## Macro title: Squore Dashboard Element Importer
## Macro category: External Content
## Macro has a body: N
## Body processing: No Body
##
## Developed by: Squoring Technologies
## Date created: 2013/07/28

## @param squrl:title=Squore Server URL|type=string|required=true|desc=The Squore Server URL
## @param sqport:title=Squore Server Port|type=string|required=true|desc=The Squore Server Port
## @param chart:title=Squore Element URL|type=string|required=true|desc=The URL of the Squore Dashboard Element
## @param sizex:title=Squore Element Width|type=string|required=true|desc= The Squore Element Width
## @param sizey:title=Squore Element Height|type=string|required=true|desc= The Squore Element Height
## @param version:title=Version|type=enum|enumValues=Current version,Last draft,Last baseline|default=Current version
#if ("Last draft"==$paramversion)
    #set($pversion="?version=last")
#elseif ("Last baseline"==$paramversion)
    #set($pversion="?version=last-baseline")
#else
    #set($pversion="")
#end
#set($login=$action.remoteUser.name)
<IFRAME frameborder="0" src="$paramsqurl:$paramsqport/SQuORE_Server/Export/ChartExport.xhtml?user=$login&width=$paramsizex&height=$paramsizey&chart=$paramchart$pversion" scrolling="no" width="$paramsizex" height="$paramsizey">
</IFRAME>The macro you added in the previous section should be available to other Confluence users as the form show below from External Content.
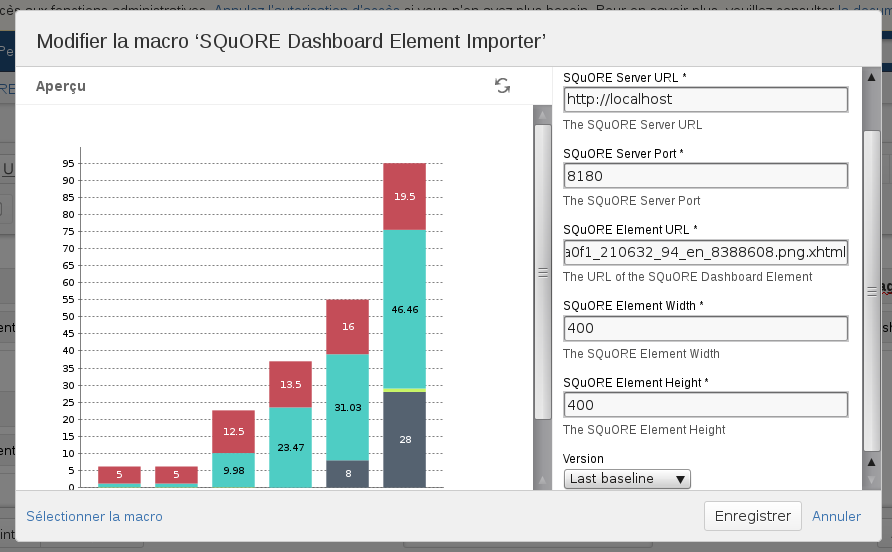
The Confluence Squore form
Users need to fill in the following details:
the Squore Server URL
the Squore Server port
the chart permalink (as retrieved according to the instructions in the section called “Embedding Dashboard Elements”)
the desired width of the chart
the desired height of the chart
the version of the chart to display (exact, last or last baseline)
You can either link to the chart URL ending in .png or .json. Using the link ending with .json allows you to embed a fully interactive chart with tooltips and zoom functionality in Confluence (new in 17.0), while the link ending in .png only displays a static image of the chart.
You can add several charts on the same Confluence page.
Squore for TeamForge Integration does not require any additional installation procedure.
The connection module must be configured in the file <SQUORE_HOME>/server/standalone/configuration/standalone.xml
by adding to the security-domain (name="squore-policy") / authentication section (before the
Database login-module):
<login-module code="com.squoring.squore.server.security.CollabnetLoginModule" flag="sufficient"/>
Restart Squore Server to apply the changes, and log in as administrator to finish configuring the integration via Administration > System. In the Configuration tab, fill in the information in the CollabNet section according to the values found in TeamForge.
TeamForge Server URL (without / at the end), for example http://localhost.
TeamForge Server Name (will appear in Squore export format list), for example TeamForge.
TeamForge artifact default status at export, for example Open.
TeamForge artifact default priority at export, for example 4.
SvnEdge Main Repository URL, for example http://localhost/svn.
SvnEdge Viewer (viewvc) URL, for example http://localhost/viewvc.
External System Id of SvnEdge (for ex: exsy1001), for example exsy1011.
Squore is integrated into TeamForge as a "linked application". Steps to add a Squore access to a TeamForge project are:
Project Admin > Project Toolbar > Linked Application > Create
Application Name: Squore
URL: http://localhost:8180/SQuORE_Server/Export/CollabNet.xhtml (+ parameters)
Single Sign On Enabled: yes
Possible parameters are:
squoreProjectId (the related Squore project Id)
squoreVersionId (the related Squore project version Id)
trackerId (The Id of the TeamForge project tracker)
If the squoreVersionId is not defined, the last version of the project will be automatically loaded.
Some Examples: (if Squore is running on localhost and on port 8180)
Squore project Id 13 (last version) and TeamForge tracker Id tracker1004
http://localhost:8180/SQuORE_Server/Export/CollabNet.xhtml?squoreProjectId=13&trackerId=tracker1004
Squore project Id 13, Squore project version 14 and TeamForge tracker Id tracker1004
http://localhost:8180/SQuORE_Server/Export/CollabNet.xhtml?squoreProjectId=13&squoreVersionId=14&trackerId=tracker1004
The access to Squore is done through a new URL: http://localhost:8180/SQuORE_Server/Export/CollabNet.xhtml
When clicking on the Squore tab in TeamForge, the TeamForge user is automatically identified into Squore. If he is not a Squore user, the connexion is forbidden (error message).
The dashboard is shown and points directly on the specified project with the specified version. (or last version if the corresponding parameter is not defined)
If the user is on the specified project, a new export format is available (name: see the section called “Squore Configuration”: cntf.server.name). The export button will directly export the selected defect reports under the form of new artifacts into the corresponding TeamForge tracker.
When visualising a source code, Squore retrieves the corresponding file using the viewvc application of the CollabNet SvnEdge server without asking the user a login and a password.
To use this functionality, the cntf.svn.url, cntf.viewvc.url and cntf.svn.exsy keys must be correctly set in the configuration file
If this functionality is not activated, the user has to use its own SVN login and password to access the source codes from Squore.
Squore Server can be monitored with external tools on your network by connecting to administration URLs to retrieve information about the status of projects and users on the server.
Access http://localhost:8180/SQuORE_Server/servlets/state/sessions to get a report of the current user sessions on Squore Server. The information is extracted as in CSV format as
session;login;session start;client
.
Access http://localhost:8180/SQuORE_Server/servlets/state/projects to get a report of the existing projects on Squore Server. The information is extracted as in CSV format as
id;project name;model id;owner;creation time;number of versions;last version;last build;status;step start;step
.
The possible values of the status field are:
0 Finished: the version has been successfully created.
1 Warning: some warnings were raised during the last analysis.
2 Error: the analysis finished with an error.
3 Processing: the version is being created. When this status is returned, the current phase of the analysis will be specified in the step field and the time at which this step started will be specified in the step start.
4 Offline: this project has no versions.
5 Pending: this project is waiting for a free slot to start an analysis.
Note that in order to access these URLs you must be either:
A logged-in user with the Administrator profile, in which case you can access the URL from anywhere.
Requesting the URL from the computer that runs Squore Server, in which case the information is available without logging in.
By writing your own script that queries the monitoring URLs regularly and saving the output to a CSV file, you can feed the information into monitoring tools like Nagios and monitor the health of Squore Server.
Table of Contents
This chapter provides information about the resource utilisation and impact of running a Squore server over time.
The disk space necessary for analyses varies depending on your analysis model as well as the amount of information analysed.
As a result, it is difficult to predict accurately the amount of space that your Squore installation will use. After a few runs, you should be able to estimate disk space requirements by working out the space required to analyse an artefact with your analysis model. Keep in mind that the first version of a project is always more costly than subsequent analyses, and that an analysis with only a few changes will use a lot less space than an analysis where there are a lot of changes.
Here is an example based on the Risk Index model, one of the standard multi-language models shipped in Squore 16.1.
Table 7.1. Project Characteristics
|
First Code Snapshot |
Second Code Snapshot | |
|---|---|---|
|
Language Distribution |
C (13%), C++ (14%), Java (73%) |
C (9%), C++ (11%), Java (80%) |
|
Source Files |
20000 |
30000 10% of previous code changed |
|
Classes |
28000 |
47000 |
|
Methods and Functions |
181000 |
296000 |
|
Lines of Code |
5.2M |
7.6M |
|
Effective Lines of Code |
2.6M |
3.6M |
|
Findings |
157000 |
234000 |
|
Action Items |
7700 |
6300 |
Table 7.2. Model Characteristics
|
Average metrics per artefact |
160 |
|
Average indicators per artefact |
15 |
Table 7.3. Project Cost
|
Database Growth |
Project Folder Growth | |
|---|---|---|
|
V1 (Snapshot 1) |
+3.5GB |
+839MB |
|
V2 (Snapshot 1) |
+100MB |
+1MB |
|
V3 (Snapshot 2) |
+3GB |
+1.1GB |
You can save disk space by keeping data files generated by Squore only for the last baseline version. This behaviour is enabled by default and can be overridden either by using a setting in your <SQUORE_HOME>/config.xml, or by changing the behaviour for each project. This can be useful when you want to debug the analysis data later.
In order to save all data files for all versions by default for every project, open <SQUORE_HOME>/config.xml and
projects
element as shown below:
<projects directory="path/to/data/folder">
	<data-providers keep-data-files="true"/>
</projects>
The behaviour is applied after a server restart, and the old files are deleted when a new version is created.
In order to override the behaviour for a particular project in the web interface, check or uncheck the Keep old versions data files box when creating a new version of the project or when managing the project.
In order to override the behaviour for a particular project from the command line, use the parameter keepDataFiles=true|false when creating a new version of the project.
Table of Contents
install — Squore install script
install [
options
...]
data_dir
install
-C
[
options
...]
data_dir
install
-U
[
inst_dir
options
...]
Installs and configures Squore.
The most useful options when installing Squore are -b
to open Squore to the network (accesses are restricted to localhost by default,
specify 0.0.0.0 to open the server to connections from
all clients on the network), and -k to deploy a licence file.
Alternatively, when upgrading an existing installation, use -U
to specify the directory to upgrade.
Squore data is stored in the
directory.data_dir
-C
Configure files only, does not create any database schema. This option may be used to reconfigure Squore after installation.
-U inst_dir
Upgrade the installation pointed to by inst_dir.
-v
Increase verbosity level.
-S
Use remote PostgreSQL server. This option may be used to point on an existing server (no cluster is created).
-P pg_dir
Location of PostgreSQL executables.
-D cluster_dir
PostgreSQL cluster directory to create (default:
).data_dir/cluster
-s size
PostgreSQL shared buffers size, in MB. Defaults to 25% of the memory available on the server.
-r dbms
Supported DBMS vendor (default: postgresql).
Valid values: postgresql, oracle.
-h db_host
Database server's host name (default: localhost).
-p db_port
Database server's port number (default: DMBS dependent, 4561 for postgresql).
-A db_admin
Database administrator name (default: DMBS dependent, postgres for postgresql).
-d db_name
Squore database name (default: squore).
-u db_user
Squore database user (default: squore).
-e
Pick existing user and database (recommended for Oracle Database).
-J java_home
Specify the Java home to use. Defaults to JAVA_HOME,
and, if this variable is not set, to an OS specific value.
-x size
Java memory allocation pool, in MB (Xmx option). Defaults to 25% of the memory available on the server, with a minimum of 512 MB.
-b bind_address
WildFly bind address (default: localhost). If
you plan to use Squore from your local network, use 0.0.0.0
for the bind address. Otherwise access is restricted to connections from localhost only.
-o binding_offset
WildFly binding port offset (default: 100). This number is added
to the default (8080 for http) to calculate the set of ports used for Squore Server. An offset of 100 means that Squore
is accessible via http://localhost:8180/SQuORE_Server
-g PhantomJS port
PhantomJS port (default: 3003). The port to use for the embedded installation of PhantomJS.
-T tmp_dir
Squore temporary directory (default: /tmp/squore)
-k squore-license.p7s
Squore licensing key.
sqexport.pl — Squore export utility
sqexport.pl [
option
...]
users
[
-r
]
sqexport.pl [
option
...]
groups
[
-m
]
sqexport.pl [
option
...]
versions
-m
[
-l
] [
-u
]
id_user
id_model
sqexport.pl [
option
...]
versions
-p
[
-l
] [
-u
]
id_user
id_project
sqexport.pl [
option
...]
artefacts
-m
[
-R
] [
--add-measure
...] [
measure
-T
...] [
type
-L
] [
level
-u
]
id_user
id_model
sqexport.pl [
option
...]
artefacts
-p
[
-R
|
-r
] [
id_rvers
--add-measure
...] [
measure
-T
...] [
type
-L
] [
level
-u
]
id_user
id_project
[
id_vers
]
The sqexport.pl script connects to the Squore database and exports data into the CSV format.
This command extracts raw data from the database. That is, it does not read i18n files or model properties to translate strings.
Columns common to the
versions
and
artefacts
exports are:
model_id - the database identifier of the model (verbose mode only).
model - the model name.
app_id - the database identifier of the project (verbose mode only).
app_name - the project name.
root_id - the database identifier of the root artefact (verbose mode only).
v_id - the database identifier of the version (verbose mode only).
v_name - the version name.
These columns are exported:
uid - the database identifier of the user (verbose mode only).
login - the login of the user.
sqexport.pl
users
[
-r
]
This command exports all user information for all Squore users. The output contains these additional columns:
fullname - the full name of the user.
email - the e-mail of the user.
password - the SHA-1 of the user password, base 64 encoded.
department - the department of the user.
When the -r option is specified, the user profiles are
exported instead. The output contains these additional columns:
role_id - the database identifier of the profile (verbose mode only).
role - the profile name of the user.
These columns are exported:
gid - the database identifier of the group (verbose mode only).
group - the name of the group.
sqexport.pl
groups
[
-m
]
This command exports all Squore groups.
When the -m option is used, group members are exported
instead. Here are the additional columns in this mode:
uid - the database identifier of the group member (verbose mode only).
login - the login of the group member.
These additional columns are exported:
status - the project's version status.
sl_rank - the (numeric) rank of the level of the project.
level - the level of the project.
app_name - The project name.
sqexport.pl
versions
-m
[
-l
] [
-u
]
id_user
id_model
This form exports all versions of projects that use the model identified
by id_model. If -l is used, only the
last version of each project is exported.
The id_user is used to restrict output data,
using access controls defined in Squore. If not supplied, versions and
projects are exported regardless of access control lists.
sqexport.pl
versions
-p
[
-l
] [
-u
]
id_user
id_project
This form exports all versions of the project identified by
id_project. If -l is used, only
the last version of the project is exported.
The id_user is used to restrict output data,
using access controls defined in Squore. If not supplied, versions and
projects are exported regardless of access control lists.
These additional columns are exported:
art_id - the database identifier of the artefact.
art_path - the path of the artefact.
art_name - the name of the artefact.
type - the type of the artefact.
sl_rank - the (numeric) rank of the level of the artefact.
level - the level of the artefact.
trend - the trend of the artefact, compared to
the reference version (with -R or -r
only). Values are 'N' for new artefacts, '^' for artefacts that improved,
'v' for artefacts that regressed, and '=' for others.
* - the measure values, as specified with
the --add-measure options.
sqexport.pl
artefacts
-m
[
-R
] [
--add-measure
...] [
measure
-T
...] [
type
-L
] [
level
-u
]
id_user
id_model
Exports all artefacts of the id_model model,
eventually filtered out by the -T and -L
filters. Both parameters of these options are identifiers of the types and
the level, as specified in the model. This is possible to specify types
separated by a comma, or multiple -T options. Such types
are then OR-ed.
Only artefacts that belong to the last version of projects are exported.
If the -R option is set, the trend of levels of artefacts is
computed against the last but one version of the projects. By default, there
is no trend computation.
Use the --add-measure option to specify the list of measures
to add to the output. Use with caution on large result sets.
The id_user is used to restrict output data,
using access controls defined in Squore. If not supplied, artefacts are
exported, regardless of access control lists.
sqexport.pl
artefacts
-p
[
-R
|
-r
] [
id_rvers
--add-measure
...] [
measure
-T
...] [
type
-L
] [
level
-u
]
id_user
id_project
[
id_vers
]
This form exports artefacts of the id_project project
in its id_vers version. If id_vers
is not specified, the last version if the project is used. Artefacts may be
filtered out with the -T and
type
-L options.level
The reference version to compute trends of levels of artefacts is either set
with -R (use the version right before id_vers),
or with -r to set an explicit
version of the project.id_rvers
Use the --add-measure option to specify the list of measures
to add to the output. Use with caution on large result sets.
The id_user is used to restrict output data,
using access controls defined in Squore. If not supplied, artefacts are
exported, regardless of access control lists.
These options are common to all export types.
-h host
Overrides the database host name.
-p port
Overrides the database port number.
-d dbname
Overrides the database name.
-u user
Overrides the database user name.
-f file
Set the CSV output file. If not specified, the output is written to the standard output.
-s sep
Set the CSV separator. Defaults to the ';' character.
-S slices
Specifies a subset of columns to write, starting from 0. The column numbering is computed against the verbose mode, not the standard mode. Separate column numbers with the ',' character.
-v
Turns on the verbose mode. Exports additional columns (mainly internal database ids), and displays some SQL and post processing timings.
-a
Turns on export at the artefact level.
-m
Turns on export at the model level.
-p
Turns on export at the project level.
-c
Counts entries only, do not list all of them.
-l
Exports the last version of each project only.
-R
Set the reference version for delta or trend computations to the last but one version of the project, from either its last version, or the user supplied version.
-r id_rvers
Set the reference version for delta or trend computations to
the version pointed to by the id_rvers.
-T type
...
Filter artefacts of types type, which is
the external id of the artefact type, as specified by the model,
like APPLICATION, CLASS, FUNCTION, etc. Types may be coma separated.
-L level
Artefacts shall have the level level,
which is the external id of the level of performance of a scale, as
specified by the model, like LEVELA, LEVELB, etc.
sqimport.pl — Squore import utility
sqimport.pl [
option
...]
users
[
-P
|
-r
]
sqimport.pl [
option
...]
groups
[
-m
]
The sqimport.pl script imports CSV data into the Squore database.
The script stops as soon as an error is encountered (SQL constraint violation, invalid input format, etc.), and modifications are discarded.
sqimport.pl
users
[
-P
|
-r
]
This command imports Squore users.
The CSV shall contain these columns (columns are mandatory, unless explicitly specified):
login - the login of the user.
fullname - the full name of the user.
email - the e-mail of the user.
password - the SHA-1 of the user password,
base 64 encoded, or the password in clear if the -P
option has been specified (optional).
department - the department of the user (optional).
Users have additional properties in Squore, like the number of connections, the selected locale, etc. Such properties are set to their default value.
When the -r is set, this command imports Squore user
profiles instead. The CSV shall contain these columns (columns are mandatory):
login - the login of the user.
profile - the profile of the user.
sqimport.pl
groups
[
-m
]
This command imports Squore groups.
The CSV shall contain this column:
group - the name of the group.
When the -m option is used, group members are
imported into Squore, and the input file shall have these columns:
group - the name of the group.
login - the login of the group member.
These options are common to all import types.
-h host
Overrides the database host name.
-p port
Overrides the database port number.
-d dbname
Overrides the database name.
-u user
Overrides the database user name.
-f file
Set the CSV input file. If not specified, CSV data is read from the standard input.
-s sep
Set the CSV separator. Defaults to the ';' character.
-n
The CSV file does not contain the header line.
-S slices
Specifies the subset of columns to use, in the CSV input file, starting from 0. This can be used to reorder input columns as well. Separate column numbers with the ',' character.
-v
Turns on the verbose mode.
— reset Squore data
sqadm
reset
-P
This command clears both the database content, and internal storage
files used by Squore. So far, the -P and -D
options are mandatory.
The shall be executed on a stopped Squore server, but a running database.
-h, --help
Display help information and exit.
-P, --project-only
Reset project related data only.
Use this option to keep management related settings, like roles, users, global settings, etc.
-y, --no-prompt
Do not prompt for confirmation.
--jdbc-url url
Database url of the form jdbc:subprotocol:subname.
--jdbc-user user
Database user.
-D dir, --data-dir dir
Squore projects directory.