| > Show on single page > Show on multiple pages |
You can create your own Data Providers by using the built-in frameworks included in Squore. Each solution uses a different approach, but the overall goal is to produce one or more CSV files that your Data Provider will send to Squore to associate metrics, findings, textual information or links to artefacts in your project.
This section helps you choose the right framework for your custom Data Provider and covers the basics of creating a custom configuration folder to extend Squore.
The following is a list of the available Data Provider frameworks:
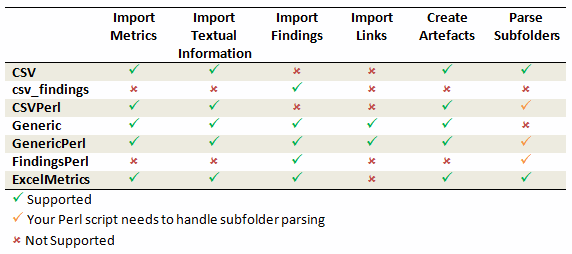
Data Provider frameworks and their capabilities
Csv
The Csv framework is used to import metrics or textual information and attach them to artefacts of type Application or File. While parsing one or more input CSV files, if it finds the same metric for the same artefact several times, it will only use the last occurrence of the metric and ignore the previous ones. Note that the type of artefacts you can attach metrics to is limited to Application and File artefacts. If you are working with File artefacts, you can let the Data Provider create the artefacts by itself if they do not exist already. Refer to the full Csv Reference for more information.
csv_findings
The csv_findings framework is used to import findings in a project and attach them to artefacts of type Application, File or Function. It takes a single CSV file as input and is the only framework that allows you to import relaxed findings directly. Refer to the full csv_findings Reference for more information.
CsvPerl
The CsvPerl framework offers the same functionality as Csv, but instead of dealing with the raw input files directly, it allows you to run a perl script to modify them and produce a CSV file with the expected input format for the Csv framework. Refer to the full CsvPerl Reference for more information.
FindingsPerl
The FindingsPerl framework is used to import findings and attach them to existing artefacts. Optionally, if an artefact cannot be found in your project, the finding can be attached to the root node of the project instead. When launching a Data Provider based on the FindingsPerl framework, a perl script is run first. This perl script is used to generate a CSV file with the expected format which will then be parsed by the framework. Refer to the full FindingsPerl Reference for more information.
Generic
The Generic framework is the most flexible Data Provider framework, since it allows attaching metrics, findings, textual information and links to artefacts. If the artefacts do not exist in your project, they will be created automatically. It takes one or more CSV files as input (one per type of information you want to import) and works with any type of artefact. Refer to the full Generic Reference for more information.
GenericPerl
The GenericPerl framework is an extension of the Generic framework that starts by running a perl script in order to generate the metrics, findings, information and links files. It is useful if you have an input file whose format needs to be converted to match the one expected by the Generic framework, or if you need to retrieve and modify information exported from a web service on your network. Refer to the full GenericPerl Reference for more information.
ExcelMetrics
The ExcelMetrics framework is used to extract information from one or more Microsoft Excel files (.xls or .xslx). A detailed configuration file allows defining how the Excel document should be read and what information should be extracted. This framework allows importing metrics, findings and textual information to existing artefacts or artefacts that will be created by the Data Provider. Refer to the full ExcelMetrics Reference for more information.
The Data Providers that are not based on these frameworks can do a lot more than just import information from CSV files. Here is a non-exhaustive list of what some of them do:
Use XSLT files to transform XML files
Read information from microsoft Word Files
Parse HTML test result files
Query web services
Export data from OSLC systems
Launch external processes
If you are interested in developping Data Providers that go beyond the scope of what is described in the open frameworks, consult Squoring Technologies to learn more about the available training courses in writing Data Providers.
After you choose the framework to extend, you should follow these steps to make your custom Data Provider known to Squore:
Create a new configuration tools folder to save your work in your
custom configuration folder: MyConfiguration/configuration/tools.
Create a new folder for your data provider inside the new tools
folder: CustomDP. This folder needs to contain the following files:
form.xml defines the input parameters for the Data Provider, and the base framework to use
form_en.properties contains the strings displayed in the web interface for this Data Provider
config.tcl contains the parameters for your custom Data Provider that are specific to the selected framework
CustomDP.pl is the perl script that is executed automatically if your custom Data Provider uses one of the *Perl frameworks.
Edit Squore Server's configuration file to register your new configuration path, as described in the Installation and Administration Guide.
Log into the web interface as a Squore administrator and reload the configuration.
Your new Data Provider is now known to Squore and can be triggered in analyses. Note that you may have to modify your Squore configuration to make your wizard aware of the new Data Provider and your model aware of the new metrics it provides. Refer to the relevant sections of the Configuration Guide for more information.
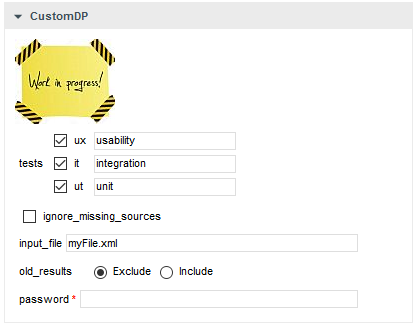
A Data Provider's parameters are defined in a file called form.xml. The following is an example of form.xml for a Data Provider extending the GenericPerl framework:
<?xml version="1.0" encoding="UTF-8"?>
<tags baseName="GenericPerl" needSources="true" image="CustomDP.png" projectStatusOnFailure="ERROR">
  <tag type="multipleChoice" displayType="checkbox" optionTitle=" " key="tests">
    <value key="ux" option="usability" />
      <value key="it" option="integration" />
      <value key="ut" option="unit" />
    </tag>
    <tag type="booleanChoice" key="ignore_missing_sources" defaultValue="false" />
    <tag type="text" key="input_file" defaultValue="myFile.xml" changeable="false" />
    <tag type="multipleChoice" key="old_results" style="margin-left:10px" displayType="radioButton" defaultValue="Exclude">
      <value key="Exclude" />
      <value key="Include" />
  </tag>
  <tag type="text" key="java_path" defaultValue="/usr/bin/java" hide="true" />
  <tag type="password" required="true" key="password" />
</tags>
The
tags
element accepts the following attributes:
baseName
(mandatory) indicates which framework you are basing this Data Provider on
needSources
(optional, default: false) allows specifying whether the Data Provider requires sources or not. When set to true, an error will be displayed if you try to select this Data Provider without adding any Repository Connector to your project.
image
(optional, default: none) allows displaying a logo in the web UI for the Data Provider
projectStatusOnFailure
(optional, default: ERROR) defines what status the project ends in when this Data Provider produces an error. The following values are allowed:
IGNORE
WARNING
ERROR
projectStatusOnWarning
(optional, default: WARNING) defines what status the project ends in when this Data Provider produces a warning. The following values are allowed:
IGNORE
WARNING
ERROR
Each
tag
element is a Data Provider option and allows the following attributes:
key
(mandatory) is the option's key that will be passed to the perl script, or can be used to specify the parameter's value from the command line
type
(mandatory) defines the type of the parameter.
The following values are accepted:
text for free text entry
password for password fields
booleanChoice for a boolean
multipleChoice for offering a selection of predefined values
displayType
(optional) allows specifying how
to display a multipleChoice
parameter by using one of:
comboBox
radioButton
checkbox
defaultValue
(optional, default: empty) is the value used for the parameter when not specified
hide
(optional, default: false) allows hiding a parameter from the web UI, which is useful when combining it with a default value
changeable
(optional, default: true) allows making a parameter configurable only when creating the project but read-only for following analyses when set to true
style
(optional, default: empty) allows setting basic css for the attribute in the web UI
required
(optional, default: false) allows showing a red asterisk next to the field in the web UI to make it visibly required. Note that this is only a visual aid at the moment and cannot be used to force users to enter a value for the parameter.
In order to display your Data Provider parameters in different languages in the web UI, yout Data Provider's form.xml does not
contain any hard-coded strings. Instead, Squore uses each parameter's key
attribute to dynamically
retrieve a translation from a form_xx.properties file located next to form.xml.
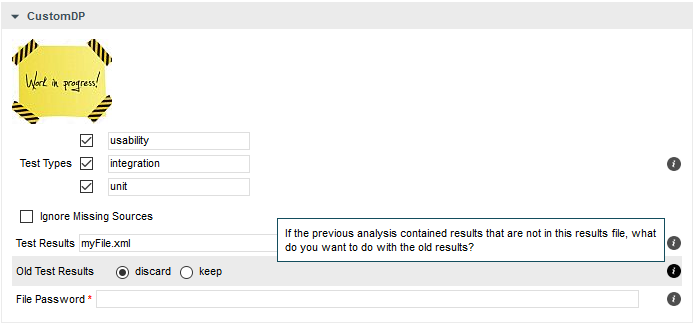
When you create a Data Provider, it is mandatory to include at least an English version of the strings in a file called form_en.properties. You are free to add other languages as needed. Here is a sample .properties for for the CustomDP you created in the previous section:
FORM.GENERAL.NAME  = CustomDP
FORM.DASHBOARD.NAME  = Test Status
FORM.GENERAL.DESCR = CustomDP imports test results for my project
FORM.GENERAL.URL   = http://example.com/CustomDP

TAG.tests.NAME  = Test Types
TAG.tests.DESCR = Check the boxes next to the types of test results contained in the results

TAG.ignore_missing_sources.NAME = Ignore Missing Sources

TAG.input_file.NAME = Test Results
TAG.input_file.DESCR = Specify the absolute path to the file containing the test results

TAG.old_results.NAME = Old Test Results
TAG.old_results.DESCR = If the previous analysis contained results that are not in this results file, what do you want to do with the old results?
OPT.Exclude.NAME = discard
OPT.Include.NAME = keep

TAG.password.NAME = File Password
TAG.password.DESCR = Specify the password to decrypt the test results file
The syntax for the .properties file is as follows:
FORM.GENERAL.NAME is the display name of the Data Provider in the project wizard
FORM.DASHBOARD.NAME is the display name of the Data Provider in the Explorer
FORM.GENERAL.DESCR is the description displayed in the Data Provider's tooltip in the web UI
FORM.GENERAL.URL is a reference URL for the Data Provider. Note that it is not displayed in ther web UI yet.
TAG.tag_name.NAME allows setting the display name of a parameter
TAG.tag_name.DESCR is a help text displayed in a tooltip next to the Data Provider option in the web UI
OPT.option_name.NAME allows setting the display name of an option
Using the form_en.properties above for CustomDP results in the following being displayed in the web UI when launching an analysis:
.properties file